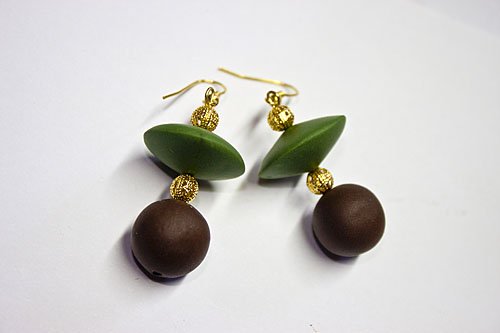
Sculpey Soufflé Tiki Room Earrings!
Sculpey Soufflé Tiki Room Earrings!
Read More
I am a fan of the Tiki Room style of the late 50’s/early 60’s. These quick and easy little earrings remind me of the style form that era – martinis and flying saucers. The lighter weight of the Sculpey Soufflé clay makes the size of the earring possible!
Read Less
ADDITIONAL SUPPLIES
Gold accent beads, gold t-pins(2), gold ear wires (2), basic jewelry tools- wire cutters, round nose pliers|Gold accent beads, gold t-pins(2), gold ear wires (2), basic jewelry tools- wire cutters, round nose pliers

Project Instructions
Getting StartedPolymer clay may stain. CLAY MAY DAMAGE UNPROTECTED FURNITURE OR FINISHED SURFACES. DO NOT USE polymer clay on unprotected surfaces. We recommend working on the Sculpey clay mat, wax paper, metal baking sheet, or disposable foil. Start with clean hands and work surface area. Knead clay until soft and smooth. For best results, clean your hands in between colors. Shape clay, pressing pieces together firmly. Bake on oven-proof glass or metal surface at 275°F (130 °C) for 30 minutes per ¼" (6 mm) thickness. For best baking results, use an oven thermometer. DO NOT USE MICROWAVE OVEN. DO NOT EXCEED THE ABOVE TEMPERATURE OR RECOMMENDED BAKING TIME. Wash hands after use. Baking should be completed by an adult.Begin by preheating oven to 275 °F (130 °C). Test temperature with oven thermometer for perfectly cured clay. For best results, condition all clay by running it through the Clay Conditioning Machine for several passes on the widest setting. Fold the clay in half after each pass and insert the fold side into the rollers first.
Roll half of the Cowboy clay out on the #1 (widest) setting on the Sculpey Clay Conditioning Machine. Reset the machine to #2 and roll the clay through again. Use the circle cutter to cut out three pieces of clay and roll the pieces together to create a ball of clay about 16mm in diameter. Create 2 balls and set aside.

Repeat #1 with the Pesto clay. Place one of the balls on a sheet of clean white paper. Using the lentil bead tool gently roll the ball in largish circles, carefully keeping the lentil bead tool level with the paper surface. You will see the ball slowly start to change into a bicone with two pointed ends (usually about 12 rotations).


Once you see the bicone appear to your taste, press a little harder and reduce the circles to small, tight circles about 4-5 rotations. Remove lentil bead tool and check out your new lentil bead!

Repeat steps 2 and 3 for the second lentil bead.
Gently drill the bead holes in your four beads by twirling the needle tool through one side with a little pressure. When you judge that the needle is about halfway through the bead, stop and repeat from the opposite side.

Bake the beads according to the directions above. Allow the beads to cool before threading onto the T pin with the gold accent beads. Trim the top of the T pin to about ¼ inch. Grasp the tip of the pin with the small needle nose pliers and roll TOWARDS you to create the loop at the top of the earring. Open this new loop and attach the ear wire. Close the loop securely and repeat for the other earring.


