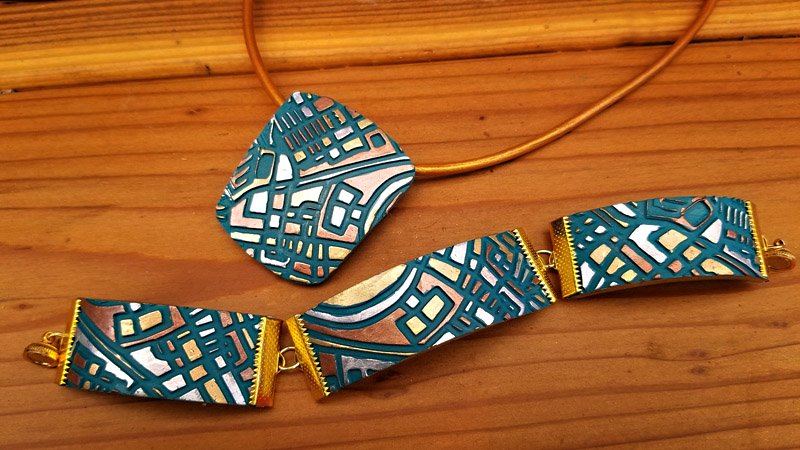
Souffle “Tech” Ribbon Crimp Bracelet
Souffle “Tech” Ribbon Crimp Bracelet
Read More
One texture sheet, one color clay, one soda can, 3 pens, 3 pairs of ribbon crimps – THAT’S all it takes to create this gorgeous pattern that looks like it could be computer parts.
Design by syndee holt
Read Less
ADDITIONAL SUPPLIES
DecoColor Premium Paint Pens (fine tip) in Gold, Silver and Copper; 3 pair ribbon crimps; 4 6mm jump rings; small magnet clasp; small flat paint brush for glaze; soda can for baking; nylon jawed pliers for crimping, small spray bottle of water; I recommend a facemask to wear while using the pens-they have a odor.

Project Instructions
- Getting Started:
Start with clean hands, unwrap and knead clay until soft and smooth, or condition by running clay though a Pasta Machine. We recommend using a designated machine for clay purposes only. When working with multiple colors, clean hands with soap and water or baby wipes (we have found that baby wipes work best) before switching colors. Shape clay, pressing pieces firmly together. Wash hands after use.
- Baking:
Sheet out the conditioned Sea Glass clay on the second from widest setting on the Clay Conditioning Machine and cut into three pieces large enough for the texture sheet. NOTE: I cut my texture sheet apart into the different patterns for easier handling. Spray the texture sheet with water and press firmly into each sheet of clay. NOTE: I put my sheet of clay on a piece of paper on my cement floor. Then I put the dampened texture sheet on top and a piece of wood. Then I step on the wood. Nice, even deep texture!

Once I select the width of ribbon crimp I wish to use, I place it on one of the pieces of stamped clay and trim to the crimp width. Repeat. Cut the other two pieces in the same manner.

I use a piece of grid paper to make sure that all my cuts are square. I also cut all the pieces to the longest lengths from each pattern, since it's so easy to trim Souffle after baking!


Since the oven is already preheating, I put the empty soda can into the oven for about 30 seconds to warm it up. Then using a towel (or my shirt) to hold the warmed can, I can lay my bracelet lengths on the can and they will wrap easily and stick to the can without a lot of pressure on the beautiful textures. Stand the can up in the oven and bake according to the directions above. Don’t turn off the oven, we will “set” the inks for 10 minutes after the coloring is completed.

Once the clay has baked and cooled, it’s time to start coloring! I prefer to color one color at time. Repeat with all three colors. You can also choose to color the edges of the bracelet lengths as well. Put the finished pieces back into the oven for about 10 minutes to set the ink.


Dip the brush tip into the Sculpey Gloss Glaze and wipe quickly on a tissue to remove excess glaze. Using a fairly dry brush, glaze the TOP of the pattern, leaving the bottom portions of the pattern the lovely suede finish of Souffle. Allow to dry.

To assemble the bracelet, select the completed length that is your favorite and cut it to fit across the front of your wrist. Place a ribbon crimp on the end of the bracelet and crimp using the nylon jaw pliers. Repeat on the other side.

Once the center piece is complete, it’s pretty easy to see what size the two side pieces should be. Baked Souffle cuts so nicely, the two side pieces can easily be trimmed to the length you wish. Add the crimps to either end of the pieces. NOTE: I prefer to LIGHTLY crimp the side pieces. Then I assemble the bracelet with the jump rings and check to see if the length is correct before I tighten the crimps on the side pieces. Add the magnetic clasp!


I made an extra pattern stamp that I used a template to cut out a pendant as well. The round circle is how I cut out a Jan Montarse Easy Back bail that will be glued on the back of the baked pendant to hold the cord. This bail is baked on a Sculpey Hollow Bead Maker on the smallest bump that it fits on. The pendant was baked on a 5 inch metal bowl for a gentle curve. And then colored with the metallic pens.


