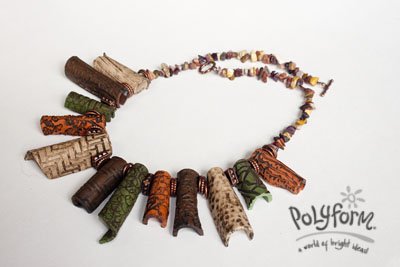
Sculpey Soufflé Roof Tile Necklace
Sculpey Soufflé Roof Tile Necklace
Old credit card or similar plastic card, dark brown and dark grey acrylic craft paints, small brush, small spray bottle of water, paper towels,25 copper spacer beads, 90 Multicolored stone pebble beads ,copper closure findings, crimp beads, plastic coated beading wire, wire cutters, crimp pliers|Old credit card or similar plastic card, dark brown and dark grey acrylic craft paints, small brush, small spray bottle of water, paper towels,25 copper spacer beads, 90 Multicolored stone pebble beads ,copper closure findings, crimp beads, plastic coated beading wire, wire cutters, crimp pliers


Maybe you're new to polymer clay or have made a few pieces and are looking for some creative inspiration. Either way, Sculpey® can help guide you in the right direction. We'll walk you through the right workspace setup, the tools you'll need and many more polymer clay crafting tips to get you started.
Polymer Clay Tools and Equipment
Whether you want to try your hand at a new polymer clay necklace or have a unique pendant in mind, we recommend stocking up on the following materials:
- - An acrylic roller: Acrylic rollers are crucial for preparing your clay before starting on your necklace or other jewelry design.
- - Polymer clay: While the particular clay brand you use will depend on your project goals, experience level and other factors, we suggest Sculpey Soufflé™ for this polymer clay roof tile necklace.
- - Clay cutters or the Sculpey Tools™ Clay Blades: The clay blade set from Sculpey® is a must-have tool for creating any oven-bake clay project. The set includes three different blade types — a long, rigid blade, a flexible blade and a wave blade for decorative cuts. Using clay cutters and blades will allow you to cut your clay without dragging or squashing it.
- - Sculpey Tools™ Clay Tool Starter Set: Equipped with a needle end pointer, blunt point and polymer clay knife tool, this starter set will help you perfect your designs with ease.
- - Sculpey Tools™ Clay Conditioning Machine: You will need to condition your clay before baking, and a clay conditioning machine will help make the crafting process more manageable and enjoyable.
- - Sculpey Tools™ Oven-Safe Work Mat: The Oven-Safe Work Mat from Sculpey® is reusable, oven safe and will protect your work surface.
Polymer Clay Tips and Tricks
It's important to consider the following tips and tricks before starting any polymer clay project:
- - Prepare your hands: Always wash your hands before working with clay or when switching between colors — we recommend baby wipes!
- - Condition your clay: Conditioning or activating your clay is essential before starting any project. By using the Sculpey Tools™ Clay Conditioning Machine, you will remove small bubbles that may have formed in the clay.
- - Ensure your oven is heated to the correct temperature: Investing in an oven thermometer will help you ensure your oven is at the proper temperature for baking. Visit our FAQ page for specific baking times and temperatures — you can also find these instructions on the back of any clay package.
- - Avoid nail varnish when sealing your clay: Avoid sealing your finished pieces with nail varnish as this may cause the clay to become sticky. Specific varnishes made for use on polymer clay will produce beautiful, glossy finishes.
Necklace Polymer Clay Crafting Ideas
For more crafting ideas and creative inspiration, check out the following how-to guides and featured necklaces on our projects page:
- - Sculpey Premo™ Iridescent Double Shift Necklace
- - Sculpey Soufflé™ Silkscreened Tiered Necklace
- - Liquid Sculpey® Crystal and Lace Princess Necklace
- - Liquid Sculpey® Trapped Stars Pendant and Earrings
Make Your Own Polymer Clay Roof Tile Necklace Today
Sculpey® is proud to offer the best polymer clay on the market in a wide range of beautiful color palettes. Order Sculpey Soufflé™ and make your own Sculpey Soufflé™ Roof Tile Necklace today!

