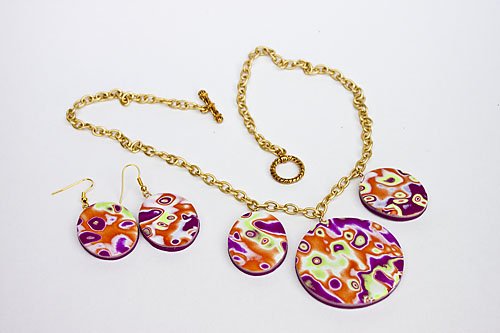
Sculpey Soufflé Controlled Chaos Necklace and Earrings
Sculpey Soufflé Controlled Chaos Necklace and Earrings
Read More
The ancient metal technique called Mokume Gane has long been adapted to polymer clay. It’s sort of a controlled chaos technique – you know what you are going to get, but you don’t really know it until you see it.
Read Less
ADDITIONAL SUPPLIES
(5) eye pins, metal chain, closure findings, pliers, pair of ear wires, small tile or smooth working surface, clear fast-drying glue|(5) eye pins, metal chain, closure findings, pliers, pair of ear wires, small tile or smooth working surface, clear fast-drying glue

Project Instructions
Getting StartedPolymer clay may stain. CLAY MAY DAMAGE UNPROTECTED FURNITURE OR FINISHED SURFACES. DO NOT USE polymer clay on unprotected surfaces. We recommend working on the Sculpey clay mat, wax paper, metal baking sheet, or disposable foil. Start with clean hands and work surface area. Knead clay until soft and smooth. For best results, clean your hands in between colors. Shape clay, pressing pieces together firmly. Bake on oven-proof glass or metal surface at 275°F (130 °C) for 30 minutes per ¼" (6 mm) thickness. For best baking results, use an oven thermometer. DO NOT USE MICROWAVE OVEN. DO NOT EXCEED THE ABOVE TEMPERATURE OR RECOMMENDED BAKING TIME. Wash hands after use. Baking should be completed by an adult.Begin by preheating oven to 275 °F (130 °C). Test temperature with oven thermometer for perfectly cured clay. For best results, condition all clay by running it through the Clay Conditioning Machine for several passes on the widest setting. Fold the clay in half after each pass and insert the fold side into the rollers first.
Slice off about 1/3 package of the Turnip and roll through the Sculpey Clay Conditioning Machine on the #1 (widest) setting a couple of times until the clay edges are relatively smooth. Set the Clay Conditioning Machine to #2 and roll through again. Place the sheet of clay on your work surface and trim a rectangle of clay about 2”x3”.
Slice off about 1/3 package of the Igoo and roll through the Sculpey Clay Conditioning Machine on the #1 (widest) setting a couple of times until the clay edges are relatively smooth. Set the Clay Conditioning Machine to #4 and roll through again. Place the Turnip rectangle onto the the sheet of Igloo and trim around it so that the two sheets of clay are the same size.
Repeat step 1 with the Pumpkin clay, again stacking it on the two previous layers on the sheet and trimming around it.
Repeat Step 2 to add another thinner layer of White between the colors.
Finally, repeat Step 1 with the Pistachio layer. Your stack should look like this:

Place the entire stack into the Clay Conditioning Machine, #1 setting and roll through to make a long, thinner rectangle. This compresses the layers and makes the striping on the edges thinner. Cut this rectangle in half and restack together.


Use the large and medium Style and Detail Ball stylus tools to press firmly into the surface of the clay. This will create the great patterns in the layers of clay. Don’t forget to turn the stack over and repeat on the other side!


Place the stack of clay on a small tile or other non-porous surface and press gently into place so that the stack will adhere to the surface.
Place the stack of clay on a small tile or other non-porous surface and press gently into place so that the stack will adhere to the surface.

Continue to slice across the surface to reveal the intricate patterns created by the ball tool depressions. One you have revealed the entire surface, you can smooth the surface by rolling the entire stack through the Clay Conditioning Machine, set on #1 (only if stack is fairly thin by now). Roll the stack through on the #2 layer and set aside. (NOTE: you can also use an acrylic roller if the stack is still fairly thick – this will prevent the pattern from distorting too much) Roll the remaining Turnip clay through on the #1 setting of the machine and stack the mokume gane pattern sheets on top

Select the area you want for the large central pendant with your cutter and punch through the stacked layers using the 1.75” circle cutter. The Turnip layer will become the backing for the pendant.
Repeat with the 1.25” oval cutter to make the four smaller shapes for the necklace and earrings. If you don’t have enough pattern left you can overlay the original slices that were set aside on the stack and roll them with an acrylic roller or put to smooth them.

Repeat with the 1.25” oval cutter to make the four smaller shapes for the necklace and earrings. If you don’t have enough pattern left you can overlay the original slices that were set aside on the stack onto the backing color and roll them with an acrylic roller to smooth them.


Bake the pieces according to directions above and allow to cool completely. Once the pieces are cooled, remove the eye pins and glue into place with the instant glue. When the glue is set, open the eye pin on the largest pendant and attach to the center of your chain length (trim the chain to the desired length first) and close the eye pin loop. Attach the smaller pendants on either side about 1-1/2 inches from the center pendant. Repeat with the earring pieces and the fish hooks.


