Skip to product information
1 of 1

Sculpey Soufflé™ Sparkling Antique-look Brocade Earrings

Sculpey Soufflé™ Sparkling Antique-look Brocade Earrings

Designed by syndee holt
Read More
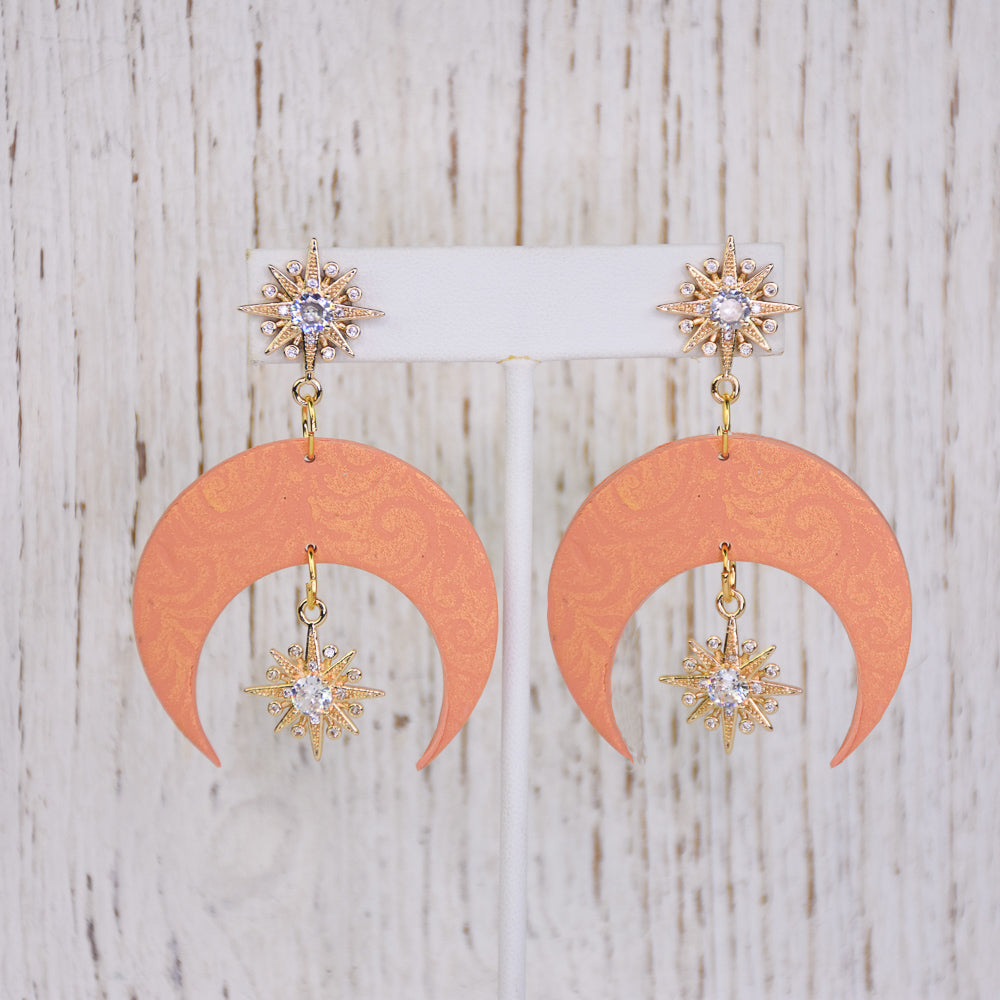
Yes, I know I’ve got the words “sparkling” and “antique” in the same sentence- but why can’t we have BOTH? I absolutely love the look of using the gelli plate for stamped images to achieve this antique brocade look. TIME TO COMPLETION: 45 minutes to make/assemble and 30 minutes to bake
Read Less
ADDITIONAL SUPPLIES
  • Favorite stamp (Mine of from Moiko)
  • Gold toned acrylic craft paint (I used Masters Touch Gold)
  • Small paint brush
  • Gelli plate
  • Brayer tool or piece of stiff paper to spread the paint
  • Sparklers for the post and to hang (mine are from Amazon) 
  • Glue – I’ve used E6000
  • Gold toned jump rings (4) and ear wires
  • Jewelry pliers (I suggest a matched pair of bent nose to open/close jump rings effectively)
View full details
Project Instructions

Step 1

Getting Started:

Please make sure your work area is covered and you are not working on an unprotected surface. We recommend working on the Sculpey® Oven-Safe Work Mat, wax paper, metal baking sheet, or disposable foil. Uncured clay may damage unprotected furniture or finished surfaces. Be sure to cover your crafting area appropriately.

Start with clean hands, unwrap and knead clay until soft and smooth, or condition by running clay though a Pasta Machine. We recommend using a designated machine for clay purposes only. When working with multiple colors, clean hands with soap and water or baby wipes (we have found that baby wipes work best) before switching colors. Shape clay, pressing pieces firmly together. Wash hands after use.

Baking (also called Curing):

Begin by preheating oven to 275 °F (130 °C). After you are done creating; for best results bake/cure clay on an oven-proof surface such metal, aluminum foil, an index card or the Sculpey® Clay Mat at 275°F (130 °C) for 30 minutes per 1/4" (6 mm) thickness according to package directions. Oven safe glass or ceramic surfaces are also acceptable for baking/curing; however please note that the baking/curing times may take longer as the glass or ceramic surfaces take longer to heat up.

For best baking results, use an oven thermometer. DO NOT USE MICROWAVE OVEN. DO NOT EXCEED THE ABOVE TEMPERATURE OR RECOMMENDED BAKING TIME.

Step 2

Mix equal parts of the Soufflé Igloo and Pumpkin to create this beautiful (and on-trend) peach tone. Note: I roll out my conditioned clay and use the large circle cutter to cut out equal portions of the clay.  I used about 2 circles each to make my sheet.

Step 3

Spread a SMALL amount of your gold paint onto your Gelli plate and use your brayer of a piece of stiff paint to spread a thin layer of paint across the Gelli plate.  LESS IS MORE WITH THE PAINT!

Step 4

Quickly place your stamp onto the plate and press rather firmly, making sure to press the entire stamp.  Remove the stamp.  Here is a look at my stamped image.

Step 5

QUICKLY place your sheet of clay onto the Gelli plate.  I like to put a piece of paper on top of my clay sheet so I can gently run my hand over the clay to ensure that I get
contact with all the paint on the Gelli plate.

Step 6

Quickly, but gently remove your sheet of clay from the Gelli plate (bend the plate to remove the clay sheet easier).  I love the aged look of brocade that this creates!  MAKE SURE TO CLEAN YOUR PLATE!
I prefer to use a baby wipe on the surface to clean it, but a wet rag will also work. Allow the paint to thoroughly dry on the clay (just takes a moment!)

Step 7

Use the 1.75-inch circle cutter to cut out two circles from your favorite areas. Save the rest of the sheet for smaller cutters!

Step 8

Use the 1.25-inch cutter to create a half moon shape in both circles. (I used the part cut out to create a second pair of earrings!)

Step 9

Use the needle tool to place holes in the top of the earring and in the curve.  NOTE: I like to use graphing paper to help line my holes up.  (If you drill your clay AFTER baking/curing like me I still use the graphing paper with small blocks of wood underneath to drill into.}

Bake/cure the clay according to the directions in Step 1 above.

Step 10

Here are my pieces after baking/curing, including the smaller pieces I cut out in Step 8. 
NOTE: the Cornflower blue earrings at the top were created by just swirling a small amount of clay onto the Gelli plate and pressing the clay.  I often use this to finish the backs of my earrings as well!

Step 11

Here is how I had planned for my earrings to mount with the sparkler pieces.  However, since there is no second loop to mount to the ear wire, I decided to glue posts to the back of the top sparkler for each earring. Allow the glue to cure completely. 

Step 12

The layout for the earrings is now simple!  I am using 8x6mm oval jump rings, but 8 mm rounds can be used also.

Step 13

Here is a look at the finished earrings!