
Sculpey Soufflé Silk Screened Statement Necklace
Sculpey Soufflé Silk Screened Statement Necklace
Read More
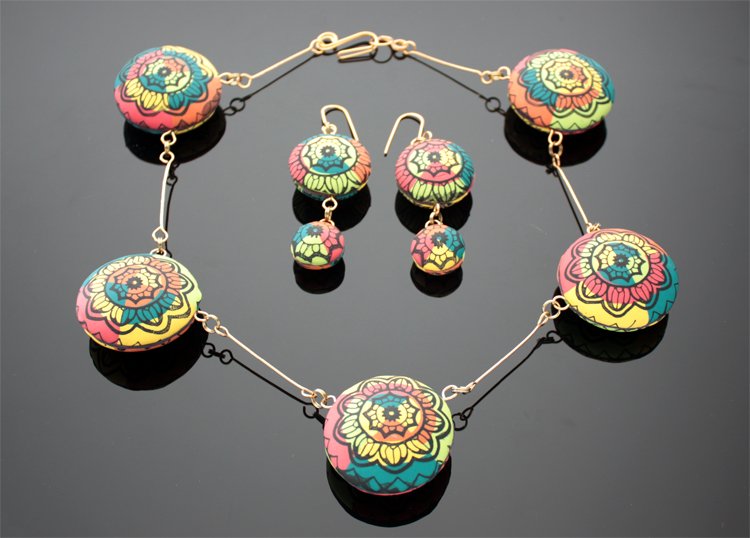
Make a statement - create this bright colorful necklace, perfect for any season!
Created by Anke Humpert
Read Less
ADDITIONAL SUPPLIES
Tile or a sheet of glass
Hand drill
Bone folder
Small exacto or craft knife
A soft toothbrush
Black acrylic paint (creamy consistency is best)
A little dish with water (not shown)
Paper towels (not shown)
A sheet of deli paper
Tape
Wire and jewelry pliers
Scrap clay|Tile or a sheet of glass
Hand drill
Bone folder
Small exacto or craft knife
A soft toothbrush
Black acrylic paint (creamy consistency is best)
A little dish with water (not shown)
Paper towels (not shown)
A sheet of deli paper
Tape
Wire and jewelry pliers
Scrap clay
Project Instructions
GETTING STARTED Polymer clay may stain. CLAY MAY DAMAGE UNPROTECTED FURNITURE OR FINISHED SURFACES. DO NOT USE polymer clay on unprotected surfaces. We recommend working on the Sculpey clay mat, wax paper, metal baking sheet, or disposable foil. Start with clean hands and work surface area. Knead clay until soft and smooth. For best results, clean your hands in between colors. Shape clay, pressing pieces together firmly. Bake on oven-proof glass or metal surface at 275°F (130 °C) for 30 minutes per ¼" (6 mm) thickness. For best baking results, use an oven thermometer. DO NOT USE MICROWAVE OVEN. DO NOT EXCEED THE ABOVE TEMPERATURE OR RECOMMENDED BAKING TIME. Wash hands after use. Baking should be completed by an adult. Begin by preheating oven to 275 °F (130 °C). Test temperature with oven thermometer for perfectly cured clay. For best results, condition all clay by running it through the Clay Conditioning Machine for several passes on the widest setting. Fold the clay in half after each pass and insert the fold side into the rollers first.
After conditioning your scrap clay roll it out at the thickest setting of your Clay Conditioning Machine. Select the round cutter that matches the biggest size of the hollow bead maker.Cut out 10 round pieces which will be used to create 5 big hollow beads. Place the discs on the hollow bead maker and bake as directed above. Repeat this step until you have 10 baked round pieces.


To make the hollow bead you will need to sand the edges of the half beads flat, so they will fit together. Use a piece of course sanding paper and some tape for this: create a circle of tape and stick it on the top of the disc, sticky side out. This will make it a lot easier to hold the flat dome shaped pieces while sanding.

Move the half beads in circular motions over the sanding paper until their edges are flat. Remove the tape.

With the Clay Conditioning machine on the thickest setting create a sheet for ½ package of each of the clay colors.

Building the colored pattern – you be creating 10 round pattern pieces to cover all 10 half beads. Cut out 2 big (same size circles (same as you used for the first scrap clay round pieces) 2 medium and 2 small round pieces for each color. Do not use the next smaller size but the one after that (leaving out one size). You should have 6 round pieces of each color.

Cut all three sizes from each color. In the largest circle cut the medium size and the smallest size into it. In the medium size cut the smallest size into it. Take all the pieces and lay them next to each other separately.


Now the fun begins: mix and match your circles in different combinations. Select color combinations that you find pleasing. When you have combined 10 circles with three different color combinations cut each of them in 4 quarters. Do not press the circles together yet, we still need to be able to take them apart.

Do some more mixing and matching, this time with the quarters of your round pieces. When you have found the combinations you like best, place all 10 pieces on one half of your deli paper. Try to get the quarter circle pieces together as close as possible. There should not be any big gaps between the components. Cover the pieces with the other half of your deli paper and use a bone folder (or if you do not have one use the back of a spoon) to join the separate pieces. Rub in a gentle circular motion over all pieces, turn the deli paper with the pieces round and do the same on the back side of your pieces.


Remove the top piece of deli wrap but not the piece they are laying on. They still should be sticking to it! Cut the deli paper in little pieces, so you can move each of the pieces separately.

Now it’s time to silk screen print the tops of the colored circles. Gather the following supplies: the Sculpey Silk Screen Set for this, a little bowl of water, black acrylic paint, asoft tooth brush and paper towels. Take one of the small round clay pieces and place a silk screen on top of it (shiny side down!). I used one of the big screens, because I liked the circular design to go on the round bead pieces. An extra plus is that it has a dot in the middle that can be placed on the center of the clay piece so I am able to have an exact placement ofthe design on all of the beads.


Add a little line of the Black acrylic paint on the screen and draw it across the screen with the squiggle that comes in the set. If you do not get all the holes in the screen with the first draw, do it again until the complete pattern has been “filled” with paint. Screen one round piece after the other. If the screen is still fairly clean you can go directly to the next piece. Clean the screen if it is too loaded with paint! Dip it in the bowl with water and gently clean the screen and the squiggle with a soft tooth brush. Dry the screen before using it again! I like to use paper towels for that. Let the paint dry completely before doing the next steps. One or two hours is enough. If you like to be on the save side, let them dry over night. Now carefully remove the pieces from the deli paper backing.


Place one piece on each one of the cured half beads, you made earlier. Carefully smooth them with your fingers on the dome, so you will not have any air between the layers. Don’t rub the surface too hard, since the paint is still fairly delicate. Try out which bead halves you want to combine and fit together, before you actually start with it. Not all color combinations are the same, so try out which ones work best together.

Use the extruder and some well conditioned scrap clay to press out long flat strips of clay. They will be used to attach the bead halves to each other. Lay a piece of the scrap clay string on top of the rim of one half of the bead. Don´t overlap it. Press it gently with your fingers to the edge.I placed the design so the holes of the beads will be in the upper third of the beads(indicated by the tooth pick. You will not need a tooth pick! It is just there to showyou where to place the holes later).


Position the designs so they will be placed with the color changes on top of each other and press the two halves together. The holes will be drilled here later on (again the tooth pick is there just to demonstrate the placing, no need to have it in there). When you press the two halves together, some of the scrap clay will be pressed out of the beads! Use your craft knife to cut this extra clay off to have clean bead rims.

When you have done that with all your beads, cure them again for 30 minutes. Theacrylic paint will also be heat set during this process. Allow the beads to cool completely.
Use a hand drill to drill the holes. Start with a small drill and be careful not to split the bead halves. The top bead shows where the wire will go through the finished bead holes. NoticeThat it is placed exactly where the colors change. This is how you position of the drill hole.

Put a piece of wire through your bead holes and make loops on each side of the bead with your jewelry pliers. Do that with all of your beads. You can now connect them with pieces of wire to hold them in place and get the length of your final necklace. Don’t forget to add a clasp to your necklace

Tip: With the remaining clay pieces, you also can make some smaller beads and create a matching pair of earrings to go with your necklace, the process it the same.
