
Sculpey Soufflé Crazy for Polka Dots!
Sculpey Soufflé Crazy for Polka Dots!
Read More
by syndee holt
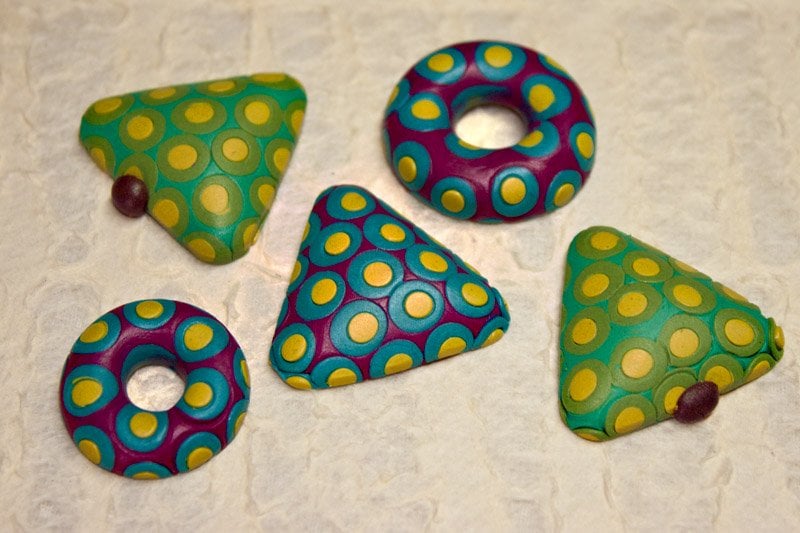
The Sculpey Etch n' Pearl tools team with the Sculpey Cabochon mold to create colorful polka-dotted creations. Use the triangle cab and create a cute stylized holiday tree that resembles old video game art!
Read Less
ADDITIONAL SUPPLIES
clean white paper or index cards, small spray bottle of water|clean white paper or index cards, small spray bottle of water
Project Instructions
FOR THE DONUT: I used Bourdeaux for the background, Sea Glass for the largest dot and Key Lime for the smallest dot. Roll a sheet out of your background color on about the #3 setting of the Sculpey Clay Conditioning Machine. Roll out a small piece of the color selected for the largest polka dot on the #7 (thin) setting.. Place this thin sheet of clay on a sheet of paper and use the largest Etch n' Pearl to punch out a circle of clay. Since we are using the paper, the clay "should" stick to the inside of the tool. If it is still stuck on the paper, just put the tool over it and swipe towards you to pick it up. Press it onto the background sheet of clay. Add 5 other circle around it to sort of create a flower.

Continue to add polka dots in the junctions of the shape as shown in the photo, creating kind of a honeycomb shape. You may think that this is hard to do, but it's much easier and faster than trying to do it randomly and it plays a big part in how the design comes out when you put it in the mold.

Build the honeycomb out until you are sure that you have enough to cover the size of the mold (this is for the largest donut mold).

Trim the background clay to leave just a small straight selvage around each side. Roll out a small piece of the color selected for the little dot (again, my color is Key Lime) on the #7 setting on the Sculpey Clay Conditioning Machine and use the smallest Etch n'Pearl to create the small dot for the center of each of the larger dots. Again, punch these out on paper so that the dot will tend to stick in the tool and then just press the tool lightly into the larger dot to transfer it.


Once your sheet is ready, lightly spray the selected donut mold with water (be sure to wipe any excess water off the upper surface of the mold - we want the mold release water only in the mold!). Place your sheet face down over the mold. Roll a small ball of scrap clay and put it over the sheet of clay and press FIRMLY.

Trim the excess clay from the mold by inserting the edge of your Super Slicer blade in the center of the mold. You should be able to feel the center of the donut, angle the blade and slice out to the edge. Repeat on the other side. This should remove all the excess clay without pulling the clay to one side.

Wiggle that mold, bend it all four ways and release the clay to pop it out. If you still have lines around the polka dots, just put the clay back into the mold and press really firmly to reduce the lines. Wiggle the mold and pop the clay out. Perfect! NOTE: I think the honeycomb shape helps to create the perfect circle of polka dots around each donut! Add your hardware and bake according to the directions above!

FOR THE TREE: Start with a #3 background layer of Jade clay,using about 1/4 of a package of conditioned clay. Set aside. Roll out a small piece of the Pesto clay on the #7 (thin) setting of the Sculpey Clay Conditioning Machine. Use the largest Etch n' Pearl tool to punch out a circle of this clay. Remember to have the clay on a sheet of paper to help the clay to stick in the tool! Press the Etch n' Pearl lightly into the background clay to transfer to the dot of clay. Add 5 more dots around this center dot.

Once again, keep adding dots to the junctions to create a honeycomb effect. I built this one as a triangle shape, since I knew it was going into the triangle mold.

Add small dots of Key Lime to each of the larger Pesto dots, using a small Etch n' Pearl tool and a #7 layer of clay.

Trim the triangle leaving a small selvage on each side.

Lightly spray the largest triangle mold with water (wipe the water from the top surface of the mold!). Place the clay face down on the mold and make sure that the edge of the clay is parallel to the edge of the mold.

Press a small ball of scrap clay FIRMLY into the mold.

Insert the edge of the blade in the center and slice out to each corner of the mold to remove the excess clay.

Wiggle the mold and pop each corner to remove the clay from the mold. CUTE!

Roll out a small piece of the Cowboy clay on the widest setting on the Sculpey Clay Conditioning Machine and punch out a "pearl" of clay with the largest Etch n' Pearl and add it to the bottom of the tree. Add your hardware and bake according to the directions above!

FOR THE DONUT: I used Bourdeaux for the background, Sea Glass for the largest dot and Key Lime for the smallest dot. Roll a sheet out of your background color on about the #3 setting of the Sculpey Clay Conditioning Machine. Roll out a small piece of the color selected for the largest polka dot on the #7 (thin) setting.. Place this thin sheet of clay on a sheet of paper and use the largest Etch n' Pearl to punch out a circle of clay. Since we are using the paper, the clay "should" stick to the inside of the tool. If it is still stuck on the paper, just put the tool over it and swipe towards you to pick it up. Press it onto the background sheet of clay. Add 5 other circle around it to sort of create a flower.
Continue to add polka dots in the junctions of the shape as shown in the photo, creating kind of a honeycomb shape. You may think that this is hard to do, but it's much easier and faster than trying to do it randomly and it plays a big part in how the design comes out when you put it in the mold.
Build the honeycomb out until you are sure that you have enough to cover the size of the mold (this is for the largest donut mold).
Trim the background clay to leave just a small straight selvage around each side. Roll out a small piece of the color selected for the little dot (again, my color is Key Lime) on the #7 setting on the Sculpey Clay Conditioning Machine and use the smallest Etch n'Pearl to create the small dot for the center of each of the larger dots. Again, punch these out on paper so that the dot will tend to stick in the tool and then just press the tool lightly into the larger dot to transfer it.
Once your sheet is ready, lightly spray the selected donut mold with water (be sure to wipe any excess water off the upper surface of the mold - we want the mold release water only in the mold!). Place your sheet face down over the mold. Roll a small ball of scrap clay and put it over the sheet of clay and press FIRMLY.
Trim the excess clay from the mold by inserting the edge of your Super Slicer blade in the center of the mold. You should be able to feel the center of the donut, angle the blade and slice out to the edge. Repeat on the other side. This should remove all the excess clay without pulling the clay to one side.
Wiggle that mold, bend it all four ways and release the clay to pop it out. If you still have lines around the polka dots, just put the clay back into the mold and press really firmly to reduce the lines. Wiggle the mold and pop the clay out. Perfect! NOTE: I think the honeycomb shape helps to create the perfect circle of polka dots around each donut! Add your hardware and bake according to the directions above!
FOR THE TREE: Start with a #3 background layer of Jade clay,using about 1/4 of a package of conditioned clay. Set aside. Roll out a small piece of the Pesto clay on the #7 (thin) setting of the Sculpey Clay Conditioning Machine. Use the largest Etch n' Pearl tool to punch out a circle of this clay. Remember to have the clay on a sheet of paper to help the clay to stick in the tool! Press the Etch n' Pearl lightly into the background clay to transfer to the dot of clay. Add 5 more dots around this center dot.
Once again, keep adding dots to the junctions to create a honeycomb effect. I built this one as a triangle shape, since I knew it was going into the triangle mold.
Add small dots of Key Lime to each of the larger Pesto dots, using a small Etch n' Pearl tool and a #7 layer of clay.
Trim the triangle leaving a small selvage on each side.
Lightly spray the largest triangle mold with water (wipe the water from the top surface of the mold!). Place the clay face down on the mold and make sure that the edge of the clay is parallel to the edge of the mold.
Press a small ball of scrap clay FIRMLY into the mold.
Insert the edge of the blade in the center and slice out to each corner of the mold to remove the excess clay.
Wiggle the mold and pop each corner to remove the clay from the mold. CUTE!
Roll out a small piece of the Cowboy clay on the widest setting on the Sculpey Clay Conditioning Machine and punch out a "pearl" of clay with the largest Etch n' Pearl and add it to the bottom of the tree. Add your hardware and bake according to the directions above!