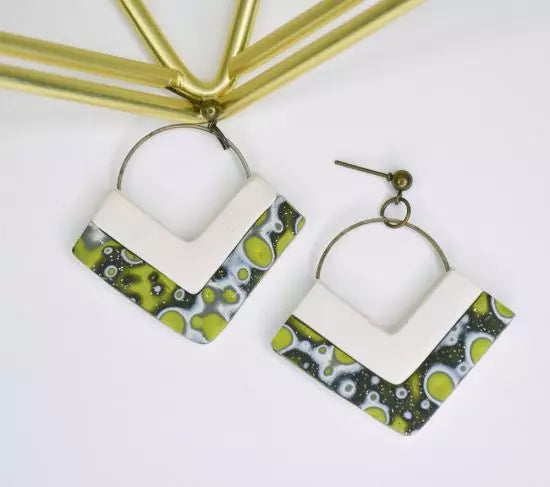
Sculpey Soufflé™ Citron Mokume Gane Triangle Earrings
Sculpey Soufflé™ Citron Mokume Gane Triangle Earrings
Designed by syndee holt
Read More
Read Less
These swingy earrings with a splash of color will go from business to casual! They are sure to be a mainstay in your earring collection for years, because black and white never go out of style, especially with a little splash of sparkle and the wonderful Citron color.
TIME TO COMPLETION:
40 minutes to make and 30 minutes to bake
ADDITIONAL SUPPLIES
- Circle hoop charm, antique brass x2 – 1.
- Post with ball and backing, antique brass x2
- Antique brass colored small jump rings (2)
- Couple sheets of plain white paper
- Optional: Small piece of graphing paper
- Small smooth surface tile

Project Instructions
Step 1
- Getting Started:
Start with clean hands, unwrap and knead clay until soft and smooth, or condition by running clay though a Pasta Machine. We recommend using a designated machine for clay purposes only. When working with multiple colors, clean hands with soap and water or baby wipes (we have found that baby wipes work best) before switching colors. Shape clay, pressing pieces firmly together. Wash hands after use.
- Baking:
Step 2
Condition the Soufflé Citron on the #3 (or middle) setting on the clay machine. Use the largest cutter (2 inches) to cut a square. Set aside for a moment.Repeat with the other 3 colors.

Step 3
Stack the colors one on top of each other in the order shown in this photo. Citron, Slate Gray, Igloo and Twinkle Twinkle. Press the layers together lightly with your hand.
Step 4
Run the stack of colors through the clay machine on the same #3 setting. Place the long sheet of clay on a sheet of paper and cut down the middle of the stack as shown.
Step 5
Restack the colors in the SAME order. Twinkle Twinkle should be a bottom layer and Citron should be a top layer.
Step 6
Run the restacked clays through the clay machine again and trim the stack in the middle again and restack in same order.
Step 7
Now the fun begins! Place your stack on a small smooth tile. Use the medium size Dual Ended tool to press randomly across the surface with a “gentle-firm” pressure. You don’t want to hit the table, but you want to push through most of the layers.
Step 8
Repeat with the small ball tool.
Step 9
Gently bend your blade using your thumbs on top of the blade. Slice just along the top surface of the clay as shown. It will take several slices to complete.
Step 10
Here is the first slice from my stack. I carefully move my sliced clay to another sheet of paper for later use.
Step 11
Continue slicing off the surface of your stack and placing the pieces on your sheet of paper. I prefer to randomly do lighter/deeper slices to get more colors showing. IF you cut to deeply, do NOT remove the slice – just gently press into place and turn the sheet and slice from the other side.
Step 12
Slide your blade underneath the sheet and pull it down to remove the clay sheet from the tile and move the sheet of clay to your working paper again.Use the acrylic roller to thin the sheet slightly and to decrease the texture in the surface slightly.

Step 13
Use the 1.75-inch cutter to cut out two squares of clay. Set the remnants aside.
Step 14
Here are my 2 cut pieces ready for the next step.
Step 15
I have moved my squares to my graphing paper and carefully aligned the top and bottom points along one of the lines. Now I’m going to use the 1-inch cutter to trim the clay as shown. Set aside the squares that you cut to make the next pair of earrings (shown at the end of the tutorial).Repeat for both pieces.

Step 16
Sheet your Igloo clay on the #3 setting or the setting closest to the thickness of your two mokume gane pieces. Use the 1.75-inch cutter to cut two squares.Sheet the Igloo clay on #4 (thinner setting) and cut 2 more same size squares.

Step 17
Gently align one of the squares of matching thickness with your Mokume Gane piece. Use the 1-inch square cutter to trim to the same width as your Mokume Gane.Repeat for the other earring.

Step 18
stack both pieces of the thinner Igloo squares and align the pieces. Do NOT press together because we are going to gently remove the top Igloo piece to install the metal ring.
Step 19
Lay one of the rings on the exposed Igloo backing piece and replace the top Igloo piece. Flip the earring over and gently press to seal all the pieces together.Trim any edges that need to be trimmed up and set aside to do the second earring.

Step 20
Once both earrings are complete, bake according to the directions in Step 1 above and allow to cool.
Step 21
Once the clay has cooled, just add your ball post using small coordinating jump rings as shown and your earrings are ready to wear!But don’t go away….

Step 22
Remember when I said to save the 1 inch squares of Mokume Gane in Step 15? Well just make coordinating squares of the Twinkle Twinkle. Bake all the squares separately and glue together as shown after the clay has cooled!
Step 23
And remember those slices of mokume gane we made off the top layer in Steps 10 and 11? You can put those slices on a new sheet of clay and even remake the textures with your tools to create a new sheet to work with! No Waste!

