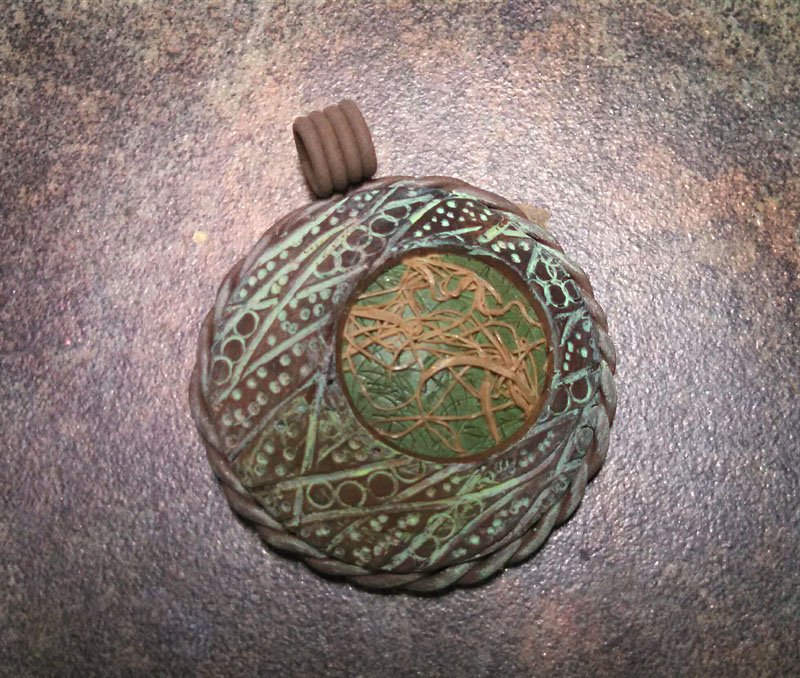
Sculpey Soufflé Carved Bubble Pendant
Sculpey Soufflé Carved Bubble Pendant
Read More
The Souffle clay allows you to carve the surface BEFORE you bake! It’s softer to carve, but it still holds the sharpness of the carve.
Read Less
ADDITIONAL SUPPLIES
Carving Tools (half round point like linoleum cutter), Light green acrylic paint, Paint brush, Clear Fast Drying Glue, Paper towels|Carving Tools (half round point like linoleum cutter), Light green acrylic paint, Paint brush, Clear Fast Drying Glue, Paper towels

Project Instructions
Polymer clay may stain. CLAY MAY DAMAGE UNPROTECTED FURNITURE OR FINISHED SURFACES. DO NOT USE polymer clay on unprotected surfaces. We recommend working on the Sculpey clay mat, wax paper, metal baking sheet, or disposable foil. Start with clean hands and work surface area. Knead clay until soft and smooth. For best results, clean your hands in between colors. Shape clay, pressing pieces together firmly. Bake on oven-proof glass or metal surface at 275°F (130 °C) for 30 minutes per ¼" (6 mm) thickness. For best baking results, use an oven thermometer. DO NOT USE MICROWAVE OVEN. DO NOT EXCEED THE ABOVE TEMPERATURE OR RECOMMENDED BAKING TIME. Wash hands after use. Baking should be completed by an adult.Begin by preheating oven to 275 °F (130 °C). Test temperature with oven thermometer for perfectly cured clay. For best results, condition all clay by running it through the Clay Conditioning Machine for several passes on the widest setting. Fold the clay in half after each pass and insert the fold side into the rollers first.
Roll out a sheet of clay using about ½ package of the Cowboy clay on the #1 (widest) setting on the Clay Conditioning Machine. Use the half round carving tool to carve random crossing lines in the sheet of clay. Feel free to start over if you don’t like the pattern.

Use the smallest Etch n’ Pearl tool and the smallest ball tool to press circles and dots into the gaps between the carved lines.

Use the largest circle cutter from the graduated metal cutters to cut out your favorite section of this custom textured sheet of clay. Use the second from the smallest cutter to cut out an offset circle in this larger circle of clay. Set aside.

Roll out a small sheet of the Latte clay on the #1 setting. Carve lines in the clay as in Step 1, but this time we are using the clay that is carved out. Gently remove the clay from the carving tool and build a small, loose pile of this clay.

Roll out a small sheet of the Souffle Pesto on the #3 setting on the clay conditioning machine. Use the front edge of the smallest circle cutter to create random half round marks in the clay to add texture. Place the thin pieces of Latte clay that were carved out of the sheet in a small, messy pile in the center of the Pesto sheet under the cutout circle.

Use the largest circle cutter to carefully position over the stacked clay and cut out the circle of clay again so that the Pesto is the same size as the Cowboy circle. Place this stack of clay on the largest dome on the Hollow Bead Maker. Look at the clay carefully from all sides to make sure that it is in full contact with the dome. Bake as directed above.

While this clay is baking, roll out the remaining Cowboy clay on the #3 setting on the Clay Conditioning Machine and use the largest circle of clay to cut out another circle. Set this aside.
Roll a long thin snake of the Cowboy clay about 12 inches long, fold it in half and twist the two pieces into a coil. The coil should be long enough to go around the large circle of clay. NOTE: An extruder can be used to create this coil also

Once the clay in the oven on the Hollow Bead Maker has baked and cooled (at least to warm), carefully paint the Cowboy surface with the light green paint and wipe the excess clay from the top surfaces with a damp paper towel. Set this clay onto the #3 circle of clay created in Step 7. Press the clay firmly and trim any excess clay. Wrap the coil of clay around edge to hide the seams of the clay.
Roll another long thin snake of clay about 8 inches long. Cut this into 4 equal pieces about 2 inches in length. Gently roll one end up to create a bail for the pendant. Do NOT attach to the pendant! Re-bake the pendant with the coil and back piece in place. Bake the bail at the same time.

Once the clay has baked and cooled, use the clear fast drying glue to attach the bail at the top of the pendant. You can add some of the green paint to the bail if you wish before gluing into place.

