Skip to product information
1 of 1

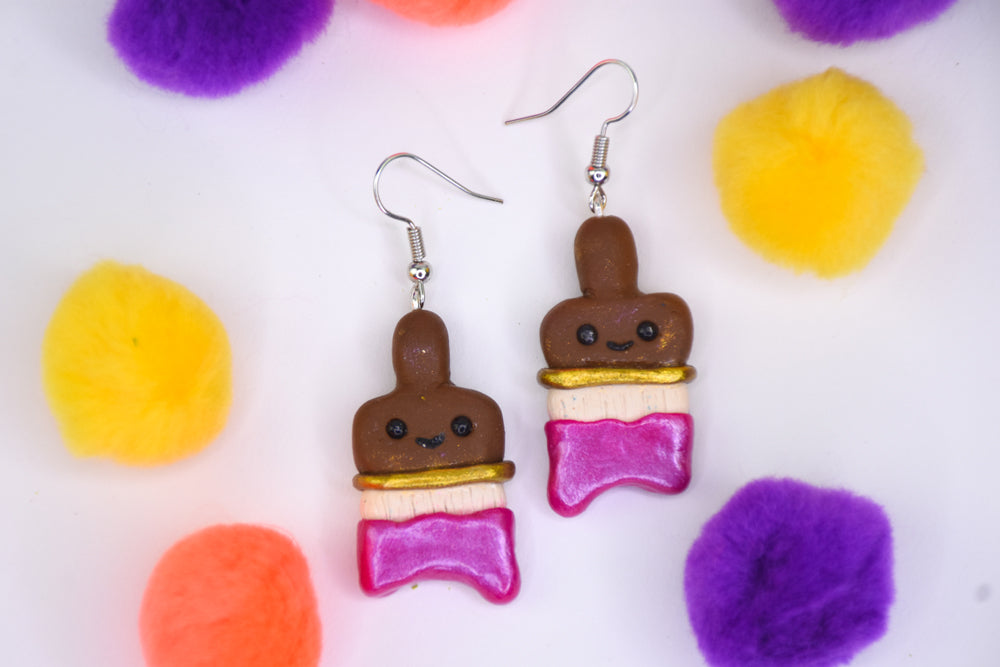
Sculpey Premo™ Paintbrush Earrings

Sculpey Premo™ Paintbrush Earrings

Designed by Lindsay Gilbert
Read More
Delight your artist friends with these clever paintbrush earrings! Team up Sculpey Premo™ with Ranger Perfect Pearls to create a sparkling finish like wet paint.
Read Less
ADDITIONAL SUPPLIES
  • Ranger Perfect Pearls - Sunflower Sparkle, Pink Gumball
  • Small Paint Brush
  • 2 Jewelry Eye Screws
  • 2 Earring Hooks
View full details
Project Instructions

Step 1

Getting Started:

Please make sure your work area is covered and you are not working on an unprotected surface. We recommend working on the Sculpey® Oven-Safe Work Mat, wax paper, metal baking sheet, or disposable foil. Uncured clay may damage unprotected furniture or finished surfaces. Be sure to cover your crafting area appropriately.

Start with clean hands, unwrap and knead clay until soft and smooth, or condition by running clay though a Pasta Machine. We recommend using a designated machine for clay purposes only. When working with multiple colors, clean hands with soap and water or baby wipes (we have found that baby wipes work best) before switching colors. Shape clay, pressing pieces firmly together. Wash hands after use.

Baking (also called Curing):

Begin by preheating oven to 275 °F (130 °C). After you are done creating; for best results bake/cure clay on an oven-proof surface such metal, aluminum foil, an index card or the Sculpey® Clay Mat at 275°F (130 °C) for 30 minutes per 1/4" (6
mm) thickness according to package directions. Oven safe glass or ceramic
surfaces are also acceptable for baking/curing; however please note that the
baking/curing times may take longer as the glass or ceramic surfaces take
longer to heat up. For best baking results, use an oven thermometer. DO NOT USE
MICROWAVE OVEN. DO NOT EXCEED THE ABOVE TEMPERATURE OR RECOMMENDED BAKING TIME.

Step 2

Roll a ball of yellow clay measuring about 1-inch, and roll a ball of brown clay measuring about ½ inch. Squish the balls of clay together to mix into one color. Knead the clay until soft and pliable.

Once the clay has been conditioned and mixed, separate one ¼  inch ball of clay and then split the remaining clay into two equal pieces.

Step 3

With one of the pieces of clay, make a rectangle measuring ¾ inch wide, about ½ inch tall, and  ¼ inch thick. Round the edges and corners for a softer look. With the remaining clay, roll it into a snake measuring about ¼ inch long, and make one end thinner than the other.


Repeat for the other piece of clay.

Step 4

Stand the rectangle piece up on one of the longer, thinner sides. Stand the snake on top of the rectangle, with the smaller end down against the clay. Blend the pieces together at the seam to create the paintbrush handle.

Step 5

Roll a ball of white clay measuring about 1 inch, and a ball of brown clay measuring ¼”. Squish the balls of clay together to mix into one color. Knead the clay until soft and pliable.

Once the clay has been conditioned and mixed, separate the clay into two equal pieces.

Step 6

Make a rectangle with one of the pieces of clay measuring about ½ inch tall, ¾ inch wide, and ¼ inch thick. Round the edges and corners for a softer look. Repeat for the other piece of clay.

To help the clay pieces stick together well, add a small line of clay adhesive along the bottom of the paintbrush handle. Then gently press the white clay against the bottom of the handle pieces.

Step 7

Split the remaining brown clay in half, then roll it into two thin snakes measuring about 1 inch long. Add a small amount of adhesive around the seam between the brush handle and bristles. Gently wrap the snake around the brush seam, with the ends meeting in the back. Blend the snake ends together.

Step 8

Use something sharp or pointed, like a craft knife or pointed tool to scratch vertical lines into the white clay to create the bristle-like texture. These don’t have to be perfect! Vary the thicknesses and depth of the scratches for a more realistic look.

Step 9

Knead and roll a ball of fuchsia clay
measuring about 1 inch. Take one small piece of clay and roll a thin snake.
Flatten it out to about ⅛ tall, and cut two pieces measuring about 1 inch long
each.

Separate the remaining clay into two equal pieces. Create two rectangles measuring about ¾ inch wide, ½ inch thick, and about ½ inch tall. Press the center of the bottom edge of clay up a bit so you end up with a rectangle with a flat top edge and a U-shaped bottom edge. This piece will become the “paint” on the brush, so the two edges at the bottom can be uneven to look like “drips”. Round all the edges for a softer look.

Artist Tip: To help the clay pieces stick together well, add a small line of clay adhesive along the bottom of the bristles. Then gently press the flat top of the rectangle against the bottom of the bristle piece

Step 10

Add a thin line of adhesive around the seam between the paint and bristles, then place the flattened snake around it with the edges meeting in the back. Blend the edges together in the back first, then blend the bottom edge of the snake with the pink clay below. Because this is representing paint, the top edge of the snake can be uneven.

Step 11

To give the paintbrush a kawaii look, it needs a face! Use a dotting tool to add two rounded indents into the front of the handle of the paintbrush. Use a craft knife or other sharpened tool to create a small, indented smile between the eyes.

Step 12

Take a tiny piece of black clay and roll it into four small balls to fill the eye holes that have been indented into the brush handle. Next, roll two tiny snakes to fit the indented smile space. For best results, I recommend adding a small drop of clay adhesive into each indentation before putting the clay eyes and mouth into place.

Step 13

The Sunflower Sparkle mica powder is a great way to give the band between the bristles and handle a metallic look. Use a small detail brush to apply the powder to the clay. Because you need so little of it, I recommend gathering mica powder from the lid of the jar instead.

 *If you get excess powder onto other parts of the clay (which is likely), dip the end of the small brush into isopropyl alcohol to gently wipe it away.

Step 14

Carefully twist jewelry eye screws into the top of the paintbrush handles. Next, carefully remove the screws. Apply a bit of clay adhesive to the ends and then twist them back in. This process should help the screws to have a more permanent hold in the clay.

Step 15

To give the paint on the brush a shimmery look, carefully apply the Bubblegum mica powder to the pink clay using a small paintbrush. Again, I recommend using the powder from the lid instead of the jar.

Place the paintbrush charms onto the oven-safe baking mat, and bake at 275º for 60 minutes.

Step 16

Once the clay has cooled completely, use a small paintbrush to apply a thin coat of gloss glaze to the “paint” and eyes of the charms. Allow the glaze to dry completely.

 *The glaze goes on with a white hue, but will turn clear as it dries.

Step 17

Use jewelry pliers to open the ring at the bottom of an earring hook. Loop the end of the hook through the eye screw on the paintbrush charm. Use the pliers again to close the ring on the earring hook. Repeat for the other charm.

Now the earrings are ready for wearing or gifting! These Kawaii Paintbrush Earrings are so fun to make, and will get so many compliments.