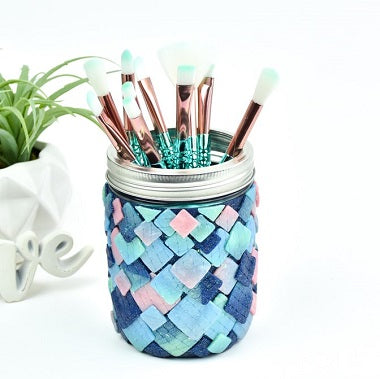
Sculpey Premo™ Mermaid Makeup Brush Holder
Sculpey Premo™ Mermaid Makeup Brush Holder
Designed by Amy Koranek
Read More
Read Less
Iridescent Premo mixed with Opal Premo and backed by Galaxy Glitter are the perfect combination for creating mermaid scales.
ADDITIONAL SUPPLIES
- Glass jar: 3.5” diameter; 4.75” tall
- Netted produce bag for texture

Project Instructions
- Getting Started:
Start with clean hands, unwrap and knead clay until soft and smooth, or condition by running clay though a Pasta Machine. We recommend using a designated machine for clay purposes only. When working with multiple colors, clean hands with soap and water or baby wipes (we have found that baby wipes work best) before switching colors. Shape clay, pressing pieces firmly together. Wash hands after use.
- Baking:
Make sure your jar is clean and ready to use. I’m using a recycled canning jar with the seal removed. I’m keeping the metal ring as a finishing touch to the jar.

Sheet 2 bars of Galaxy Glitter through the pasta machine on the thickest setting making a sheet that is large enough to wrap around your jar. Trim a straight edge and line it up around the top of the jar under where the ring goes. Butt the edges and trim to make a nice flat seam. Smooth the seam with your fingertips.

Bend the excess clay over the bottom edge of the jar and smooth it down. Trim the rough edges with the Super Slicer as desired.

Make strips of colors as shown using the scraps of Galaxy Glitter, one ounce each of Iridescent Blue and Iridescent Pink, and 1/2 ounce of Iridescent Yellow. The strips should be made on the thickest setting of the pasta machine and in total, they should be narrower than the pasta machine rollers. Overlap the strips slightly

Sheet 1/2 ounce of Opal Premo on the thickest setting. Lay this sheet across the colors. Roll over all the pieces with the Acrylic Clay Roller to seal them together.

Sheet the pieces through the pasta machine all together on the thickest setting feeding them through with the stripes perpendicular to the rollers. Fold the sheet in half with the Opal inside matching like color to like color.

Fold across the stripes and press through the pasta machine on the thickest setting several times creating a pretty blend as shown. Always fold matching like color to like color and inserting the folded end of the sheet through the rollers first. The Opal will blend in randomly as you fold and sheet the clay.

When you are happy with the blend, press it through the pasta machine to the third thickest setting. Stretch out the produce netting and place it over the clay sheet. Roll the texture into the clay with the Acrylic Clay Roller.

Carefully remove the netting to leave behind the scaly texture.

Cut out squares from the blended sheet using the 1”, .75”, and .5” square cutters.

Starting at the bottom of the jar, randomly place the squares diagonally on the jar.

Overlap some of the squares over others as you cover the jar.

I used larger squares at the bottom and smaller squares at the top.

Keep adding squares all the way up to the top of the background color.

Bake the jar following the baking instructions for Premo. When the jar is completely cool, add the metal ring to finish it. If you wish you can add a coordinating ribbon to the metal ring.

- Choosing a selection results in a full page refresh.
- Opens in a new window.

