
Sculpey Premo™ Garden Clock
Sculpey Premo™ Garden Clock
Designed by Cindi McGee
Read More
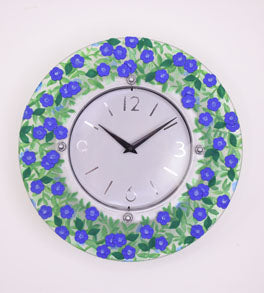
Perennial Vinca Major, also known as Periwinkle, has always been a garden favorite of mine. The color of the blossoms is a perfect match for the Pantone Color of the Year Veri Peri, which is why I chose it as my theme to decorate this project. The glass clock itself had its first “life” as a holiday home décor piece after I etched it with a nativity scene and holiday phrase. But when it was time to repurpose it, polymer clay seemed like the perfect option!
TIME TO COMPLETE: 90 minutes including baking and assembly
Read Less
ADDITIONAL SUPPLIES
- Craft knife
- Clock with removable glass face frame
- Parchment paper
- Green translucent glass paint
- Alcohol markers - 2 shades of green and a purple similar to Veri Peri
- White pastel
- Soft tipped applicator
- Tiny flower impression tool (optional) or fine tipped tool (such as Etch n’ Pearl)
- Fine tip brush
Project Instructions
- Getting Started:
Start with clean hands, unwrap and knead clay until soft and smooth, or condition by running clay though a Pasta Machine. We recommend using a designated machine for clay purposes only. When working with multiple colors, clean hands with soap and water or baby wipes (we have found that baby wipes work best) before switching colors. Shape clay, pressing pieces firmly together. Wash hands after use.
- Baking:
Take clock apart before beginning. Clean the glass.
Mix equal parts Translucent, Yellow and Blue Liquid Sculpey® to create a shade of green. Add additional small amounts of Yellow and blend after each until you reach your desired shade. I was trying to match Forest Green Premo!
Mix equal parts Translucent, Yellow and Blue Liquid Sculpey® to create a shade of green. Add additional small amounts of Yellow and blend after each until you reach your desired shade. I was trying to match Forest Green Premo!

Use a fine paint brush to add vines and leaves over the glass surface. My project was inspired by a dense patch of Vinca vines, so I used a photo as reference for my leaf shape. Bake according to manufacturer instructions and let cool. By using liquid clay, instead of paint, the vines have more depth and dimension.

I wanted to achieve a dense, dimensional effect, so I chose to use green translucent glass paint to add additional leaves randomly in the background. Let the paint dry.

Mix equal parts Galaxy Glitter, Purple, and White. Once blended, add an equal amount of White Translucent and mix well. I chose Galaxy Glitter instead of a solid dark blue such as Navy because I wanted just a touch of sparkle in my finished flowers.

Use the Flowers mold to make as many of the 5 petal flowers as you desire.

Use a flower impression tool (or fine tipped tool) to make an impression in the center of each flower.

Use an applicator to add a light amount of white pastel to the center of each flower.

Apply a small amount of clay adhesive and add the flowers.

I wanted to add some partial flowers against some of the whole flowers. I baked one flower and then used it as a “template” while I used a craft knife to cut portions from some of the flowers before adding them.
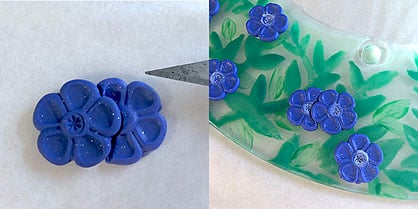
Use the Flower mold and Forest Green to make multiple of the smallest leaves. Use clay adhesive and add them randomly to the vines.

To add accent details to the leaves, I used various shades of green alcohol markers.

To add the effect of some flowers in the background, I used a purple alcohol marker in a shade similar to Veri Peri to add partial flowers around some of the clay flowers.
Bake according to manufacturer instructions. Let cool.
Reassemble the clock and enjoy!
Bake according to manufacturer instructions. Let cool.
Reassemble the clock and enjoy!
