
Sculpey Premo!™ Coral Caned Frame
Sculpey Premo!™ Coral Caned Frame
Designed by Cindi McGee
Read More
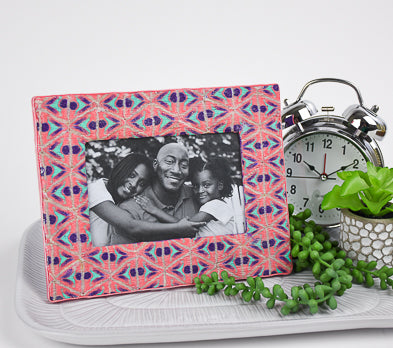
This eye-catching frame utilizes a polymer clay cane to create the intricate looking pattern. A real desktop stunner for sure!
The measurements of clay may vary dependent upon your desired size of the finished cane.
Time to create cane and complete frame:
Approximately 2 hours.
Baking time: 1 hour, twice.
Read Less
The measurements of clay may vary dependent upon your desired size of the finished cane.
Time to create cane and complete frame:
Approximately 2 hours.
Baking time: 1 hour, twice.
ADDITIONAL SUPPLIES
- Wooden frame
- Acrylic paint in color of choice - I used Dioxazine Purple
- Paintbrush
- Wire brush tool (optional)
Project Instructions
- Getting Started:
Start with clean hands, unwrap and knead clay until soft and smooth, or condition by running clay though a Pasta Machine. We recommend using a designated machine for clay purposes only. When working with multiple colors, clean hands with soap and water or baby wipes (we have found that baby wipes work best) before switching colors. Shape clay, pressing pieces firmly together. Wash hands after use.
- Baking:
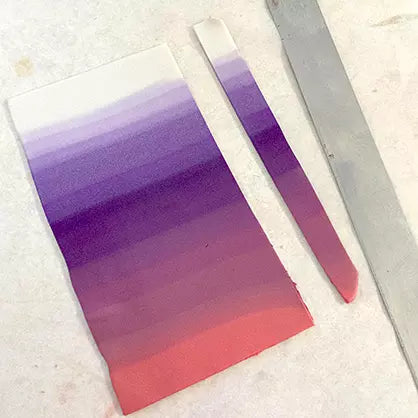
Create a Skinner Blend which evolves from Coral, to Purple, and lastly Pearl. I used approximately .5 oz of clay for each section of the blend.
Fold the points down to the bottoms of the triangles and roll through the pasta machine with the fold first. Continue to fold and roll in the exact same fashion. Do not process the blend completely, allow it to remain somewhat differentiated for more obvious color transition effects.
Fold the points down to the bottoms of the triangles and roll through the pasta machine with the fold first. Continue to fold and roll in the exact same fashion. Do not process the blend completely, allow it to remain somewhat differentiated for more obvious color transition effects.

Use the clay blade to cut strips about 1/4” wide from the blend.
Stack the strips on top of each other with the end colors matching.

Use your fingers to compress the stack and create a rectangular block.

Cut the block in half lengthwise. Cut the Pearl edges at a diagonal so they will meet and form a point. We are creating an open bottomed triangle shape. Trim away excess from the ends as desired.

Roll Coral clay to a setting #3 on the pasta machine. Wrap each piece of the blended triangular shape in Coral clay. Place the pieces together with the tops creating a point.

Create a block of Fiji clay the same thickness as the blended triangle. Cut a triangle shape of Fiji which will fit beneath/between the blended pieces.

Roll a sheet of Pearl clay to setting #3 on the pasta machine. Cut a strip the same thickness as the Fiji triangle and wrap the triangle in the Pearl clay.

Use the end of a paintbrush or a dowel or other tool to push inward and make a curve in the wide base of the triangle.

Use your fingers to gently pull the sides back out to create the triangular shape, with the curve indentation on the bottom. Place in the opening of the blended pieces. Pack the area extending beyond the blended pieces with Pearl clay as shown.

Roll Pearl clay to setting #3 on the pasta machine. Cut a strip the same thickness as the cane. Begin where the edge of the Fiji triangle meets the Pearl filler clay and wrap the strip of Pearl up and around the blended pieces and back down and under to the opposite side of the Fiji triangle.

Roll Coral clay to setting #3 on the pasta machine. Cut a strip the same thickness as the cane. Wrap the entire outside edge of the cane with the Coral strip.

Create a plug of Purple clay about 3/4” in diameter, and the same thickness as the cane. Roll Pearl clay to setting #3, cut a strip the same thickness and wrap the plug with Pearl clay.

Create a Skinner Blend beginning with Coral, then Pearl, then ending with Coral as shown.

Fanfold the blended sheet of clay to make a stack.

Use your fingers to compress the stack to a rectangular block the same thickness as the cane and about half the width of the base of the triangle.

Cut the rectangular block in half lengthwise. Place the Purple plug into the round depression at the base of the triangle. Then add the pieces you just created on either side, using your fingers to shape the ends to a triangular shape.
Once they are packed in tightly, use your clay blade to make a slice along the bottom edge and remove the bottom half of the Purple plug and the clay on either side.
Once they are packed in tightly, use your clay blade to make a slice along the bottom edge and remove the bottom half of the Purple plug and the clay on either side.

Now begin reducing the triangle into a cane. Once you’ve reached the desired size, roll a sheet of Pearl clay to setting #3 on the pasta machine and wrap the cane in Pearl clay. Continue reducing if desired.

If necessary, sand any rough edges on the frame. Apply Sculpey® Oven Bake Adhesive to the surface of the frame.

Use a sharp, rigid blade to cut slices of the cane. I cut mine about 1/8” thick, as I planned to add texture after application and did not want them so thin that they would tear.
Begin adding the slices of cane to the frame, I used the triangles with the flat sides together to create a diamond pattern covering the entire front surface.
Begin adding the slices of cane to the frame, I used the triangles with the flat sides together to create a diamond pattern covering the entire front surface.

Once the surface of the frame was covered, I used the wire bristle tool to gently create striations for texture over the surface of the frame. Keep the brush marks in the same direction. Use a fluffy paintbrush to brush away any unwanted specks of clay.
Bake according to instructions provided and let cool.
Bake according to instructions provided and let cool.

Roll Coral clay to setting #3 on the pasta machine. Cut strips the width of the side edge of the frame. Add Bake & Bond and apply the strips around the outer edge, smoothing the corners together with your fingers. Bake according to manufacturer instructions and let cool.

To paint the back of the frame, I used Dioxazine Purple acrylic paint. I wanted a paint wash effect rather than an opaque effect, so I diluted the paint with a small amount of water before applying it. When dry, it still allows the pattern of the wood to show through the color.

Back of frame with paint wash effect.
