
Sculpey® III Whoot! Whoot! Owl
Sculpey® III Whoot! Whoot! Owl
Read More
Britta Lautenschlager
Can we get a whoot whoot for this bright and fun looking owl? He makes the perfect desktop companion at home, school or work.
Read Less
Britta Lautenschlager
Can we get a whoot whoot for this bright and fun looking owl? He makes the perfect desktop companion at home, school or work.
ADDITIONAL SUPPLIES
• Spray bottle with water
• Jewelry wire
• Crimp beads
• Clasp
• Wire cutters
• Pencil|• Spray bottle with water
• Jewelry wire
• Crimp beads
• Clasp
• Wire cutters
• Pencil
Project Instructions
Your Workspace:
Please make sure your work area is covered and you are not working on an unprotected surface. We recommend working on the Sculpey® Work ‘n Bake Clay Mat, wax paper, metal baking sheet, or disposable foil. Uncured clay may damage unprotected furniture or finished surfaces. Be sure to cover your crafting area appropriately.
Getting Started:
Start with clean hands, unwrap and knead clay until soft and smooth, or condition by running clay though a Pasta Machine. We recommend using a designated machine for clay purposes only. When working with multiple colors, clean hands with soap and water or baby wipes (we have found that baby wipes work best) before switching colors. Shape clay, pressing pieces firmly together. Wash hands after use.
Baking:
Begin by preheating oven to 275 °F (130 °C). After you are done creating; for best results bake clay on an oven-proof surface such metal, aluminum foil, an index card or the Sculpey® Clay Mat at 275°F (130 °C) for 15 minutes per ¼" (6 mm) thickness according to package directions. Oven safe glass or ceramic surfaces are also acceptable for baking; however please note that the baking times may take longer as the glass or ceramic surfaces take longer to heat up. For best baking results, use an oven thermometer. DO NOT USE MICROWAVE OVEN. DO NOT EXCEED THE ABOVE TEMPERATURE OR RECOMMENDED BAKING TIME.
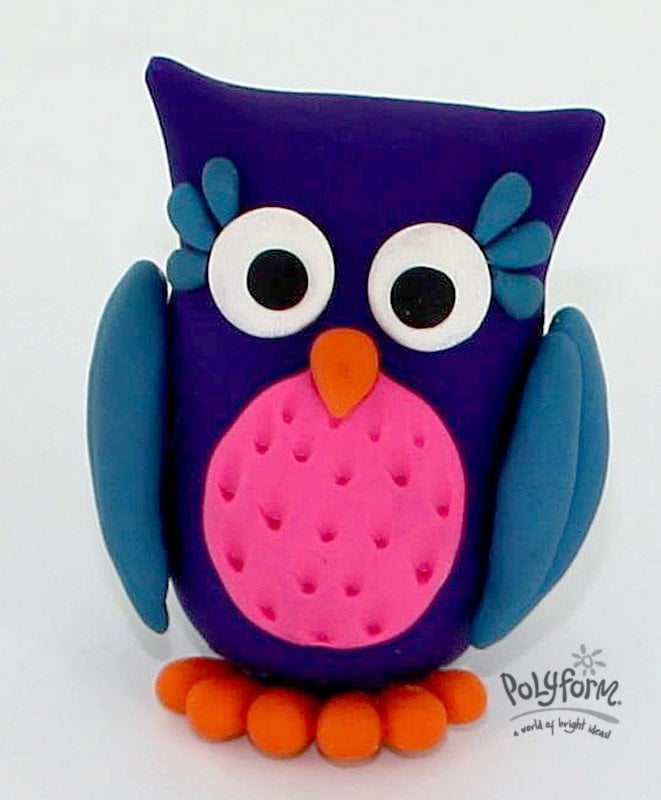
Body: take 1 ounce of Purple clay and shape it into a long oval. With your fingertips, stretch out the sides of one end of the oval to create the owl’s ears.

Chest: Take 1/8th row of Hot Pink clay and shape it into a flattened oval. Using the tip of the purple pointed tool i press a pattern into the pink oval as shown in the image.

Wings: Take 1/4 row of Turquoise clay cut in half and shape each half into three long pointed logs; approx 1 ¼” inch . Press three of them together to shape one wing. Keep the top rounded and make the bottom pointy. Make the second wing in the same manner. Using the Bake & Bond, gently squeeze onto the inside of each of the wings and press the wings to the sides of the owl’s body.

Eyes: Using the White clay, make two small White balls for the eyes approx, ¼” inch and two very small Black balls for the inside of the eyes. Using the Bake & Bond, glue the White part of the eyes to the body of the owl, then press the small Black balls to the eyes.

Beak: Using the Just Orange clay, make one small cone shape. Add a little Bake & Bond to the upper back of the beak. Press the beak onto the body underneath the eyes.

Eyelashes: Using the Turquoise clay, make six very small balls and shape each into a club shape; approx ¼” inch. Press three of them to each the upper right and the upper left side of the eyes.

Feet: Take 1/8 roll of Just Orange, cut in half and shape each half into three club shapes; approx ½”inch . Press them together to create the feet. Add a small amount of Bake & Bond and press the feet to the bottom of the owls body.

Bake according to the directions above in Step 1 and let cool completely.
Your Workspace:
Please make sure your work area is covered and you are not working on an unprotected surface. We recommend working on the Sculpey® Work ‘n Bake Clay Mat, wax paper, metal baking sheet, or disposable foil. Uncured clay may damage unprotected furniture or finished surfaces. Be sure to cover your crafting area appropriately.
Getting Started:
Start with clean hands, unwrap and knead clay until soft and smooth, or condition by running clay though a Pasta Machine. We recommend using a designated machine for clay purposes only. When working with multiple colors, clean hands with soap and water or baby wipes (we have found that baby wipes work best) before switching colors. Shape clay, pressing pieces firmly together. Wash hands after use.
Baking:
Begin by preheating oven to 275 °F (130 °C). After you are done creating; for best results bake clay on an oven-proof surface such metal, aluminum foil, an index card or the Sculpey® Clay Mat at 275°F (130 °C) for 15 minutes per ¼" (6 mm) thickness according to package directions. Oven safe glass or ceramic surfaces are also acceptable for baking; however please note that the baking times may take longer as the glass or ceramic surfaces take longer to heat up. For best baking results, use an oven thermometer. DO NOT USE MICROWAVE OVEN. DO NOT EXCEED THE ABOVE TEMPERATURE OR RECOMMENDED BAKING TIME.
Please make sure your work area is covered and you are not working on an unprotected surface. We recommend working on the Sculpey® Work ‘n Bake Clay Mat, wax paper, metal baking sheet, or disposable foil. Uncured clay may damage unprotected furniture or finished surfaces. Be sure to cover your crafting area appropriately.
Getting Started:
Start with clean hands, unwrap and knead clay until soft and smooth, or condition by running clay though a Pasta Machine. We recommend using a designated machine for clay purposes only. When working with multiple colors, clean hands with soap and water or baby wipes (we have found that baby wipes work best) before switching colors. Shape clay, pressing pieces firmly together. Wash hands after use.
Baking:
Begin by preheating oven to 275 °F (130 °C). After you are done creating; for best results bake clay on an oven-proof surface such metal, aluminum foil, an index card or the Sculpey® Clay Mat at 275°F (130 °C) for 15 minutes per ¼" (6 mm) thickness according to package directions. Oven safe glass or ceramic surfaces are also acceptable for baking; however please note that the baking times may take longer as the glass or ceramic surfaces take longer to heat up. For best baking results, use an oven thermometer. DO NOT USE MICROWAVE OVEN. DO NOT EXCEED THE ABOVE TEMPERATURE OR RECOMMENDED BAKING TIME.
Body: take 1 ounce of Purple clay and shape it into a long oval. With your fingertips, stretch out the sides of one end of the oval to create the owl’s ears.
Chest: Take 1/8th row of Hot Pink clay and shape it into a flattened oval. Using the tip of the purple pointed tool i press a pattern into the pink oval as shown in the image.
Wings: Take 1/4 row of Turquoise clay cut in half and shape each half into three long pointed logs; approx 1 ¼” inch . Press three of them together to shape one wing. Keep the top rounded and make the bottom pointy. Make the second wing in the same manner. Using the Bake & Bond, gently squeeze onto the inside of each of the wings and press the wings to the sides of the owl’s body.
Eyes: Using the White clay, make two small White balls for the eyes approx, ¼” inch and two very small Black balls for the inside of the eyes. Using the Bake & Bond, glue the White part of the eyes to the body of the owl, then press the small Black balls to the eyes.
Beak: Using the Just Orange clay, make one small cone shape. Add a little Bake & Bond to the upper back of the beak. Press the beak onto the body underneath the eyes.
Eyelashes: Using the Turquoise clay, make six very small balls and shape each into a club shape; approx ¼” inch. Press three of them to each the upper right and the upper left side of the eyes.
Feet: Take 1/8 roll of Just Orange, cut in half and shape each half into three club shapes; approx ½”inch . Press them together to create the feet. Add a small amount of Bake & Bond and press the feet to the bottom of the owls body.
Bake according to the directions above in Step 1 and let cool completely.