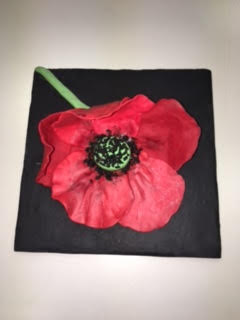
Sculpey III Sculpted Poppy Tile
Sculpey III Sculpted Poppy Tile
Read More
What a beautiful little pick-me-up for your favorite room!
Design by Patricia Nay
Read Less
ADDITIONAL SUPPLIES
Small grater

Project Instructions
Your workspace:
Please make sure your work area is covered and you are not working on an unprotected surface. We recommend working on the Sculpey® Work ‘n Bake Clay Mat, wax paper, metal baking sheet, or disposable foil. Uncured clay may damage unprotected furniture or finished surfaces. Be sure to cover your crafting area appropriately.
Getting Started:
Start with clean hands, unwrap and knead clay until soft and smooth, or condition by running clay though a Pasta Machine. We recommend using a designated machine for clay purposes only. When working with multiple colors, clean hands with soap and water or baby wipe before switching colors.Shape clay, pressing pieces firmly together. Wash hands after use.
Baking:
Begin by preheating oven to 275 °F (130 °C). After you are done creating; for best results bake clay on an oven-proof surface such metal, aluminum foil, an index card or the Sculpey® Clay Mat at 275°F (130 °C) for 15 minutes per ¼" (6 mm) thickness according to package directions. Oven safe glass or ceramic surfaces are also acceptable for baking; however please note that the baking times may take longer as the glass or ceramic surfaces take longer to heat up. For best baking results, use an oven thermometer. DO NOT USE MICROWAVE OVEN. DO NOT EXCEED THE ABOVE TEMPERATURE OR RECOMMENDED BAKING TIME.
Paint back & sides of tile with black acrylic paint. Allow to dry and paint front with a thin coat of white glue and allow it to dry.
Use ¾ of 2 oz block of black clay and condition by rolling between palms. Roll into round log shape ¾” in diameter. Cut into 1 ½” pieces, pat down and run through clay conditioning machine on #2 or 3. Lay on front of tile until area is roughly covered with clay strips, then blend and smooth with Sculpey clay starter tool set #5 & 6 using the #6 to bring edges together. Then use Sculpey style & detail tool with flexible tip shaper and fingers to smooth surface. Trim edges and smooth over edge.

Lay second tile, smooth side down on top of clay before baking to keep bubbles from forming in clay as it bakes.Bake as directed and let cool
Cut ½ block of Red Hot clay into 4 pieces. Cut ¼ of Red block in halfCut Leaf Green in ½ of 1 quarter of blockCut Lemonade in ½ of 1 quarter block

Top 3 petalsFirst petal use 1 piece of Red Hot clay and roll it into a ball and flatten using your fingers to work into a petal shape.Second petal use ½ of Red Hot clay piece and ½ of Lemonade piece mixing together first in your hands and then running through clay conditioning machine then roll into a ball and again with fingers press into petal shapeThird petal use ½ of Red and ½ Red Hot mixing as above and then rolling into a ball and flattening into a petal shape.Lay the petals out on the tile as shown in the picture shows.

Flower CenterUsing ¼ of the Leaf Green clay piece, blend together with remaining Lemonade using the clay conditioning machine . Roll into a ball and flatten into a 1 1/8” diameter.

Using some of the left over black clay grate it (chop further if needed with exacto knife

Bottom 3 petalsMix 1 petal ½ Red Hot and ½ Red together, blend using the clay conditioning machine. Roll into a ball and flatten with fingers and shape into a petal as you did with the top three petals.Next petal just RedThird petal Red Hot

Lay petals out as seen in photo and press all petals down gently but firmly at center so that they adhere to the black surface.Sprinkle some of the black grated clay in center and then add the green center piece gently pressing into petals at center. Sprinkle more of the black grated clay on surface of center.Carefully fold bottom petals up as shown in photo and use Sculpey smoothing tools anywhere needed to blend out any marked areas on the petals.

Using the remaining Leaf Green and Lemonade clay, blend using the clay conditioning machine and roll into a stem shape and add to finished flower.Bake as directed above. Use some aluminum foil wrinkled up to keep lower petals in place while baking.


