Skip to product information
1 of 1

Sculpey III® CATerpillar Paintbrush Holder

Sculpey III® CATerpillar Paintbrush Holder

Designed by Emma Wedel
Read More
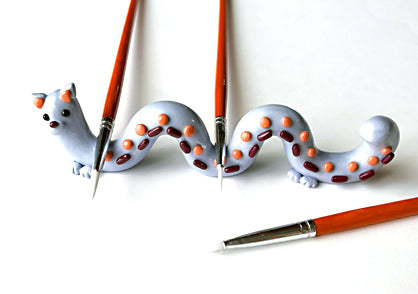
Banish that old brush jar and create this delightful little CATerpillar paintbrush holder that is sure to bring a smile while helping keep track of your brushes as well. TIME TO COMPLETION: About 30 minutes
Read Less
ADDITIONAL SUPPLIES
  • Craft Knife
  • Needle tool
  • Oven
View full details
Project Instructions

Step 1

Getting Started:

Please make sure your work area is covered and you are not working on an unprotected surface. We recommend working on the Sculpey® Oven-Safe Work Mat, wax paper, metal baking sheet, or disposable foil. Uncured clay may damage unprotected furniture or finished surfaces. Be sure to cover your crafting area appropriately.

Start with clean hands, unwrap and knead clay until soft and smooth, or condition by running clay though a Pasta Machine. We recommend using a designated machine for clay purposes only. When working with multiple colors, clean hands with soap and water or baby wipes (we have found that baby wipes work best) before switching colors. Shape clay, pressing pieces firmly together. Wash hands after use.

Baking (also called Curing):

Begin by preheating oven to 275 °F (130 °C). After you are done creating; for best results bake/cure clay on an oven-proof surface such metal, aluminum foil, an index card or the Sculpey® Clay Mat at 275°F (130 °C) for 15 minutes per 1/4" (6
mm) thickness according to package directions. Oven safe glass or ceramic
surfaces are also acceptable for baking/curing; however please note that the
baking/curing times may take longer as the glass or ceramic surfaces take
longer to heat up. For best baking results, use an oven thermometer. DO NOT USE
MICROWAVE OVEN. DO NOT EXCEED THE ABOVE TEMPERATURE OR RECOMMENDED BAKING TIME.

Step 2

Roll 1/4 of the Arctic blue block into an 8-inch-long snake shape while keeping the
ends neat. Shape the snake into a squiggle shape like shown in the photo.

Step 3

Flip the snake to its side and gently press the bottom of the snake on a flat
surface so it can stand upright.

Roll three small balls of Arctic Blue. Take two and shape them into a triangle shape with your fingers and press them onto the top of the face of the caterpillar for ears.

Roll the last ball into an oval shape and attach it to the center of the face.

Step 4

Next, we will be adding details to the cat’s face.

With Black clay, roll two dot sized balls for eyes and place them above the center oval, evenly spaced.

Roll a tiny dot for a cute little nose with the Plum. Press it onto the top of the center oval.

Finally with Coral, roll two more small balls and shape them into triangles.
Place these in the center of the ears.

The face is finished!  

Step 5

Roll 4 pea sized balls with Arctic Blue, these will be used for the caterpillar’s
paws. With a needle tool sketch two lines on each ball and place the paws on
the front and back end of the creature.

Step 6

Take about a 1/8 of the Plum block and roll it into a thin snake shape.

Cut 15 pieces and roll them into a sprinkle shape like in the photo.

Step 7

Like Step 6, cut about a 1/8 of the Coral block and roll into a snake shape. Cut 16
small pieces and shape into balls.

Step 8

Alternate and arrange both the plum and coral shapes into the side of the caterpillar to create a colorful pattern. Be creative and use other colors and shapes if you
would like!

Step 9

Bake the caterpillar upright and follow the Sculpey III baking instructions. Once your
creation is out of the oven, glaze the paintbrush holder in the gloss glaze to
waterproof and give the project a shiny finish.

Step 10

Place paintbrushes, pens and pencils, or other tools in the notches. Enjoy your new
helpful little clay friend!