
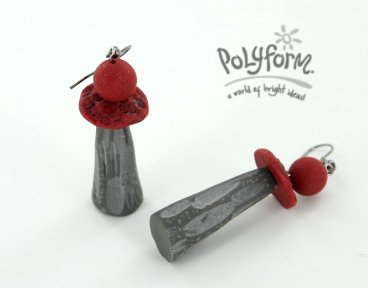
Sculpey® III Carved Grey Earrings
Sculpey® III Carved Grey Earrings
Read More
I love how the carving adds both dimension and color change to these textural earrings.
Read Less
ADDITIONAL SUPPLIES
• Silver eye pins (2)
• Ear wires (2)
• Instant glue
• Bamboo skewer|• Silver eye pins (2)
• Ear wires (2)
• Instant glue
• Bamboo skewer
Project Instructions
Your workspace:
Please make sure your work area is covered and you are not working on an unprotected surface. We recommend working on the Sculpey® Work ‘n Bake Clay Mat, wax paper, metal baking sheet, or disposable foil. Uncured clay may damage unprotected furniture or finished surfaces. Be sure to cover your crafting area appropriately.
Getting Started:
Start with clean hands, unwrap and knead clay until soft and smooth, or condition by running clay though a Pasta Machine. We recommend using a designated machine for clay purposes only. When working with multiple colors, clean hands with soap and water or baby wipes (we have found that baby wipes work best) before switching colors. Shape clay, pressing pieces firmly together. Wash hands after use.
Baking:
Begin by preheating oven to 275 °F (130 °C). After you are done creating; for best results bake clay on an oven-proof surface such metal, aluminum foil, an index card or the Sculpey® Clay Mat at 275°F (130 °C) for 15 minutes per ¼" (6 mm) thickness according to package directions. Oven safe glass or ceramic surfaces are also acceptable for baking; however please note that the baking times may take longer as the glass or ceramic surfaces take longer to heat up. For best baking results, use an oven thermometer. DO NOT USE MICROWAVE OVEN. DO NOT EXCEED THE ABOVE TEMPERATURE OR RECOMMENDED BAKING TIME.
Cut the package of Elephant Grey clay along the lines marked on the clay. Gently round the rectangles in your hands, reducing one end to a blunt point. Use the needle tool put a hole in the blunt pointed end about ¼ inch deep. Create two and set aside.
Pass a small amount of the Red clay through the #1 (widest) setting of the Clay Conditioning Machine. Use the second to the smallest circle cutter (2.5 cm) to cut out a circle of clay. Roll this circle of clay into a ball.
Cut the ball of clay in half using the Super Slicer. Roll each half into a ball. Flatten one of the balls between your finger and thumb.

Repeat Steps 3 and 4 so that you have 2 round balls and 2 flattened balls. Use the blunt end of the skewer to texture the top of the flattened balls. Use the needle tool to pierce both sets of balls and flattened circles through the center.

Bake the grey and red pieces according to the directions above in Step 1. When the clay is still warm but not hot, use the wider shovel shape blade to carve short pieces of the grey surface away, stroking the tool away from you. Use the needle tool or the end of the smallest carving tool to texture the remaining smooth areas of the clay.

Assemble the earrings as shown and glue the eye pin into the top of the grey clay.
Your workspace:
Please make sure your work area is covered and you are not working on an unprotected surface. We recommend working on the Sculpey® Work ‘n Bake Clay Mat, wax paper, metal baking sheet, or disposable foil. Uncured clay may damage unprotected furniture or finished surfaces. Be sure to cover your crafting area appropriately.
Getting Started:
Start with clean hands, unwrap and knead clay until soft and smooth, or condition by running clay though a Pasta Machine. We recommend using a designated machine for clay purposes only. When working with multiple colors, clean hands with soap and water or baby wipes (we have found that baby wipes work best) before switching colors. Shape clay, pressing pieces firmly together. Wash hands after use.
Baking:
Begin by preheating oven to 275 °F (130 °C). After you are done creating; for best results bake clay on an oven-proof surface such metal, aluminum foil, an index card or the Sculpey® Clay Mat at 275°F (130 °C) for 15 minutes per ¼" (6 mm) thickness according to package directions. Oven safe glass or ceramic surfaces are also acceptable for baking; however please note that the baking times may take longer as the glass or ceramic surfaces take longer to heat up. For best baking results, use an oven thermometer. DO NOT USE MICROWAVE OVEN. DO NOT EXCEED THE ABOVE TEMPERATURE OR RECOMMENDED BAKING TIME.
Please make sure your work area is covered and you are not working on an unprotected surface. We recommend working on the Sculpey® Work ‘n Bake Clay Mat, wax paper, metal baking sheet, or disposable foil. Uncured clay may damage unprotected furniture or finished surfaces. Be sure to cover your crafting area appropriately.
Getting Started:
Start with clean hands, unwrap and knead clay until soft and smooth, or condition by running clay though a Pasta Machine. We recommend using a designated machine for clay purposes only. When working with multiple colors, clean hands with soap and water or baby wipes (we have found that baby wipes work best) before switching colors. Shape clay, pressing pieces firmly together. Wash hands after use.
Baking:
Begin by preheating oven to 275 °F (130 °C). After you are done creating; for best results bake clay on an oven-proof surface such metal, aluminum foil, an index card or the Sculpey® Clay Mat at 275°F (130 °C) for 15 minutes per ¼" (6 mm) thickness according to package directions. Oven safe glass or ceramic surfaces are also acceptable for baking; however please note that the baking times may take longer as the glass or ceramic surfaces take longer to heat up. For best baking results, use an oven thermometer. DO NOT USE MICROWAVE OVEN. DO NOT EXCEED THE ABOVE TEMPERATURE OR RECOMMENDED BAKING TIME.
Cut the package of Elephant Grey clay along the lines marked on the clay. Gently round the rectangles in your hands, reducing one end to a blunt point. Use the needle tool put a hole in the blunt pointed end about ¼ inch deep. Create two and set aside.
Pass a small amount of the Red clay through the #1 (widest) setting of the Clay Conditioning Machine. Use the second to the smallest circle cutter (2.5 cm) to cut out a circle of clay. Roll this circle of clay into a ball.
Cut the ball of clay in half using the Super Slicer. Roll each half into a ball. Flatten one of the balls between your finger and thumb.
Repeat Steps 3 and 4 so that you have 2 round balls and 2 flattened balls. Use the blunt end of the skewer to texture the top of the flattened balls. Use the needle tool to pierce both sets of balls and flattened circles through the center.
Bake the grey and red pieces according to the directions above in Step 1. When the clay is still warm but not hot, use the wider shovel shape blade to carve short pieces of the grey surface away, stroking the tool away from you. Use the needle tool or the end of the smallest carving tool to texture the remaining smooth areas of the clay.
Assemble the earrings as shown and glue the eye pin into the top of the grey clay.