premo! Shield Necklace
premo! Shield Necklace
Read More
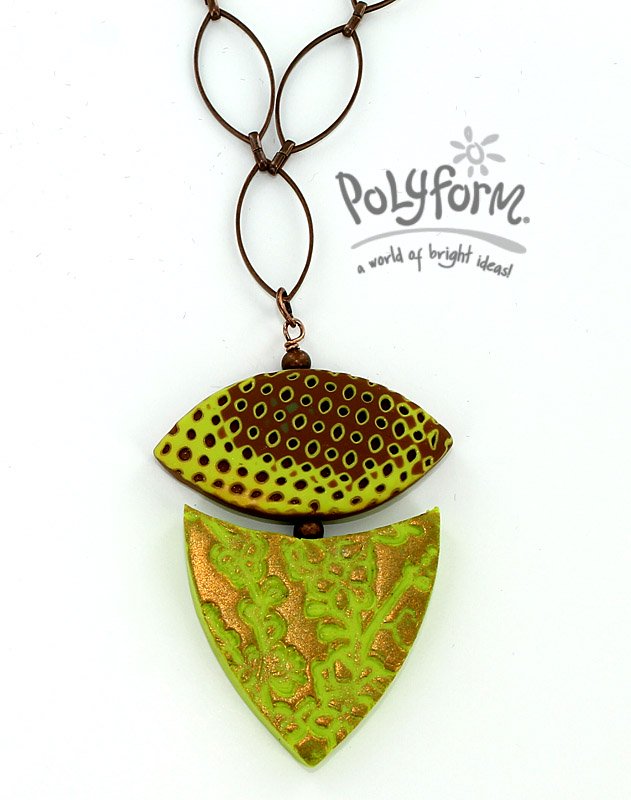
Beautiful combination of bronze, gold and mix of greens truly gives this piece a special twist. This project incorporates our new Design It Jewelry Templates.
Designed by: Britta Lautenschlager
Read Less
ADDITIONAL SUPPLIES
Water spray bottle, Needle tool, Bronze mica powder, Jewelry tools, One head pin, Two 4 mm spacer beads, Chain, Three jump rings, Jewelry closure|Water spray bottle, Needle tool, Bronze mica powder, Jewelry tools, One head pin, Two 4 mm spacer beads, Chain, Three jump rings, Jewelry closure

Project Instructions
Getting Started:
Polymer clay may stain. CLAY MAY DAMAGE UNPROTECTED FURNITURE OR FINISHED SURFACES. DO NOT USE polymer clay on unprotected surfaces. We recommend working plain white paper, wax paper, metal baking sheet, or disposable foil. Start with clean hands and work surface area. Knead clay until soft and smooth. For best results, clean your hands in between colors. Shape clay, pressing pieces together firmly. Bake on oven-proof glass or metal surface at 275 °F (130 °C) for 15 minutes per ¼" (6 mm) thickness. For best baking results, use an oven thermometer. DO NOT USE MICROWAVE OVEN. DO NOT EXCEED THE ABOVE TEMPERATURE OR RECOMMENDED BAKING TIME. Wash hands after use. Baking should be completed by an adult. Begin by preheating oven to 275 °F (130 °C). Test temperature with oven thermometer for perfectly cured clay. For best results, condition all clay by running it through the clay conditioning machine several passes on the widest setting. Fold the clay in half after each pass and insert the fold side into the rollers first.
Polymer clay may stain. CLAY MAY DAMAGE UNPROTECTED FURNITURE OR FINISHED SURFACES. DO NOT USE polymer clay on unprotected surfaces. We recommend working plain white paper, wax paper, metal baking sheet, or disposable foil. Start with clean hands and work surface area. Knead clay until soft and smooth. For best results, clean your hands in between colors. Shape clay, pressing pieces together firmly. Bake on oven-proof glass or metal surface at 275 °F (130 °C) for 15 minutes per ¼" (6 mm) thickness. For best baking results, use an oven thermometer. DO NOT USE MICROWAVE OVEN. DO NOT EXCEED THE ABOVE TEMPERATURE OR RECOMMENDED BAKING TIME. Wash hands after use. Baking should be completed by an adult. Begin by preheating oven to 275 °F (130 °C). Test temperature with oven thermometer for perfectly cured clay. For best results, condition all clay by running it through the clay conditioning machine several passes on the widest setting. Fold the clay in half after each pass and insert the fold side into the rollers first.
Take 1 ounce of each color, Spanish Olive, Raw Sienna, 18 Karat Gold and Wasabi. Condition and roll out on the # 1 setting of the clay conditioning machine. Cut into 1x3” strips. Layer the Wasabi with the 18 Karat Gold and the Spanish olive with the Raw Sienna. Run each stack through the # 1 setting of the clay conditioning machine, then stack the two strips with the Wasabi and Raw Sienna in the middle and pass through the clay conditioning machine on the # 1 setting. Cut the strip and stack, then cut and stack one more time. Make sure to lightly press down each time when layering the clay to avoid air bubbles.
Let the stacked clay rest, or put into the freezer for a short time, to make sure the clay is firm. Spray the technique design block- Dots with a fine mist of water and press into the stacked clay. Remove the tool and with the tissue blade, slice thin slices of the stack. Take one of those slices and set aside. On the # 2 setting of the clay conditioning machine, roll out some Raw Sienna and fold in half, then press the slice of clay onto it. Using the football shape template from the Design it Templates, cut out the football shape. With the needle tool press a hole through the bead.

Roll out some more Wasabi on the #1 setting of the clay conditioning machine and fold in half. Using the Cherry Blossom pattern from the landscape texture sheet, slightly mist with water and press onto the folded clay. Cut out one arrowhead shape,1 ¼ “ high and press the head pin into its top, slightly press down onto it to secure it. Gently brush the top with the mica powder.

Bake both pieces according to the directions above and let them cool. Assemble with the spacer beads. Attach the necklace closure with the jump rings to the chain and then attach the finished clay pieces with a jump ring to the chain.


