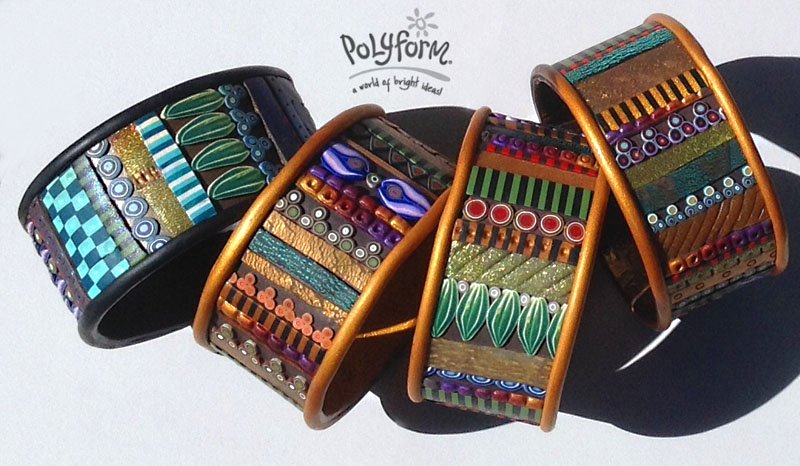
Premo! Patchwork Striped Cuff
Premo! Patchwork Striped Cuff
Read More
Designed by: Mary Anne Loveless
www.lamplightartgallery.com
This project is an excellent way to use up all those colorful cane bits and pieces we all tend to hoard! Matching a certain outfit? Feel free to make NEW canes just for this project too! And it is suggested that you use scrap clay for the base of the bracelet as well!
Read Less
ADDITIONAL SUPPLIES
poster board, or something similar- should be stiffer than card stock, soda pop can, ruler, Exacto knife, extruder, lots of bits of canes and cane ends, scrap clay for the base of the bracelet|poster board, or something similar- should be stiffer than card stock, soda pop can, ruler, Exacto knife, extruder, lots of bits of canes and cane ends, scrap clay for the base of the bracelet

Project Instructions
Getting StartedPolymer clay may stain. CLAY MAY DAMAGE UNPROTECTED FURNITURE OR FINISHED SURFACES. DO NOT USE polymer clay on unprotected surfaces. We recommend working on the Sculpey clay mat, wax paper, metal baking sheet, or disposable foil. Start with clean hands and work surface area. Knead clay until soft and smooth. For best results, clean your hands in between colors. Shape clay, pressing pieces together firmly. Bake on oven-proof glass or metal surface at 275°F (130 °C) for 30 minutes per ¼" (6 mm) thickness. For best baking results, use an oven thermometer. DO NOT USE MICROWAVE OVEN. DO NOT EXCEED THE ABOVE TEMPERATURE OR RECOMMENDED BAKING TIME. Wash hands after use. Baking should be completed by an adult.Begin by preheating oven to 275 °F (130 °C). Test temperature with oven thermometer for perfectly cured clay. For best results, condition all clay by running it through the Clay Conditioning Machine for several passes on the widest setting. Fold the clay in half after each pass and insert the fold side into the rollers first.
Make a template for your bracelet with a ruler and Exacto knife ( suggested dimensions 1 1/4 inches x 8 5/8 inches or 22cm x 3cm). I suggest using poster board for this. You want something stiff, but not too thick.
Condition scrap clay. It won't be seen, so it doesn't matter what muddy color it turns out to be. Roll it out on at a 6 or 7 thickness on the pasta machine, which is about the third from the thinnest setting. Place the clay onto the template and carefully trim on all sides with your Super Slicer blade. We'll call this clay the "bed."

Here's the fun part! Take a look at your scraps, your cane ends, your little bits of this and that, the pieces you couldn't bear to part with. This is the perfect time to use them. You can either decide on a color scheme, or simply get started and see where you end up. Even when I'm doing more of a crazy quilt approach, I still like to have a few unifying colors or patterns that will be repeated. Start with those, and lay down strips of random width (at a thickness of 6 or 7) in four or five spots across the surface of the bed. Trim as you go.

Cover the bed of clay completely. I always like to use a few strips of clay with mica powders, some stripe canes, some with glitter inclusions, some that have been stamped with my favorite rubber stamps or texture plates, and some Skinner blends. I also like gold and silver leaf that has been sandwiched between two layers of translucent clay. When the bed of clay on your template is full, you may want to let the piece rest and cool a bit before proceeding to the next step.

Slip your blade carefully under a corner of your finished bed of clay. Slide it under the work, putting pressure on the template, so as to avoid slicing through all your hard work. Pick up the clay, and place it around an empty soda pop can. I try to line it up with whatever marks there are on the can, so it's perfectly perpendicular, and it lines up as you make the joint. The template is slightly longer than the dimensions of the soda pop can, so lightly lay one end on top of another as you join it together, and make a clean cut with your tissue blade through both layers of clay. Eliminate the excess, and cut another thin strip of clay to lay over your joint.

Select a color for your border. I like to use gold or black. Extrude enough clay to go around the pop can twice, with a little extra. Keep a steady pressure going as you extrude, so the border will be smooth and uniform. Lay the border along one edge of the bracelet. Cut and join and smooth your joint. Repeat on the other side. Make sure that the border pieces join the bracelet by applying a little uniform pressure. I do this by twisting the can with one hand and gently pushing the border into the bracelet without losing the shape of the extrusion
Inspect your work, then bake it on the can according to the directions above in Step 1. Cool, then slide a butter knife under the bracelet, and carefully slip it off the can.

Your bracelet might look like it is complete now, but you really need to line it. For one thing, it needs another layer thickness for strength, and for another thing, you can now jazz it up with a funky interior!
- Choosing a selection results in a full page refresh.
- Opens in a new window.

