Premo Decor Art on Wood
Premo Decor Art on Wood
Read More
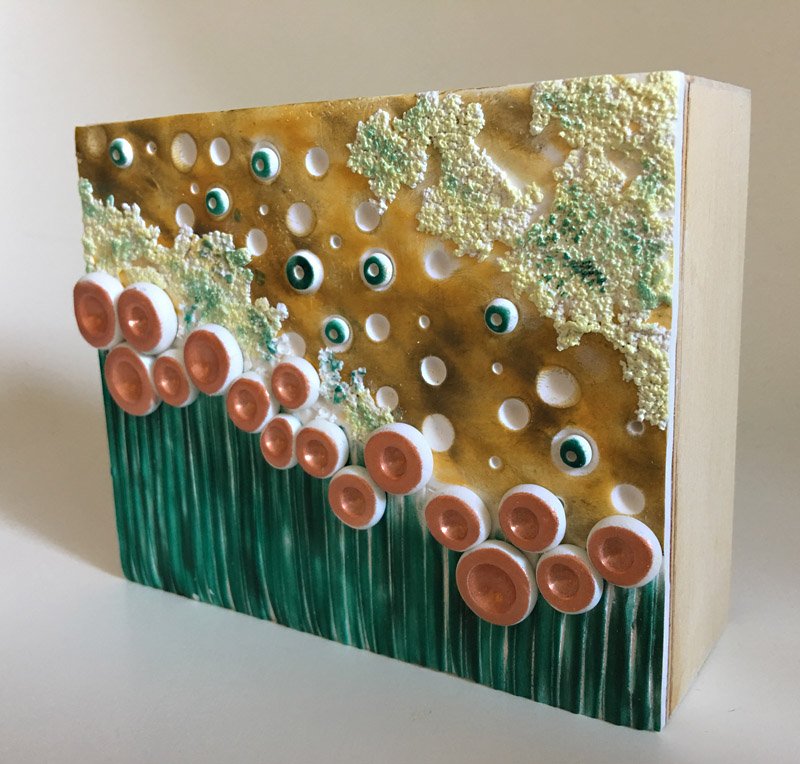
The design for this project evolved by simply playing with clay, giving curiosity and serendipity the upper hand. But it is meant to be abstract, allowing the viewer to find the story that speaks to them. While I will outline techniques during this tutorial, artists are encouraged to use their own sense of creativity to make the design their own.
The birch artist’s panels were chosen to allow the finished product to be hung or stand independently on a flat tabletop or shelf. The sides of the panels can be left natural or painted as the artist desires. You can create one or more panels for your artwork!
Designed by: Lyn Tremblay
Read Less
ADDITIONAL SUPPLIES
Wooden (Birch) artist’s block 4” x 5”, pan pastels, pan pastel applicator and sponge tip, ‘Safety-Walk’ texture strip (a slip resistant tread make by 3M), coarse sandpaper, tissue blade, wooden popsicle stick, roller, parchment sheet, spray bottle of water, small piece of glass or plexi-glass, a piece of ribbed plastic shelf-liner, fine needle tool, PYM II spray sealant.

Project Instructions
- Getting Started:
Start with clean hands, unwrap and knead clay until soft and smooth, or condition by running clay though a Pasta Machine. We recommend using a designated machine for clay purposes only. When working with multiple colors, clean hands with soap and water or baby wipes (we have found that baby wipes work best) before switching colors. Shape clay, pressing pieces firmly together. Wash hands after use.
- Baking:
Prepare a wooden artist’s block by first drying it in a 250 degrees (F) oven for one hour and leaving it in the oven overnight or until it is cool. Then, sand the surface lightly with coarse sandpaper and apply a thin layer of Sculpey ‘Bake and Bond’ (with a wooden popsicle stick).


Condition enough clay to cover the block and run a sheet through on the thickest setting of your pasta machine. Lay it over your wooden block, place a sheet of parchment paper on top and burnish with a roller.

Trim the left-hand side of the clay with a tissue blade and start the first base texture by lining up a pre-cut piece of ribbed shelf-liner vertically flush along the trimmed side. Place a sheet of parchment paper on top and burnish well to ensure the texture imprints the clay.


Trim the other three sides of the clay sheet. Option: at this point, if you wish to accentuate the ‘ribbed’ texture, you might add more lines using a carving tool.

For the second base texture in the upper part of the design, apply randomly placed divots using Sculpey ball tools (various sizes).

Now start adding colour to the base design using pan pastels. I applied a light shade of my chosen colour on both areas first, and then applied a darker shade on top. The colours can be applied with the pan pastel sponge applicators and blended later with your fingers if desired. Leave a band of uncoloured clay between the two sections so the second layer of texture will adhere better to the clay base.


A second layer of texture will give a three dimensional effect. To create the ‘lace’ effect, condition a sheet of clay on the thickest setting of your pasta machine, spray a strip of ‘Safety Walk’ with water, and run it with the clay through your machine on a #4 setting. (Depending on the make of your machine, you may have to experiment to get the desired delicate look of the ‘lace’ layer.)


Gently release the ‘lace’ from the texture strip and apply randomly to the design. Apply pan pastels randomly on the lace, allowing a bit of the white base to show through.


Create the final ‘bubble’ texture by making small balls of clay in random sizes and applying them, first along the dividing space between the upper and lower part of the design, and secondly, adding small balls of clay randomly to some of the divots.

Slightly flatten the balls by placing a sheet of parchment tissue over the design and pressing with a flat piece of plexi-glass or glass. Add pan pastel colour to the larger dividing balls, and then make divots in their surface using your Sculpey ball tools. When applying colour to the smaller balls in the upper part of the design – push small divots into the balls first, and then add colour.


Trim the edges once more to finish. Use a fine needle tool to randomly prick holes throughout the design. Bake at 275 degrees (F) for 30 minutes. When cooled, seal your artwork with PYM II.


