
premo! Clay Flower and Lace Necklace
premo! Clay Flower and Lace Necklace
Read More
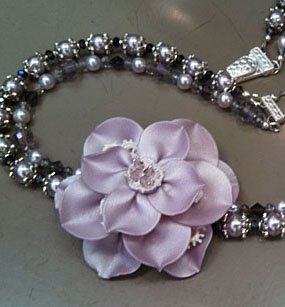
This lovely pastel purple flower has real lace peeking out from among the delicate petals. The use of pearl clay gives the finished flower a glistening sheen that resembles satin. Using only two sizes of circles and simple techniques, this stunning blossom is a snap to make. Created by Chris Crossland.
Read Less
ADDITIONAL SUPPLIES
7 small pieces of lace
3 small fresh water pearls
20 ga wire
28 ga wire
1 1/8” circle cutter
¾” circle cutter
Small artist’s brush
Round nose pliers
Chain nose pliers
Card stock
Bathroom tissue
Lace – see Designer’s note Step 2|7 small pieces of lace
3 small fresh water pearls
20 ga wire
28 ga wire
1 1/8” circle cutter
¾” circle cutter
Small artist’s brush
Round nose pliers
Chain nose pliers
Card stock
Bathroom tissue
Lace – see Designer’s note Step 2
Project Instructions
Getting Started Polymer clay may stain. CLAY MAY DAMAGE UNPROTECTED FURNITURE OR FINISHED SURFACES. DO NOT USE polymer clay on unprotected surfaces. We recommend working on the Sculpey clay mat, wax paper, metal baking sheet, or disposable foil. Start with clean hands and work surface area. Knead clay until soft and smooth. For best results, clean your hands in between colors. Shape clay, pressing pieces together firmly. Bake on oven-proof glass or metal surface at 275 °F (130 °C) for 30 minutes per ¼" (6 mm) thickness. For best baking results, use an oven thermometer. DO NOT USE MICROWAVE OVEN. DO NOT EXCEED THE ABOVE TEMPERATURE OR RECOMMENDED BAKING TIME. Wash hands after use. Baking should be completed by an adult. Begin by preheating oven to 275 °F (130 °C). Test temperature with oven thermometer for perfectly cured clay. For best results, condition all clay by running it through the Clay Conditioning Machine several passes on the widest setting. Fold the clay in half after each pass and insert the fold side into the rollers first.
Spools of lace can be purchased at fabric or hobby stores. Test bake the lace at 275° before assembling the flower to make sure it will hold up to baking. Most polyester laces bake well. For this project, I used white 100% polyester lace which was 2 inches wide. The pattern I used could be easily divided into individual sections which were each about 1 inch wide and 2 inches tall. It was purchased at Hobby Lobby. Cut the lace with sharp scissors. Do your cutting far, far away from your clay working surface or you may end up with tiny lace inclusions that are not a part of your planned design. Cut the lace to form 6 small pieces as shown. I have used three section of this lace cut in half, resulting in 3 pieces which are slightly larger than the remaining 3 pieces. Cut 1 piece to use as the center of the flower.


Condition the clay and add small amounts of the Purple Pearl to the Pearl to produce a Pastel Purple mixture. Although pearl clays are not highly saturated, go slowly and add the purple a little at a time until you have achieved a tint you like.

Run the finished clay mixture through the Clay Conditioning Machine on the #2 setting. To form the base of the flower, cut 2 circles 1 1/4” in diameter. Using 20 ga wire and round nose pliers, form 4 hanging loops with small hooks on each end to give the clay something to grab onto. Place the finished loops on one circle of clay. Each pair of hangers should be the same distance apart and each set of pairs should be placed directly across from each other on the circle. This will assure that the strands of your finished necklace will hang properly. Place the remaining circle on top of the first and gently press all the way around to seal the two pieces of clay and secure the hanging loops between them. Place the finished base on a piece of card stock so your work can be easily turned during assembly. Set aside a ball of clay about the size of a walnut.

Run the remaining clay through the Clay Conditioning Machine at the #6 setting. The petals are thin and delicate, so care must be taken in handling them. Using a Super Slicer blade under one edge of each circle makes lifting them off the cutting surface easier. Cut 11 circles using the 1 1/4 inch circle cutter and 4 circles using the 1” circle cutter. Using your thumbs and index fingers, form a “pleat” on one edge of 6 of the larger circles and gently compress the pleat to flatten it. This will form the cupped shape of the petals.

Place the 6 completed petals around the edge of the base with the pleated part of each petal resting on the base piece with most of the petal extending over the edge. Don’t press the petals into the base until you have placed all 6 of them and adjusted them so they cover the base with little or no overlap of petals. Take care to completely cover the hanging loops.

Using a small piece of the ball of reserved clay, form a button of clay that is large enough to cover the back edges of the first 6 petals. Using an artist’s brush, spread a small amount of Translucent Liquid Sculpey (TLS) on the back edge only of the 3 largest pieces of lace. Do not coat the entire piece of lace, just the part that will rest on the button of clay. Place the lace pieces evenly around the button of clay. Brush TLS over the top of the lace pieces where they overlay the clay button.


Form 5 more petals using the remaining 1 1/4” circles of clay. Place the petals in a circle on the flower on top of the lace pieces. Arrange the petals so that the lace below them shows between the petals. Form another small button of reserved clay and place it in the center of the second layer of petals. Brush TLS on the back edge of the remaining 3 pieces of lace and place them over the clay button. It looks best if the second layer of lace pieces are smaller than the first pieces you used.

Form the last 4 petals using the 1 inch circles. Brush TLS on top of the lace pieces and place these petals over the lace to form the top layer of petals.
Cut 3 pieces of 28 ga wire about 2 inches long. Thread a wire through each of the 3 small fresh water pearls. Center each pearl on the wire and hold it firmly. Grasp the ends of the wire with chain nose pliers. While holding the ends of the wire with your pliers, gently twist the pearl with your fingers until the wire is twisted tightly against the end of the pearl. Repeat with the remaining 2 pearls. Carefully thread each of wires through the center of the lace. Using chain nosed pliers, twist all three sets of wires tightly together. Cut the wire about ½” below the piece of lace and use the pliers to form a small hook which will hold the wires in the clay.

Form a very small button of clay (small enough not to show around the edges of the center lace piece) and press it into the center of the top 4 petals. Brush TLS on the top of the button of clay and on the bottom of the lace and pearl centerpiece. Press the wires gently but firmly into the center of the flower to seat the flower center. Wow! It’s done. Take a moment to admire your beautiful completed flower. You are almost ready to bake.

Using small strips of bathroom tissue (about ¼” wide and 1” long), form little rolls and insert them under each petal so they won’t sag during baking. Use as many of these rolls as you need to make sure the lace can be seen between the petals and the petals lift off one another. The tips of each petal can be gently pinched to form a pointed edge, if desired. Bake at 275° as directed above. Cool completely before removing the pieces of tissue.

When stringing the necklace, you will need to make 4 strands. The flower is offset from the center of the necklace. For the shorter pair of strands, I used strands which were 7” long and 6” long. The longer pair are 12” and 11” long. This provides a nice separation between the strands when the necklace is worn.
Notes about using lace:•ALWAYS test bake (at 275°) a small piece of your lace or cording to make sure that it is safe to bake.•Always apply Fray Check (available in yardage sections) to cut edges unless you are absolutely sure that the lace won’t fray/unravel where the pattern is cut.•Use Translucent Liquid Sculpey (TLS) to bond lace to the unbaked clay. This medium can be thinned if necessary with a drop or two of Sculpey Liquid Clay Softener to make a creamy, brushable consistency. These can be mixed in a small metal condiment cup or something similar. Clean the container and brush with rubbing alcohol and then wash them with soap and water to remove any residue.•TLS must be applied to the back side of the lace to make it bond with the clay. If the lace is captured between two layers of clay, TLS should be applied to the back of the top layer of clay also to allow both pieces of clay to bond, securing the lace between them.•Glazing over the lace after baking is optional. It isn’t needed to keep the lace secured (if you used the TLS). However, you can glaze the clay around the lace if you wish to seal mica powders or other surface treatment.