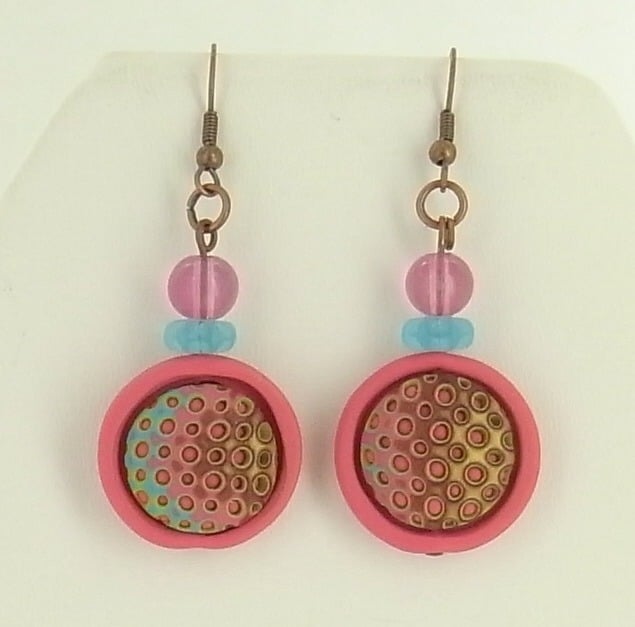
premo! Cabochon Mokume Gane Earrings
premo! Cabochon Mokume Gane Earrings
Read More
These beautiful earrings incorporate the use of our new cabochon and bezel molds.
Read Less
ADDITIONAL SUPPLIES
"• Water in a spritz bottle
• Paper towel
• (Two) 2"" copper head pins
• (Two) copper ear wires
• (Two) small copper jump rings
• Coordinating glass beads|• Water in a spritz bottle
• Paper towel
• (Two) 2"" copper head pins
• (Two) copper ear wires
• (Two) small copper jump rings
• Coordinating glass beads"

Project Instructions
Getting Started
Polymer clay may stain. CLAY MAY DAMAGE UNPROTECTED FURNITURE OR FINISHED SURFACES. DO NOT USE polymer clay on unprotected surfaces. We recommend working on the Sculpey clay mat, wax paper, metal baking sheet, or disposable foil. Start with clean hands and work surface area. Knead clay until soft and smooth. For best results, clean your hands in between colors. Shape clay, pressing pieces together firmly. Bake on oven-proof glass or metal surface at 275°F (130 °C) for 30 minutes per ¼" (6 mm) thickness. For best baking results, use an oven thermometer. DO NOT USE MICROWAVE OVEN. DO NOT EXCEED THE ABOVE TEMPERATURE OR RECOMMENDED BAKING TIME. Wash hands after use. Baking should be completed by an adult.Begin by preheating oven to 275 °F (130 °C). Test temperature with oven thermometer for perfectly cured clay. For best results, condition all clay by running it through the Clay Conditioning Machine for several passes on the widest setting. Fold the clay in half after each pass and insert the fold side into the rollers first.
Polymer clay may stain. CLAY MAY DAMAGE UNPROTECTED FURNITURE OR FINISHED SURFACES. DO NOT USE polymer clay on unprotected surfaces. We recommend working on the Sculpey clay mat, wax paper, metal baking sheet, or disposable foil. Start with clean hands and work surface area. Knead clay until soft and smooth. For best results, clean your hands in between colors. Shape clay, pressing pieces together firmly. Bake on oven-proof glass or metal surface at 275°F (130 °C) for 30 minutes per ¼" (6 mm) thickness. For best baking results, use an oven thermometer. DO NOT USE MICROWAVE OVEN. DO NOT EXCEED THE ABOVE TEMPERATURE OR RECOMMENDED BAKING TIME. Wash hands after use. Baking should be completed by an adult.Begin by preheating oven to 275 °F (130 °C). Test temperature with oven thermometer for perfectly cured clay. For best results, condition all clay by running it through the Clay Conditioning Machine for several passes on the widest setting. Fold the clay in half after each pass and insert the fold side into the rollers first.
Make 2 small circle bezels in Blush. To make a bezel you will make a snake of the Blush clay and press down hard to pack the clay into the recessed edge of the bezel mold. Make sure to outline the entire shape of the bezel with one snake overlapping the ends of the snake. Fill the rest of the bezel shape with Blush clay press down firmly. Carefully slide the Super Slicer blade across the surface of the mold to remove the excess clay. Repeat to make the other bezel.
Sheet all colors through the clay conditioning machine on the #1 setting.
Cut out small squares, about 2" X 2", of each color. Make a stack with Bronze on the bottom, then Blush, Turquoise, Wasabi, and Gold on top.

Hand roll the stack of colors until it is about 3" X 3". Roll one side and then the other.
Cut the sheet of colors into fourths. Stack each piece up again. Don't worry about it if the sides are not even.

Hand roll the stack of color until it is about 3" X 3" again. Cut the sheet of colors into thirds. Stack the pieces up again. Push on the sides of the stack with your hands to smooth out the edges into a nice rectangular stack.

Spritz the top of the stack with a thin layer of water. Press the dots texture block into the stack applying enough pressure so that the texture is about 1/16" deep. Remove the texture block. Blot excess water away with a paper towel.

Carefully slice off the textured layer revealing a colorful pattern of dots.

From the sheet cut out a shape that is a little larger than the small circle cabochon mold. Push the dots sheet into the cabochon mold, making sure the side that you prefer from the sheet is facing down. Backfill the well of the cabochon with Blush clay. Trim the excess from the back of the mold and remove the clay from the mold. Repeat making another small circle cabochon.

Use a dot of TLS to secure the cabochon into the bezel. Repeat to make a second earring piece.
Push a head pin up through the bottom of each earring piece. Bake as directed above.
Add 2 coordinating beads to each head pin. Trim the head pin so that there is just 1/2" extra pin above the bezel. Curl the excess head pin around the tip of your pliers until it is curled all the way down to the top of the bezel. Attach the jump ring to the loop you just created in the head pin. Attach an ear wire to the jump ring. Repeat for the second earring.


