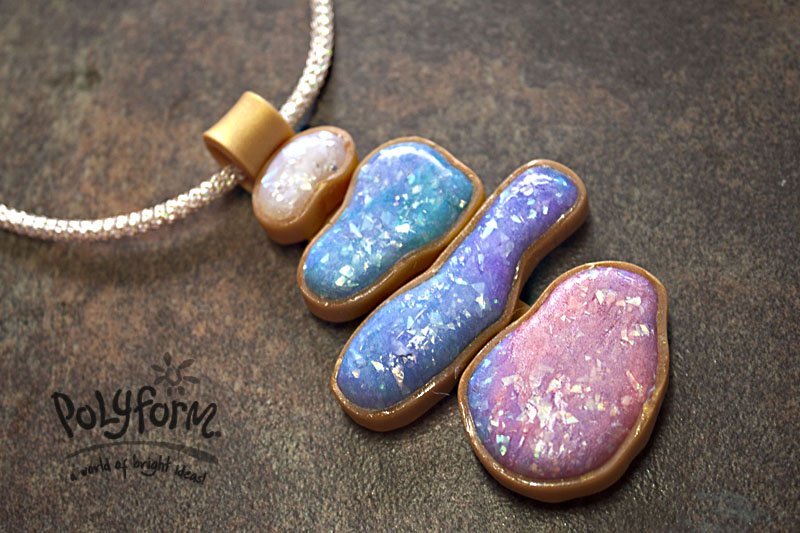
premo! Accents Watercolor Faux Opal Pendant
premo! Accents Watercolor Faux Opal Pendant
Read More
designed by syndee holt
The new Opal and Sunset Pearl clays team up with other Premo! Accents Pearls to create a dramatic set of watercolor opals.
A set of Sculpey Oval Cutters are bent with pliers to create a whole new set of custom shapes!
Read Less
ADDITIONAL SUPPLIES
Candy or deli paper, Pendant cording, Closure findings, jewelry pliers, Small soft brush, small bowl with ice water, small sheet of aluminum foil|Candy or deli paper, Pendant cording, Closure findings, jewelry pliers, Small soft brush, small bowl with ice water, small sheet of aluminum foil

Project Instructions
Getting StartedPolymer clay may stain. CLAY MAY DAMAGE UNPROTECTED FURNITURE OR FINISHED SURFACES. DO NOT USE polymer clay on unprotected surfaces. We recommend working plain paper, wax paper, metal baking sheet, or disposable foil. Start with clean hands and work surface area. Knead clay until soft and smooth. For best results, clean your hands in between colors. Shape clay, pressing pieces together firmly. Bake on oven-proof glass or metal surface at 275 °F (130 °C) for 15 minutes per ¼" (6 mm) thickness. For best baking results, use an oven thermometer. DO NOT USE MICROWAVE OVEN. DO NOT EXCEED THE ABOVE TEMPERATURE OR RECOMMENDED BAKING TIME. Wash hands after use. Baking should be completed by an adult. Begin by preheating oven to 275 °F (130 °C). Test temperature with oven thermometer for perfectly cured clay. For best results, condition all clay by running it through the clay dedicated pasta machine several passes on the widest setting. Fold the clay in half after each pass and insert the fold side into the rollers first.
Cut or break off 1/3 package of the Premo! Accents Opal and mix a small (large pea size) amount of Premo! Accents Purple Pearl with it by rolling both through the clay conditioning machine, set on the #1 setting. The Purple Pearl does NOT have to be mixed thoroughly. Repeat with the other two remaining colors. Break off pieces of each color and partially blend with each other to create a water color effect.

Use the jewelry pliers to bend the nested oval cutters to more organic shapes. Bend the cutting side of the cutter ONLY. Set aside.

Roll another 1/3 package of Opal through the #1 setting on the clay conditioning machine and fold in half to make two layers. Add a portion of the mixed color on top of this. NOTE: All these are cut using three #1 layers of clay. Lay a sheet of the candy paper on top, position the selected cutter for the area you want to use. Press the cutter firmly down. The candy paper will pull the top edge of the clay down slightly making a more rounded top edge. Remove the cutter and the candy paper. Use the craft knife to help remove the cut piece of clay from the rest of the stack of clay. You can peel those bottom two layers off (and reuse) if you are not going to cut anymore “stones” from this particular color mix.

Repeat Step 3 for four different size cutters and color mixes. Make sure to always have three #1 layers and to put the candy paper down BEFORE the cutter! Place your new “stones” into your design as you work.

Roll 1/3 of 18k Gold out on the #4 setting of the clay conditioning machine to create a sheet of clay at least three inches long. Use the long edge of the Super Slicer blade to cut a strip of clay that is roughly 1/4 inch wide. Wrap this strip of clay around the edge of each of the “stones”, lining the strip up with the back edge of the “stone”. Overlap the edges and then trim the edges and blend the seam with your finger (I use the flat upper portion of my fingernail). Repeat for all the new “stones”.

Cut a strip of 18k Gold clay a little under ½ wide by 3 inches. Roll one end up to create the bail. Position each of the stones onto the strip and press lightly into place, using a drop of Translucent Liquid Sculpey to adhere them securely to the strip.

Using the aluminum foil, tent the opal clay to keep it as light as possible. Bake the clay according to the directions above. Once the clay is baked, IMMEDIATELY remove it from the oven and dump it into the bowl of ice water. This shocks the clay and creates an even more translucent effect. Remove the clay after about 10 minutes and use a small piece of the 800 grit sandpaper to lightly sand the top surfaces to remove any bits of the opal glitter sticking out of the clay. NOTE: The sandpaper and the clay should both be wet!
Dry the clay thoroughly and apply several light coats of Sculpey Gloss Glaze. Allow the glaze to dry and string the pendant!


