Liquid Sculpey Dream Catcher
Liquid Sculpey Dream Catcher
Read More
The Liquid Sculpey clays combine to create this lovely little dream catcher.
Design by Teresa Salgado
Read Less
ADDITIONAL SUPPLIES
Squeegee (I used the one from my Sculpey Clay Silk Screen Kit); Drill – Hand or Power; Round lacey silicone mold; Can-larger diameter than the mold; Hemp cord; Assorted wooden beads; Soft, thin wire; Feathers

Project Instructions
Liquid Bakeable MediumGetting started:
Please make sure your work area is covered and you are not working on an unprotected surface. We recommend working on the Sculpey® Work ‘n Bake Clay Mat, wax paper, metal baking sheet, or disposable foil. Uncured Liquid Bakable Medium may damage unprotected furniture or finished surfaces. Be sure to cover your crafting area appropriately.
-Gently stir the bottle of liquid bakeable medium.-Wash hands after use (we have found that baby wipes work best) Baking
-It is important to use oven thermometer when you bake the liquids so that you can ensure your oven is at the correct temperature. -Do not microwave the liquids. They must be baked in a Preheated oven at 300 ºF (149 ºC) for liquid colors and 325 ºF (163 ºC) for Clear – Do not exceed baking temperatures. -If you are using the liquids as a glaze or in thin pieces less than ¼ inch bake for 15 minutes. For thicker pieces that are ¼ or above bake for 30 minutes. -If you are baking on a ceramic tile then you will also need to bake at 30 minutes since it will take longer for the tile to heat up. This will ensure the proper fusing of the liquid material. -When baking these liquids you may experience some vapors or a slight odor. This is not harmful and will not affect your creation. -If your liquid project has become yellowed or discolored in the oven, when you remake it, tent it by placing either – folding an index card in half and placing your project under it or by using aluminum foil over your project.
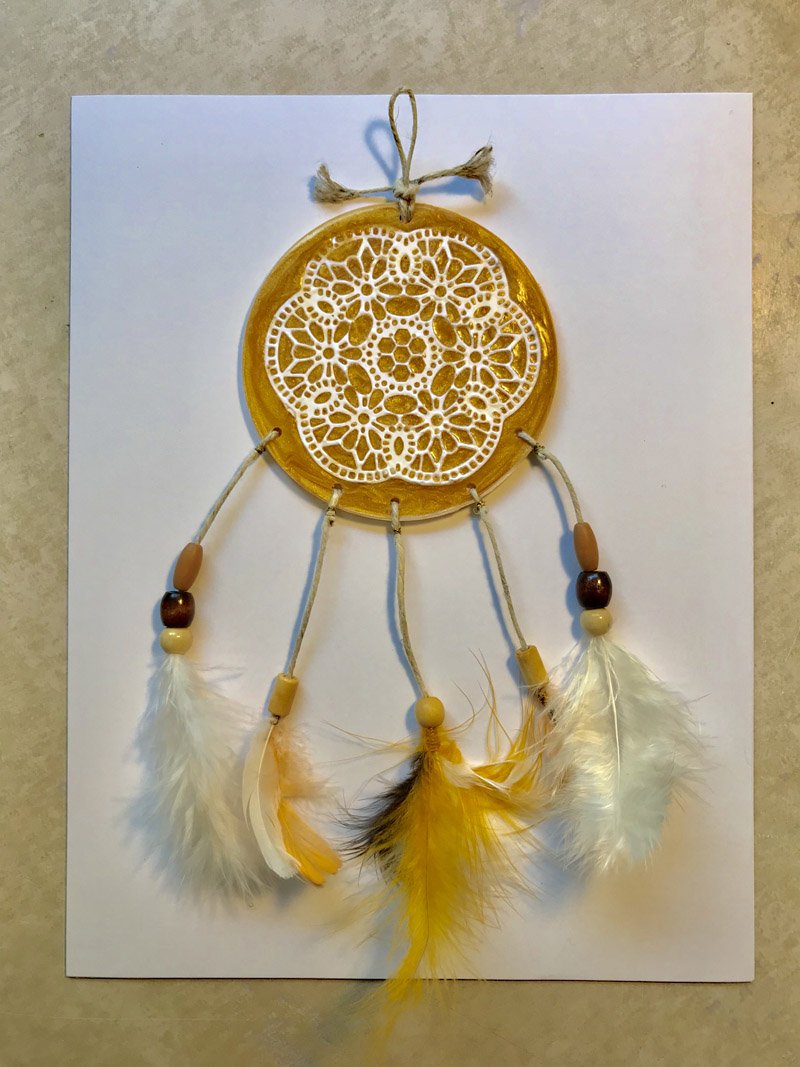
Pour a small amount of Sculpey Liquid Bakeable White into the silicone mold. Scrape off excess with a squeegee. Bake completely according to the directions above and CAREFULLY de-mold.


To make the center medallion, pour about half Sculpey Liquid Bakeable Gold and half Clear into the top of a can. Stir it up and pop any bubbles. Leave a little bit of room at the top. Place the white lacey piece in the center of the gold. Bake according to the directions above.

While the clay is baking: Gather your feathers, beads and hemp cord. Arrange the feathers on the cord, add a dab of superglue, dry, then wrap with wire.

Cool medallion and drill six holes, one at the center top and five across the bottom. Tie on hanging loop and shred the ends of the hemp.

Add beads to the hemp and attach the feathers to the medallion, wrapping with wire and trimming hemp as shown.

Isn’t that cute? Now that you’ve done it once, be sure to make more!