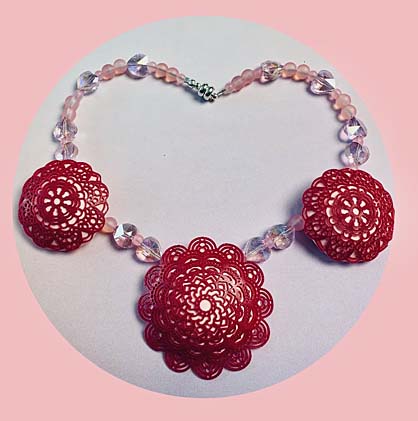
Liquid Sculpey® Crystal & Lace Princess Necklace
Liquid Sculpey® Crystal & Lace Princess Necklace
Designed by Teresa Pandora Salgado
Read More
Read Less
Make this sparkling necklace for your favorite little princess using a combination of Sculpey Premo™ and
Liquid Sculpey®.
TIME TO COMPLETION: 60 minutes including assembling
ADDITIONAL SUPPLIES
- Toothpicks
- Pennies

Project Instructions
Please make sure your work area is covered and you are not working on an unprotected surface. We recommend working on the Sculpey® Oven Safe Work Mat, wax paper, metal baking sheet, or disposable foil. Uncured Liquid Polymer Clay may damage unprotected furniture or finished surfaces. Be sure to cover your crafting area appropriately.
Getting Started with Premo Clay:
Start with clean hands, unwrap and knead clay until soft and smooth, or condition by running clay though a Pasta Machine. We recommend using a designated machine for clay purposes only. When working with multiple colors, clean hands with soap and water or baby wipes (we have found that baby wipes work best) before switching colors. Shape clay, pressing pieces firmly together. Wash hands after use.
Getting Started with Liquid Sculpey
Stir Liquid Sculpey® completely. Thin with Sculpey® Liquid Clay Softener as needed - Wash hands after use (we have found that baby wipes work best) .
Getting Started with Premo Clay:
Start with clean hands, unwrap and knead clay until soft and smooth, or condition by running clay though a Pasta Machine. We recommend using a designated machine for clay purposes only. When working with multiple colors, clean hands with soap and water or baby wipes (we have found that baby wipes work best) before switching colors. Shape clay, pressing pieces firmly together. Wash hands after use.
- Baking:
Getting Started with Liquid Sculpey
Stir Liquid Sculpey® completely. Thin with Sculpey® Liquid Clay Softener as needed - Wash hands after use (we have found that baby wipes work best) .
- Baking:
Make Liquid Sculpey® Garnet Metallic Mandalas. Stir the bottle of Liquid Sculpey and squeeze a small amount onto the mold. Use the scraper provided with the mold to clean off the upper surfaces of the mold before baking. Bake for 15 minutes at 275 ºF. Cool and remove.

Place the completed mandalas on the convex side of the Hollow Bead Maker. Place pennies in the center. Bake again for 15 minutes. Cool and remove.

Make a sheet of Premo Rose Quartz on the number 1 setting. Make another sheet on the #3 setting. From the #1 sheet, cut out one 1.75” circle, two 1.5” circles, and two 1’circles. From the #3 sheet, cut out 5 circles with the .75” cutter. Use the mini round cutter to cut two sides from the tops of the .75” circles as shown.

Place the thicker circles into the concave side of the Hollow Bead Maker. Add a small amount of Bake n’Bond to the edges of the thinner, cut out circles. Gently press them onto the back of the domes with your Ball Stylus. Put toothpicks thru the stringing loops as shown. Bake for 30 minutes at 275F. Cool and remove.

Apply Liquid Clear Sculpey thinly and smoothly to the domes and press the rounded mandalas over firmly. Wipe off any excess. Place in the concave side and bake for 15 minutes. Cool.

I strung this one with frosted beads, crystal hearts, and a magnetic safety clasp. My little princess loves it.

