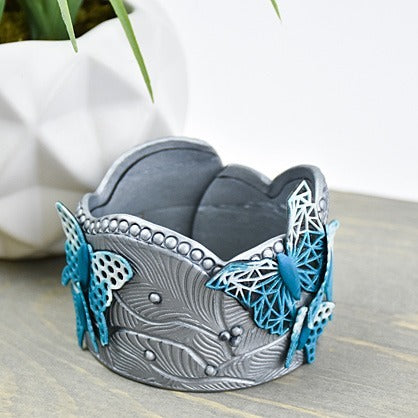
Liquid Sculpey® and Premo Sculpey® Butterfly Landing Cuff
Liquid Sculpey® and Premo Sculpey® Butterfly Landing Cuff
Designed by Amy Koranek
Read More
Read Less
Liquid Sculpey® and Premo Sculpey® team up to help you create this gorgeous one-of-a-kind cuff bracelet.
TIME TO COMPLETE: 60 minutes plus baking
ADDITIONAL SUPPLIES
- Scissors
- Circle or oval shaped cookie cutter to be used as cuff form - should fit comfortably over your wrist
- Knitting needle

Project Instructions
- Getting Started:
- Baking:
Fill the tips of the butterfly wings with Pearl Liquid Sculpey® (LS). Fill the bottoms of the wings and the bodies with Peacock Pearl LS.

Use the squeegee to push the liquids into all the details allowing the colors to mix slightly. Squeegee off excess. Bake the butterfly mold following the baking instructions for LS.

Allow the mold to cool completely but don’t release the butterflies. Squirt Black LS on the backs of each butterfly while they are still in the mold. Use your fingertip to spread the Black evenly over the backs. Don’t worry about neat edges right now.

Bake the mold again following the baking instructions for LS. When the mold is completely cool gently flex it to remove the pieces. Trim around each butterfly with sharp scissors leaving a tiny border of Black around each. Set the butterflies aside for now

Sheet Silver Premo through the clay conditioning machine on the thickest setting. Reduce the setting to the second thickest and sheet again. We need a double thickness of this setting that is long enough to wrap around the cutter shape.

Texture the clay as deeply as possible with the texture sheet. The texture I’m using is repeatable so I’m lining it us as best as I can and texturing the length three times to make a continuous pattern.

Trim along the top edge with the knife attachment in the 5-in-1 Clay Tool to make a nice rolling edge. Trim the bottom edge straight with the Super Slicer.

Smooth the top and bottom edges with your fingertips to remove the cut look. Flex the Super Slicer and trim the short ends to a nice curved shape. Smooth these edges as well. Exaggerate some of the lines in the texture pattern with the 2mm Ball Tool.

Roll a rope of Silver Premo that is as thick as the clay sheet. Apply the rope to the top rolling edge.

Texture the rope edge with divots using the Small Etch ‘n Pearl.

Bend the clay around the cutter shape to make the form of a cuff bracelet. Leave a small gap at the back. You can trim the clay as needed or stretch it slightly to achieve this gap.

Next press the butterflies into place using a knitting needle. The knitting needle allows you to just place pressure on the body area as you push the butterfly into the base clay. Then the wings will lift slightly giving them a more flighty appearance. Position the butterflies so they overlap slightly and look free style.

Add little pearls with the small Etch ‘n Pearl tool in Silver Premo. Add body shapes in Peacock Pearl Premo. Pinch a ridge along the body as you push it into place.

Bake the bracelet on the form following the baking instructions for Premo. Make sure your oven temperature is reset to 275F for Premo. Allow the bracelet to cool completely. Then gently flex the bracelet off of the cutter by squeezing the cutter gently.


