
Sculpey Bake Shop® Bendy Butterfly
Sculpey Bake Shop® Bendy Butterfly
Designed by Phoebe Doehring
Read More
Read Less
Sculpey Bake Shop® Bendy is the perfect clay to create your new little "flutter friend"!
TIME TO COMPLETION: 45 minutes
ADDITIONAL SUPPLIES
- Toothpick
- Acrylic Paints: Black, White
- Paintbrush
Project Instructions
- Getting Started:
Start with clean hands, unwrap and knead clay until soft and smooth, or condition by running clay though a Pasta Machine. We recommend using a designated machine for clay purposes only. When working with multiple colors, clean hands with soap and water or baby wipes (we have found that baby wipes work best) before switching colors. Shape clay, pressing pieces firmly together. Wash hands after use.
- Baking:
Condition 1/4 of the bar of Black clay. Roll a small snake approximately 1” long and 1/4” thick. Roll and point one end.
Roll a small pinky nail size ball for the head. Pinch and shape little antennae. Use your clay knife and make a happy mouth. Press the head on top of the body and set aside.
Roll two nickel sized balls of Red clay.
Roll two dime sized balls of Yellow clay.
Roll a small pinky nail size ball for the head. Pinch and shape little antennae. Use your clay knife and make a happy mouth. Press the head on top of the body and set aside.
Roll two nickel sized balls of Red clay.
Roll two dime sized balls of Yellow clay.

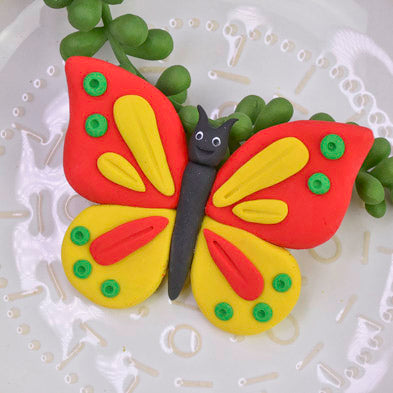
Shape the Red balls into teardrop shapes. Flatten until they are 1/8 to 1/4” thick. Keep them rounded or create pointed tipped wings as shown on this butterfly.
Do the same with the Yellow balls but keep them round and teardrop shaped.
Do the same with the Yellow balls but keep them round and teardrop shaped.

Place the butterfly body onto your baking tile or sheet. Press the wings onto the size of the body. Red on top Yellow on the bottom.
Make little teardrop shapes in Yellow to decorate the wings. 2 larger, 2 smaller. Press them flat onto the wings.
Make two little Red teardrop shapes and press these on to either of the bottom Yellow wings.
Roll 10 little balls of Green clay. Press two up in the corner of each Red wing. Press 3 along the bottom curve of each yellow wing.
Using your toothpick press a little dot in the center of each Green spot.
Make lines down the center of all the teardrop shapes decorating the wings.

Bake according to the package directions. Allow to cool.
Use your acrylic paints and paint tiny eyes on the butterfly.
Use your acrylic paints and paint tiny eyes on the butterfly.
