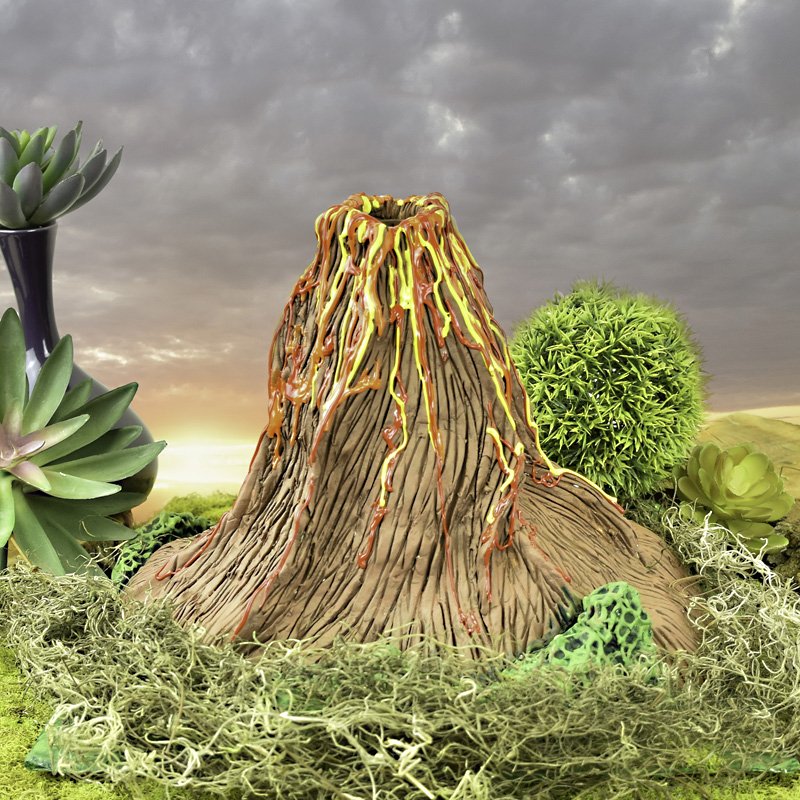
Sculpey Air-Dry™ Volcano for School Project or Rainy Afternoon
Sculpey Air-Dry™ Volcano for School Project or Rainy Afternoon
Designed by Amy Koranek
Read More
Read Less
Sculpey Air-Dry™ makes a school project or rainy afternoon project super easy and fun to create a tabletop model of a volcano.
COMPLETION TIME: 2.5 hours not including drying time for clay or paint. This volcano is quite large considering it needs to hold a plastic bottle inside to make it erupt. When scheduling your model’s completion, we would suggest making sure you have at least three days for it to dry completely.
ADDITIONAL SUPPLIES
- Empty 12oz plastic bottle
- Cardboard base
- Masking tape
- Aluminum foil
- Bubble wrap or other filler material
- Acrylic paint in dark brown, light brown, dark green, and bright green
- Paintbrush
- Puffy paint in red, yellow, and orange

Project Instructions
Getting Started:Surface: For the best results in sculpting and crafting with air dry clay, plan to work with a smooth, well-cleaned, non-porous surface. Amount: Because the clay is made to air-dry, try to open only what you need at the time and leave the rest still wrapped or sealed and stored. Pinch or cut off the amount you need and take more out as you go, even for larger projects.Working: Knead your clay before you begin shaping it for your creations. Our polymer clay is already soft and pliable, but warming the clay with your hands is a good practice to spread the substance, condition the material and get a feel for what you’re working with. Shaping: You can use a combination of your hands, crafting tools and multimedia materials to shape your clay into the design you desire, create unique patterns and textures and incorporate mixed media elements. Remember: you can create anything you can imagine! Just make sure the finished product is exactly what you want before allowing it to dry. Drying: Lay or stand your air dry clay projects on a nonporous surface with a clean and smooth finish in an area with low humidity. Let the projects remain untouched and undisturbed for about 24 hours to ensure complete hardening. Designer’s Note: This volcano is quite large considering it needs to hold a plastic bottle inside to make it erupt. When scheduling your model’s completion, I would suggest making sure you have at least three days for it to dry completely.
To make your own volcano you will need a cardboard base, masking tape, an empty clean 12 oz plastic bottle, and some aluminum foil. You might also want to use some bubble wrap to help build up the sides of the volcano. Cover the edges of the cardboard base with masking tape.

Tape the bottle to the center of the cardboard with masking tape.

Surround the bottom of the bottle with bubble wrap or crumpled aluminum foil. This is to bulk out the base of the volcano to use less of the clay. Tape the bubble wrap or the aluminum foil into place with the masking tape.

Surround the bottom of the bottle with bubble wrap or crumpled aluminum foil. This is to bulk out the base of the volcano to use less of the clay. Tape the bubble wrap or the aluminum foil into place with the masking tape.

Add layers of aluminum foil next to refine the shape of the sloping sides. Secure the foil with masking tape as well.

Open the first package of air dry clay. Break off a large piece and knead it with your hands. Shape it into a piece that can wrap around the top of the bottle. Smooth the clay into place and smooth the seam where it wraps around and touches itself.

Keep kneading more pieces of Model Air and applying them to the sides of the volcano. Keep the layers of Model Air to at least 1/8” thick. Smooth seams with your fingertips as you go. If you need to make the clay more moist, you can dip your fingertips in water and rub it onto the clay.

At the base of the volcano, add large lumps of clay that will look like the tops of trees. Open the second package of air dry clay if needed.

Add thick ropes of clay to the volcano and pinch them up into ridges. If you have extra Model Air clay, wrap it up tightly and secure it so that it doesn’t dry out.

Use a pointed tool like the needle tool or a toothpick to score lines in the sides of the volcano. Make the lines run up and down the sides randomly.

Use the ball tool to texture the treetops.

Allow the volcano to dry completely. You will know it is completely dry when the clay is no longer cold to the touch. It will take at least 24 hours to dry completely.

When the clay is completely dry, and no longer feels cool to the touch you can paint it. Begin by painting the sides of the volcano in a dark brown. Make sure all of the crevices are covered with the dark brown paint and that no white is showing.

Paint the trees and the cardboard base with dark green paint.

Dry brush a layer of lighter brown paint all over the volcano. When you dry brush, make sure the paintbrush is not overly filled with paint and just try to apply paint to the raised surfaces.

Dry brush a layer of brighter green paint over the raised surfaces of the foliage. Dab bright green paint over the base as well.

Allow the acrylic paint to dry completely. To make lava, drip yellow puffy paint down the sides of the volcano from the mouth.

Add orange and red drips of puffy paint next. Allow the puffy paint to dry completely.

When your volcano is complete, you can fill the bottle with your favorite lava-making ingredients and watch it erupt.
