Sculpey Air-Dry™ Bug Impression Ornament or Tag
Sculpey Air-Dry™ Bug Impression Ornament or Tag
Designed by Amy Koranek
Read More
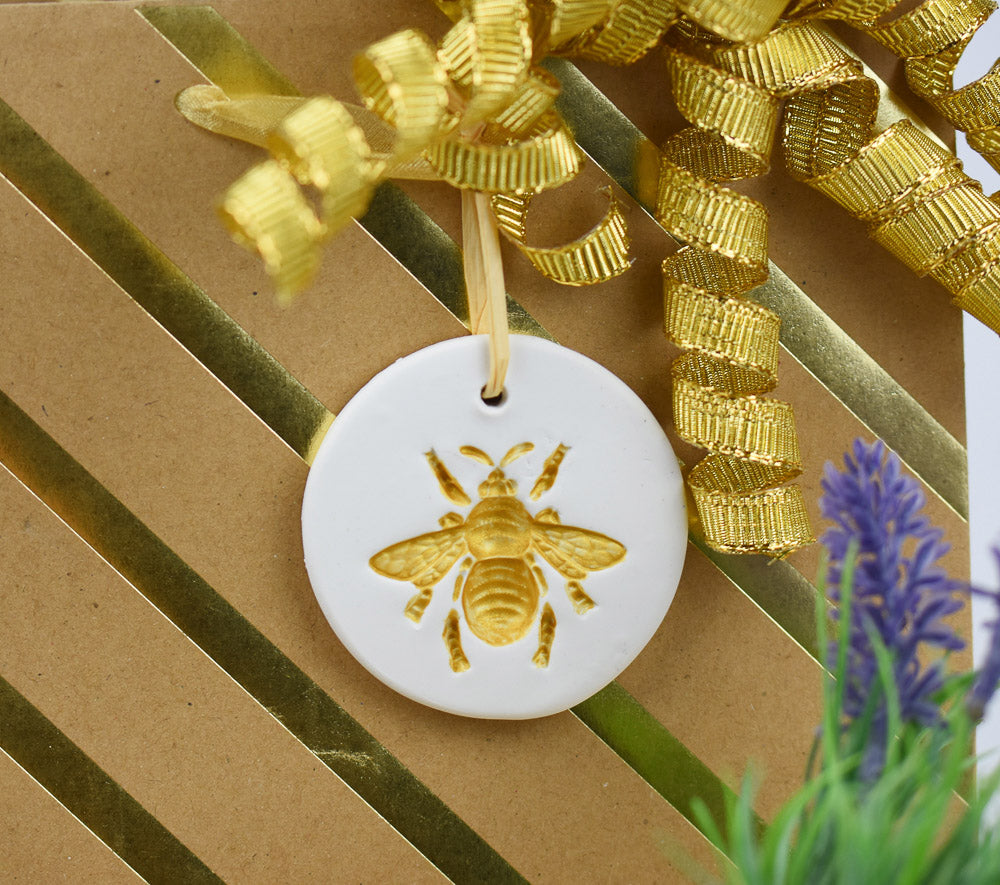
You can make an impression with just about anything in our Air-Dry™ clay. Make up some fun and personal decorations to hang on the tree or use as gift tags in any season.
COMPLETION TIME:
15 Minutes plus drying time - recommended that you let each piece dry overnight before finishing.
Read Less
ADDITIONAL SUPPLIES
- Clear kitchen wrap or zip lock storage bag
- Water basin
- 5” Metal circle cutter
- Something to impress into the clay - I’m using a bumble bee metal drawer pull because it’s cute and it has lots of detail.
- Craftsmart Yellow Gold Premium Matte Metallic acrylic paint
- Paintbrush
- 9” Coordinating ribbon or raffia for each tag
- Scissors

Project Instructions
Getting Started with Air Dry Clay:
Surface: For the best results in sculpting and crafting with air dry clay, plan to work with a smooth, well-cleaned, non-porous surface.
Amount: Because the clay is made to air-dry, try to open only what you need at the time and leave the rest still wrapped or sealed and stored. Pinch or cut off the amount you need and take more out as you go, even for larger projects.
Working: Knead your clay before you begin shaping it for your creations. Our clay is already soft and pliable but warming the clay with your hands is a good practice to spread the substance, condition the material and get a feel for what you’re working with.
Shaping: You can use a combination of your hands, crafting tools and multimedia materials to shape your clay into the design you desire, create unique patterns and textures and incorporate mixed media elements. Remember: you can create anything you can imagine! Just make sure the finished product is exactly what you want before allowing it to dry. Keep a shallow dish of water on hand in case you need to make an area softer or use water to help joint pieces together at the seam.
Drying: Lay or stand your air dry clay projects on a nonporous surface with a clean and smooth finish in an area with low humidity. Let the projects remain untouched and undisturbed for about 24 hours to ensure complete hardening.
Slice or pinch off just enough clay from the bar of Sculpey® Air Dry™. You will need a piece large enough to make about a 3” square 1/4” thick. Replace the rest of the Air Dry™ in an air tight baggie for later use.
Hand condition the clay and then roll it out flat with the Acrylic Clay Roller. You want your slab to be thick enough to receive whatever item you are impressing. My drawer pull of the bumble bee is deep so my slab is about 1/4” thick.
Hand condition the clay and then roll it out flat with the Acrylic Clay Roller. You want your slab to be thick enough to receive whatever item you are impressing. My drawer pull of the bumble bee is deep so my slab is about 1/4” thick.

Impress the bumble bee (or other image) into the clay making sure to capture all the details.
Carefully remove impression item
Carefully remove impression item

Line up the circle cutter to look nice around the impressed image. Make sure to leave some room around the outer rim where you will want to poke a hole.
Replace the unused clay into storage with the remainder of the bar of Air Dry™.
Replace the unused clay into storage with the remainder of the bar of Air Dry™.

Poke a hole using the Blunt Point Tool leaving at least a 1/8” border from the edge so the dried piece will be strong enough to support itself.
Allow the clay piece to dry overnight. For flat items like this, I check on them every 4-6 hours. If the clay piece appears to be bending or warping during drying, I gently flip it over to counter the bend and help it flatten back out.
Allow the clay piece to dry overnight. For flat items like this, I check on them every 4-6 hours. If the clay piece appears to be bending or warping during drying, I gently flip it over to counter the bend and help it flatten back out.

Once the piece is completely dry, use gold paint and a detail paintbrush to fill in the image. Allow the paint to dry before handling.

Add a coordinating ribbon to finish it off. Tie an overhand knot and trim with scissors.
