Skip to product information
1 of 2

Sculpey Premo™ "Join the Trend" Lamp Bases

Sculpey Premo™ "Join the Trend" Lamp Bases

Designed by Ferne Atelier
Read More
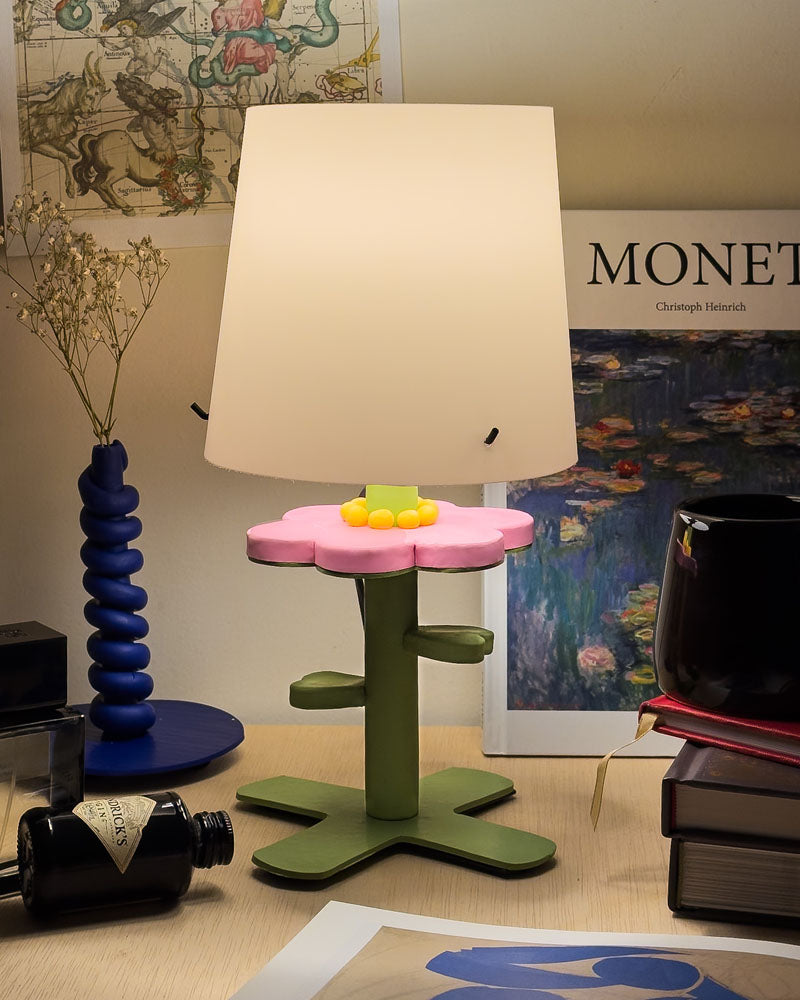
In love with the trending Memphis Milano Revival look on Instagram and Tiktok lately? All the lovely statement furniture and decor are a must have! So, let's take these bright and boldly coloured everyday objects, scale it down and make our very own dupe the trend lamp.
Read Less
ADDITIONAL SUPPLIES
  • Ikea Barlast lamp
  • Bulb (sold separately from lamp)
  • Large cutter for the base (or freehand cut)
  • Parchment paper/baking sheet
View full details
Project Instructions

Step 1

Getting Started:

Please make sure your work area is covered and you are not working on an unprotected surface. We recommend working on the Sculpey® Oven-Safe Work Mat, wax paper, metal baking sheet, or disposable foil. Uncured clay may damage unprotected furniture or finished surfaces. Be sure to cover your crafting area appropriately.

Start with clean hands, unwrap and knead clay until soft and smooth, or condition by running clay though a Pasta Machine. We recommend using a designated machine for clay purposes only. When working with multiple colors, clean hands with soap and water or baby wipes (we have found that baby wipes work best) before switching colors. Shape clay, pressing pieces firmly together. Wash hands after use.

Baking (also called Curing):

Begin by preheating oven to 275 °F (130 °C). After you are done creating; for best
results bake/cure clay on an oven-proof surface such metal, aluminum foil, an
index card or the Sculpey® Clay Mat at 275°F (130 °C) for 30 minutes per
1/4" (6 mm) thickness according to package directions. Oven safe glass or
ceramic surfaces are also acceptable for baking/curing; however please note
that the baking/curing times may take longer as the glass or ceramic surfaces
take longer to heat up. For best baking results, use an oven thermometer. DO
NOT USE MICROWAVE OVEN. DO NOT EXCEED THE ABOVE TEMPERATURE OR RECOMMENDED BAKING TIME.

Step 2

Making the base

Roll a sheet of clay approximately 5-8 mm thick, cut out a circle for the base.

Step 3

Step 3 (optional)

Adding some ‘weights’ to the base

The Barlast Lamp comes with an overlapping cross metal base, if you would like to keep that in the design for extra stability, cut a circle larger than the cross; alternatively you can do away with the metal cross, but you will need a thicker clay base to ensure the lamp does not topple.

Don’t forget to make a cutout in the middle of the base for the base screw of the lamp that will connect to the barrel/stem (parts pictured in the top right hand corner )

Step 4

Making the stem of the lamp

Wrap a layer of parchment/baking sheet over the metal barrel(stem) that comes with the Barlast Lamp.


This ensures that the clay will not adhere
to the metal but simply take the shape of the barrel, leave the excess at the
ends for easier removal after baking.


I’ve decided to make it this way so that it
can be disassembled and you can always change out the design, but that’s
entirely up to you! If you want to have it fixed, just skip the parchment step
and make the base and stem together!

Step 5

Roll a sheet of clay approximately 2-4 mm thick, and wrap the clay around the parchment covered barrel.

Step 6

Roll a thick rope about 3-4 times the length of the stem.

*Tip: longer rope gives you more room to play with, you can always trim the excess, but it is difficult to add on the rope if it is too short*

Step 7

The fun part!

Coil the rope along the stem so that it spirals at an angle. Press lightly to ensure that the rope adheres properly to the clay sheet on the stem.

Step 8

 Baking method

 To ensure the spiral maintains its form without flattening, insert a thin rod like a bamboo skewer or wooden dowels through the metal barrel and suspend the coiled stem with some scrap clay (as in the picture).


Bake according to the instructions on the
packaging and bear in mind the thickness of the clay.

Step 9

After removing the parchment from the barrel, reinsert the barrel in the coiled stem and you’re ready to assemble the parts!
Simply screw on the barrel to the base, followed by the bulb holder on the other end of the barrel.

Step 10

Then insert the pins to the holder (follow the instructions on the Barlast Lamp manual).

Step 11

And you’re done! A brand new lamp design for your home / studio space.

Step 12

Alternative use?

A plant holder maybe? Or something purely for decor.

Step 13

Try it with other styles too! 

For the flower design, I traced the shape of the cross-metal base from the Barlast
Lamp
so that it’s slightly wider (about 5mm around) to hide the metal parts.

Then comes the stem of the lamp. I wrapped a layer of parchment over the metal barrel(stem) that comes with the lamp, then wrapped a thick layer of clay around this.

Shape the clay into leaf shapes and attach to the stem, I used the Sculpey Oven Bake Adhesive (formerly called Bake n' Bond) to help adhere the parts, but you can also sculpt them in before baking.


The flower part is quite large so I decided
to make it hollow, just cut out two of the same shaped flowers, and then cut
out the circumference of the stem in the middle and bake them on a flat tile,
and then join both parts using strips in the same colour and adhere with bake
and bond.


Once all the parts are baked, it’s time to
assemble!

Step 14

This also makes an adorable flower holder!