Skip to product information
1 of 1

Sculpey III® Heishi Bead Keychain

Sculpey III® Heishi Bead Keychain

Designed by Amy Koranek
Read More
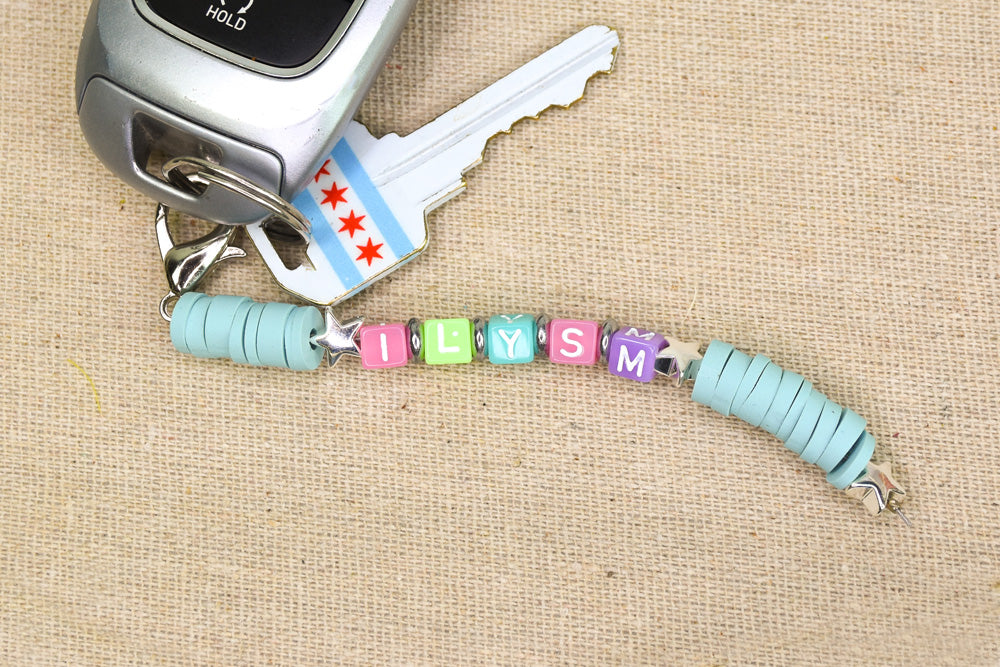
Wow! You can create this super cool keychain in just about an hour adding metal and alphabet beads to glam it up. COMPLETION TIME: 60 Minutes to make, bake, and assemble
Read Less
ADDITIONAL SUPPLIES
  • If you don’t have Etch ‘n’ Pearl tools you can use a thick wire to make Heishi beads,
  • 12” Bead stringing wire
  • Lobster claw clasp
  • Crimp beads (2)
  • Metal star shaped beads (3)
  • Metal disc spacer beads (4)
  • Alphabet beads
  • Scissors
  • Ruler
  • Flat nose pliers
View full details
Project Instructions

Step 1

Getting Started:

Please make sure your work area is covered and you are not working on an unprotected surface. We recommend working on the Sculpey® Oven-Safe Work Mat, wax paper, metal baking sheet, or disposable foil. Uncured clay may damage unprotected furniture or finished surfaces. Be sure to cover your crafting area appropriately.

Start with clean hands, unwrap and knead clay until soft and smooth, or condition by running clay though a Pasta Machine. We recommend using a designated machine for clay purposes only. When working with multiple colors, clean hands with soap and water or baby wipes (we have found that baby wipes work best) before switching colors. Shape clay, pressing pieces firmly together. Wash hands after use.

Baking (also called Curing):

Begin by preheating oven to 275 °F (130 °C). After you are done creating; for best results bake/cure clay on an oven-proof surface such metal, aluminum foil, an index card or the Sculpey® Clay Mat at 275°F (130 °C) for 15 minutes per 1/4" (6
mm) thickness according to package directions. Oven safe glass or ceramic
surfaces are also acceptable for baking/curing; however please note that the
baking/curing times may take longer as the glass or ceramic surfaces take
longer to heat up. For best baking results, use an oven thermometer. DO NOT USE
MICROWAVE OVEN. DO NOT EXCEED THE ABOVE TEMPERATURE OR RECOMMENDED BAKING TIME.

Step 2

Heishi beads are super easy to make and they can made with a hole already drilled through them. Another tip is to pre-bake the clay before slicing them into beads so that they are very clean edged and evenly sized. They can also be made in a myriad of sizes.

Begin with 1/8 bar of Aqua SIII®. Roll it into a fat little log.

Step 3

Thread the clay log onto a Small Etch ‘n’ Pearl tool. The thickness of the Etch ‘n’ Pearl will dictate the size of the hole in the finished beads. By selecting the size of the tool you can directly make the size of pre-drilled holes in the beads in whatever size is required. You can also adjust the hole size by using a straight thick wire if you don’t have the E’n’P Tools.

Step 4

Gently roll the clay while on the tool or wire until the clay is the thickness desired and is also even in thickness throughout. The one in the photo is approximately 1/4” in diameter.

Bake the clay on the tool or wire.

Step 5

When the clay is completely cool, it can be sliced. With the clay still on the tool or wire, cut through it with a Clay Blade while rolling the clay on the work surface. The rolling motion will allow you to cut down to the tool or wire evenly. Start by removing the wonky ends of the clay.

Step 6

Use the rolling cut technique to make Heishi beads. When done remove them from the tool or wire.

Step 7

Layout the findings, beads, alphabet beads, and Heishi beads in order.

Cut a piece of stranded beading wire long enough to string the bead design x 2.

Step 8

Thread the lobster claw to the center of the bead wire to the center. Secure the lobster clay in place with a crimp bead. String the crimp bead onto both wires, snug it to the clasp, and flatten it into place by smashing it with flat nose pliers.

Step 9

String the beads in desired order. I chose the letters I L Y S M to make the abbreviated message, “I Love You So Much”.

At the end of the design add another crimp bead to hold all the beads together tightly. Smash with flat nose pliers to secure.

Step 10

Trim the tails ends of the wire with scissors.