Skip to product information
1 of 1

Sculpey Air-Dry™ Rustic Ornament

Sculpey Air-Dry™ Rustic Ornament

Designed by Amy Koranek
Read More
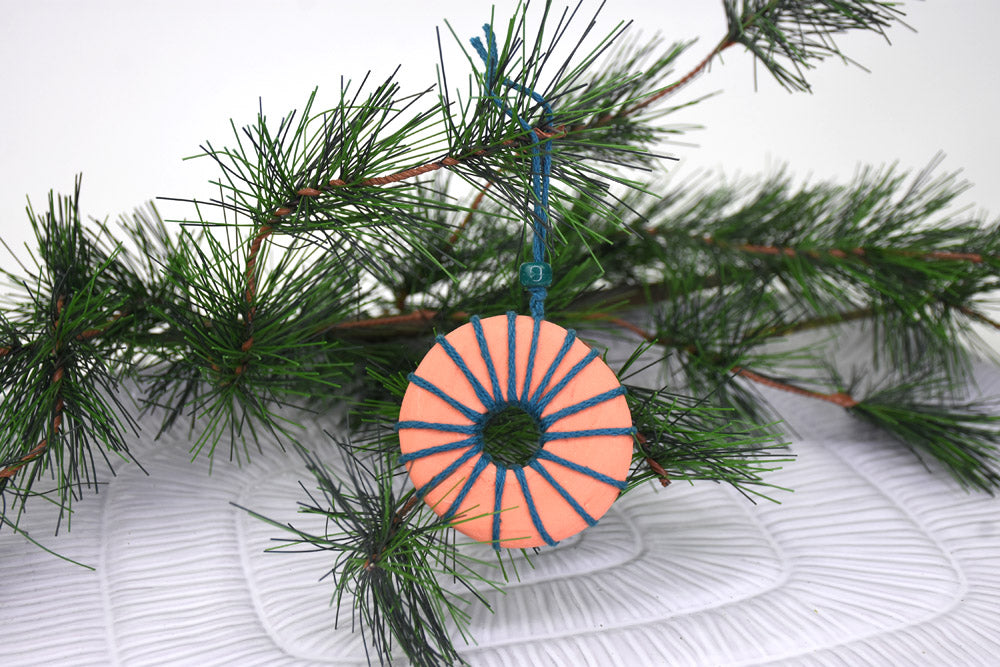
Adapt this tutorial to make different shapes and styles of sewn ornaments. Use yarn, floss, or cord to change the look and style of your finished pieces. These make great planter ornaments, even gift name tags! COMPLETION TIME: 30 Minutes plus drying time - recommended that you let each ornament dry overnight before finishing.
Read Less
ADDITIONAL SUPPLIES
  • Clear kitchen wrap or zip lock storage bag
  • Water basin
  • 2” Metal circle cutter or 2” square cutter
  • Coordinating cord, floss, or yarn
  • Scissors
View full details
Project Instructions

Step 1

Getting Started:

Surface:

For the best results in sculpting and crafting with air dry clay, plan to work with a smooth, well-cleaned, non-porous surface.

Amount:

Because the clay is made to air-dry, try to open only what you need at the time and leave the rest still wrapped or sealed and stored. Pinch or cut off the amount you need and take more out as you go, even for larger projects.

Working:

Knead your clay before you begin shaping it for your creations. Our polymer clay is already soft and pliable, but warming the clay with your hands is a good practice to spread the substance, condition the material and get a feel for what you’re working with.

Shaping:

You can use a combination of your hands, crafting tools and multimedia materials to shape your clay into the design you desire, create unique patterns and textures and incorporate mixed media elements. Remember: you can create anything you can imagine! Just make sure the finished product is exactly what you want before allowing it to dry.

Drying:

Lay or stand your air dry clay projects on a nonporous surface with a clean and smooth finish in an area with low humidity. Let the projects remain untouched and
undisturbed for about 24 hours to ensure complete hardening.

Step 2

Use the Clay Roller to rollout a sheet of Air Dry Terra Cotta to a sheet between 1/8”-1/4” thick. Cut out shapes as desired. In this tutorial I have cut two circles and two squares.

Wrap up the remaining clay tightly to preserve it for future projects.

Step 3

Poke holes using your favorite hole poking tool.

Poke holes around the perimeter of the circle. When poking holes in Air Dry Clay, dip your tool in water, poke from the front and then poke through the same hole from the back. Poke again once more from the front to make sure the holes are open and clear.

Poke a slightly larger hole in the center. Carefully insert the tool further and further into the hole to make sure it is large enough to accommodate several layers of the yarn, cord, twine, or floss.

Step 4

Here’s a look at the hole patterns that I made in each ornament. The donut style piece has no holes at all and will offer a different pattern of stringing than the others.

Allow the ornaments to dry completely. I like to keep an eye on the pieces as they dry, checking them every few hours. If they start to curl one way or the other, carefully flip them to make sure they dry evenly.

Step 5

Cut off 30” of your string. Start at any outer hole and leave a 4” tail stringing from back to front.

Step 6

Hold the tail so you don’t pull it through. Thread the rest of the string around the edge coming back out through the same hole.

Step 7

Thread the string through the center hole pulling tightly. Then go back out again to the next hole and thread back to front. Repeat going through the center hole and then through the next hole back to front.

Step 8

Repeat going all the way around the ornament through the center hole and to each outer hole in turn always threading the outer holes back to front.

At the final hole, go through the first outer hole one more time, back to front so that the extra string comes out the front again.

Step 9

Trim the tails to about 4”. Slide a matching wooden or plastic pony bead onto the tails. Cinch the bead down to the top of the ornament with an overhand knot. Tie another overhand knot at the other end of the tails to make a loop for hanging.

Step 10

Here’s a look at the variety of ways that the ornaments can be sewn.