Skip to product information
1 of 1

Liquid Sculpey® Tropical Leaf Earrings

Liquid Sculpey® Tropical Leaf Earrings

Designed by Amy Koranek
Read More
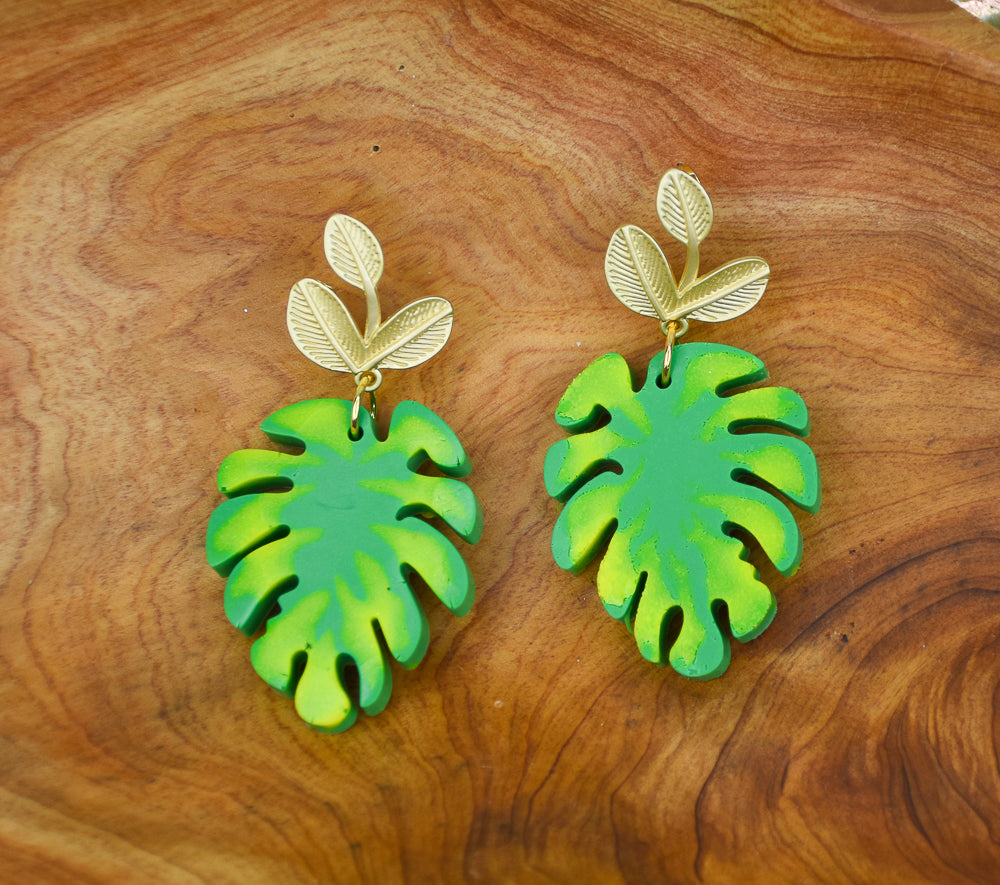
Vibrant natural colors of Liquid Sculpey team up with a simple leaf mold to create these dynamic earrings perfect for Summertime or as a gift for your favorite gardener friend. TIME TO COMPLETION: 60 Minutes to make, bake, and assemble
Read Less
ADDITIONAL SUPPLIES
  • Paper towel
  • Silicone earring mold with tropical leaves
  • Gold tone leaf connectors with posts (2)
  • Gold tone ear backs (2)
  • 6 mm Gold tone jump rings (2)
  • Flat nose pliers
View full details
Project Instructions

Step 1

Getting Started with Liquid Sculpey®:

Please make sure your work area is covered and you are not working on an unprotected surface. We recommend working on the Sculpey® Oven Safe Work Mat, wax paper, metal baking sheet, or disposable foil. Uncured Liquid Polymer Clay may damage unprotected furniture or finished surfaces. Be sure to cover your crafting area appropriately.

- Stir Liquid Sculpey® completely. Thin with Sculpey® Liquid Clay Softener as needed
- Wash hands after use (we have found that baby wipes work best)

Baking:

-It is important to use oven thermometer when you bake the liquids so that you can ensure your oven is at the correct temperature.

-Do not microwave the liquids. They must be baked in a Preheated oven at 275 ºF (130 ºC) for liquid colors and 300 ºF (149 ºC) for Clear – Do not exceed baking temperatures.

-If your piece is less than 1/4” bake for 15 minutes. For thicker pieces that are 1/4” or above bake for 30 minutes.

-If your liquid project has become yellowed or discolored in the oven, when you remake it, tent it by placing either – folding an index card in half and placing your project under it by using aluminum foil over your project.

Here’s a tip for baking perfectly in silicone molds. Dampen a dish towel
with water and wring out as much of the water as you can. Fold the damp towel
so that the molds can sit level on top of it. The damp towel will slow down the
curing process so that the LS will cure evenly throughout and avoid warping.

Step 2

Place just a dot of Yellow Liquid Sculpey (LS) in each lobe of the leaf.

Step 3

Use the tip of the Needle Tool to drag a thin line of each Yellow dot toward the center
of the leaf.

Step 4

Use the tip of the Needle Tool to drag a thin line of each Yellow dot toward the edge
of the leaf.

Step 5

Back fill the entire leaf to level with Green LS.

Repeat Steps 2-4 for the second leaf.

Tap the mold on the work surface to release air bubbles.

Step 6

Bake the mold following the baking instructions for Liquid Sculpey®.

Allow to cool completely before flexing the mold to release the pieces.

Here is the basic layout for the earring design.

Step 7

Attach the leaves to the connectors with jump rings using flat nose pliers to open and close the jump rings.