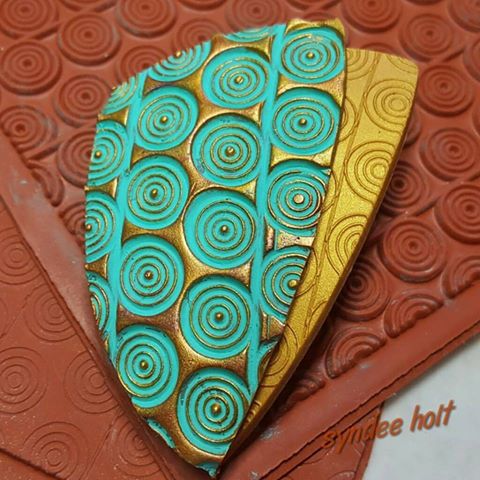
Souffle Stamped Vine Pendant
Souffle Stamped Vine Pendant
Read More
This one is a showstopper! And it's so easy to make using a unique combination of both the positive and negative stamp images.
Design by syndee holt
NOTE: These positive/negative stamps are available from www.stampafe.com or https://lindasartspot.com/
Souffle is used for the painted portions since the suede-like surface texture of Souffle handles paints so well!
For more information on Citadel paints, see my blog page at: http://bit.ly/synspaints
Read Less
ADDITIONAL SUPPLIES
Small smooth ceramic tile, Craft knife, Citadel Retributor Armour paint (or Gold Lumiere acrylic paint) Copper paint (optional), Turquoise craft paint (mine is Craftsmart Ocean Breeze), inexpensive watercolor brush, Loew Cornell 8 piece Sponge Sticks, instant glue (Loctite Gel), 8 inch metal bowl (Ikea), small spray bottle of water (for stamp release), smooth ceramic tile, Baby wipes, plastic templates for shapes –mine is from Melanie Muir: http://www.melaniemuir.com/tools/, 3mm leather cord or rubber cord with findings to hang the pendant.

Project Instructions
Getting StartedPolymer clay may stain. CLAY MAY DAMAGE UNPROTECTED FURNITURE OR FINISHED SURFACES. DO NOT USE polymer clay on unprotected surfaces. We recommend working on the Sculpey clay mat, wax paper, metal baking sheet, or disposable foil. Start with clean hands and work surface area. Knead clay until soft and smooth. For best results, clean your hands in between colors. Shape clay, pressing pieces together firmly. Bake on oven-proof glass or metal surface at 275°F (130 °C) for 30 minutes per ¼" (6 mm) thickness. For best baking results, use an oven thermometer. DO NOT USE MICROWAVE OVEN. DO NOT EXCEED THE ABOVE TEMPERATURE OR RECOMMENDED BAKING TIME. Wash hands after use. Baking should be completed by an adult.Begin by preheating oven to 275 °F (130 °C). Test temperature with oven thermometer for perfectly cured clay. For best results, condition all clay by running it through the Clay Conditioning Machine for several passes on the widest setting. Fold the clay in half after each pass and insert the fold side into the rollers first.
Sheet out about 2/3 the conditioned Sage Souffle on the 2nd widest setting on your Sculpey Clay Conditioning Machine. Lightly spray the POSITIVE stamp with water. Place the sheet of clay between a sheet of paper folded in half. Position the stamp on the clay sheet and fold the paper over. Find a smooth hard floor (my studio has a cement floor). Place the folded paper on the floor and step on it – from all sides. This will ensure a deep even impression! (NOTE: if your shoes have a very defined pattern on the bottom, consider removing them! The lugs on my lowboy hiking boots interferred with a smooth impression). Carefully remove the paper from the sheet of clay, the stamp will just pop off.

Place the sheet of clay on the smooth ceramic tile and press LIGHTLY into place. Position the template and use the craft knife to cut around the inside of the template. (NOTE: I recommend holding the knife loosely and letting it just ride around the template. If you do cut into the design, don’t panic! Start cutting from the opposite side and the cut will mend itself.) Set aside.

Sheet 2/3 of the Gold clay through the Sculpey Clay Conditioning Machine on the middle setting. Lightly spray the NEGATIVE stamp with water and emboss as directed in Step 2 above.

Use the same template you used on the Sage pendant clay and make sure that it faces the same way! (although the reverse shape can be used as well).

Place the large pendant pieces on the 8 inch metal bowl (near the top). Lightly run your finger around the edges of each shape to remove the “cut” look to the edge. . (NOTE: the larger bowl will give a more gently curve to the shield shape. I think it starts to look a little like a fang is baked on the smaller, more curved bowl!) Bake per the directions above. I have cut pieces of cardboard about 5 x 9 inches from box flaps (THANKS Amazon!). I place the bowl at one end of the cardboard and then in the oven. Once the pieces are baked, I just lift out of the oven using the empty part of the cardboard as the handle).
Create the Jan Montarse Easy Back:Use the second to smallest circle cutter to cut out a circle. Use the smallest oval cutter to cut two notches at the top of the circle. Place the clay on the second smallest “bump” on the Hollow Bead Maker and bake per the directions above.


Once the clay is baked and cooled, quickly paint the entire surface of one of the Souffle clay piece with the turquoise craft paint. Wipe the paint off the top surface with the baby wipe. Set aside to dry.

Once the piece has dried, select the flat tipped sponge stick. Dip the tip of the watercolor brush into the Retributor Armour (or Gold paint) and apply it to the end of the sponge stick.

Lightly stroke the sponge stick over the top surface of the pendant. A little bit of paint goes a long way! (Hmm, I kind of like it just on about 2/3 of the pendant with the bottom left with just the Ocean Breeze paint…) The sponge stick doesn’t have hairs that can stray down into the bottom portions of the pattern, so it makes it easy to paint the top surface!

Don’t forget to paint the edges of the clay as well!

If desired, apply a little Lumiere Copper paint to the sponge stick and light daub in a few places on the pendant. Set aside to dry.
When all the paints have dried, glue the Gold embossed piece to the back of the painted piece. Glue the Montarse Easy Back to the top center of the back of the pendant with the notches facing up. The cord will be threaded through the notches once the glue has dried.


