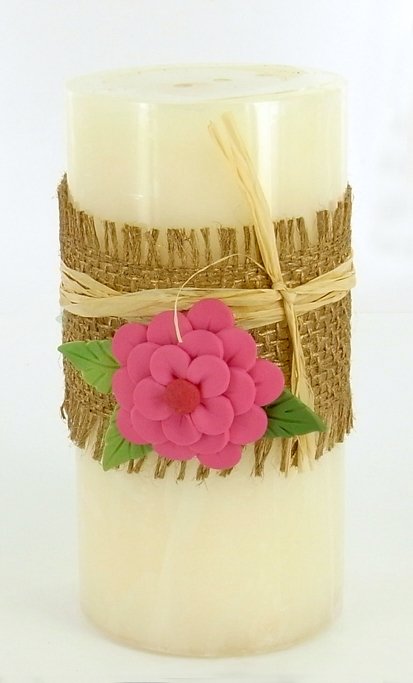
Sculpey Soufflé Flower Candle Charm
Sculpey Soufflé Flower Candle Charm
Read More
Add some creative charm to your candles with Sculpey Soufflé clay!
Read Less
ADDITIONAL SUPPLIES
Wilton leaf fondant cutter – 2” , Large electronic candle, Wide jute ribbon, Raffia, Wire,Hot glue gun or craft glue|Wilton leaf fondant cutter – 2” , Large electronic candle, Wide jute ribbon, Raffia, Wire,Hot glue gun or craft glue

Project Instructions
Getting Started Polymer clay may stain. CLAY MAY DAMAGE UNPROTECTED FURNITURE OR FINISHED SURFACES. DO NOT USE polymer clay on unprotected surfaces. We recommend working on the Sculpey clay mat, wax paper, metal baking sheet, or disposable foil. Start with clean hands and work surface area. Knead clay until soft and smooth. For best results, clean your hands in between colors. Shape clay, pressing pieces together firmly. Bake on oven-proof glass or metal surface at 275°F (130 °C) for 30 minutes per ¼" (6 mm) thickness. For best baking results, use an oven thermometer. DO NOT USE MICROWAVE OVEN. DO NOT EXCEED THE ABOVE TEMPERATURE OR RECOMMENDED BAKING TIME. Wash hands after use. Baking should be completed by an adult.Begin by preheating oven to 275 °F (130 °C). Test temperature with oven thermometer for perfectly cured clay. For best results, condition all clay by running it through the Clay Conditioning Machine for several passes on the widest setting. Fold the clay in half after each pass and insert the fold side into the rollers first.
Mix equal parts Cherry Pie and Igloo together (1/4 brick ea.)to make a nice Dark Pink color. Run this through the clay conditioning machine on the #1 setting. Using the 1.5” circle cutter, cut out one circle for the flower base. Using the Premo! Large tear drop all petal cutter cut out 20 petal shapes. Set aside.

Mix together some Pesto and Pistachio. Leave it a little streaky if you want for the leaves. Run through the clay conditioning machine on the #1 setting. Cut out 2 leaf shapes with the leaf cutter. Then using just the Pesto clay cut out one leaf shape. Set aside.

Start the flower by using 5 petals. Using your Sculpey tool make a line down the center of each petal. Arrange these along the outside edge of your circle base. You want the petals to be coming off the edge of the circle about ½ way down each petal. You will have large gaps between each petal. Now you will begin your second row in the same manner. Make lines down the center of 5 more petals and place these between the first 5 petals. Placing them about ¼ to ½ way down from the mid-point of the first set. Now on to row 3. Repeat the same process. You want to make sure your circle base isn’t showing between petals.

Now you will make your final center flower. Make a line down the center of each petal and then gently fold in the pointed end of each petal to give them a little depth and also reduces their size a bit. Fit these 5 petals together to make a small flower shape. Press this flower into the center of the flower base that you started.

Make a small ball of Cherry Pie and place it in the center of the flower. You can give it a little texture by poking with your Sculpey tool or crumple a little foil into a ball and use that for texture.
Time to add the leaves.Using your clay tool make veins in each leave. Make indentations on the side of each leaf for texture. Attach the leaves to the back of the flower making sure the side with the veins if facing forward.

Bend a 1” piece of wire in ½. Insert this into the back of the flower so it can hang on the raffia.Bake according to the directions above. Allow to cool.
Using your hot glue gun, glue a piece of Jute ribbon to fit around your candle. String your flower candle charm onto some raffia and tie in a knot around the jute. Snip ends


