
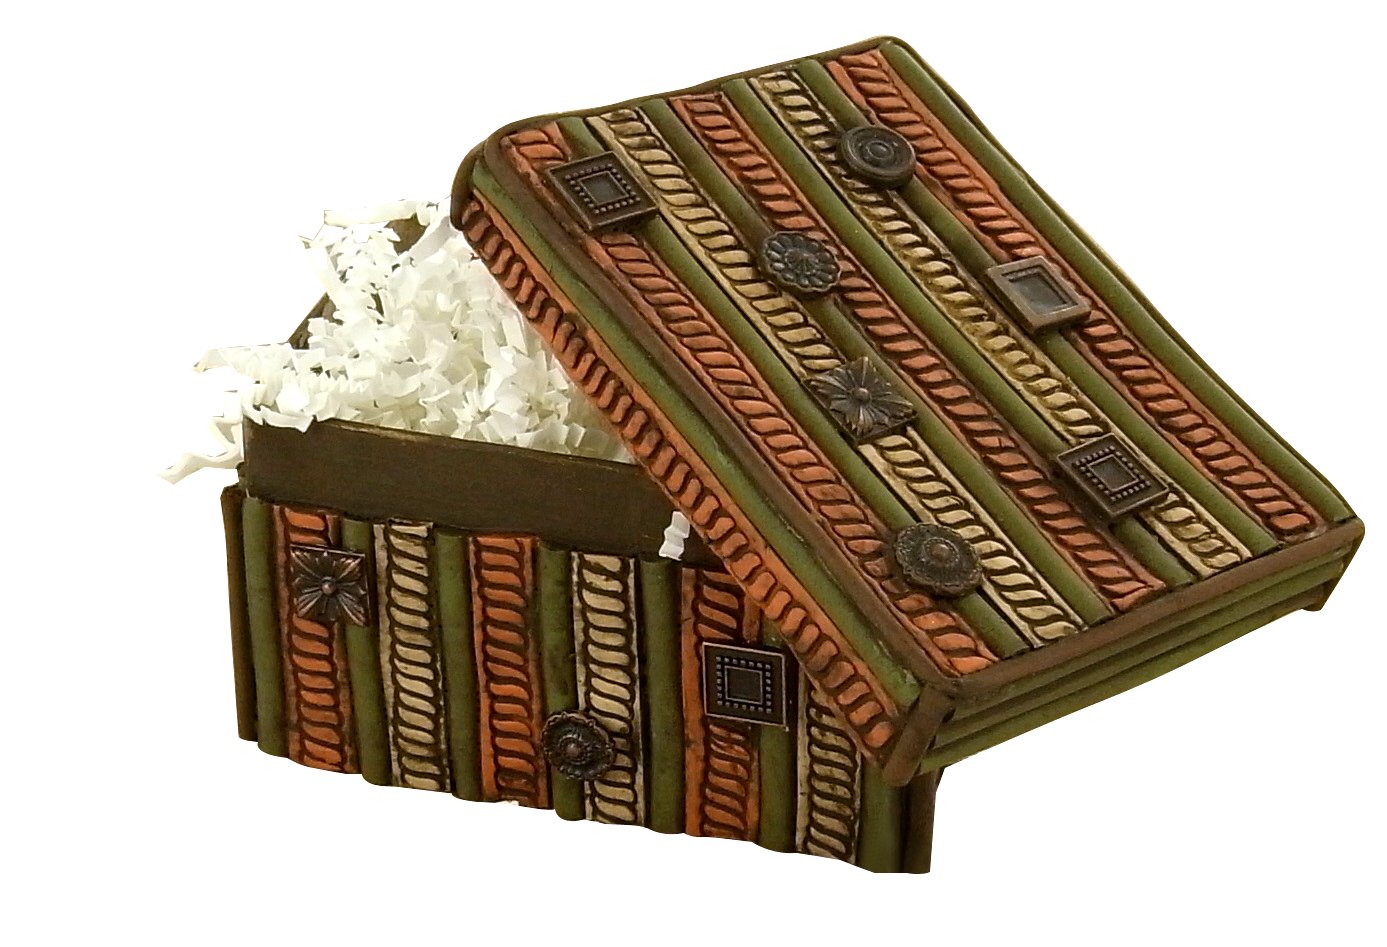
Sculpey® Soufflé Decorated Cardboard Box
Sculpey® Soufflé Decorated Cardboard Box
Read More
Cover simple cardboard boxes and create a treasured keepsake! The Sculpey® texture wheels are a great way to create strips of clay that can be used to easily cover areas of your box.
Read Less
ADDITIONAL SUPPLIES
• Cardboard box (this one is 4 inches in width)
• White glue
• Antique copper color decorative brads (clip off the brad parts on the back),
• Burnt Umber brown craft paint
•Small paint brush
• Small foam brush
• Paper towels
• Bamboo skewer
• 12 Inch length of 1x1 wood or ruler|• Cardboard box (this one is 4 inches in width)
• White glue
• Antique copper color decorative brads (clip off the brad parts on the back),
• Burnt Umber brown craft paint
•Small paint brush
• Small foam brush
• Paper towels
• Bamboo skewer
• 12 Inch length of 1x1 wood or ruler
Project Instructions
Your Workspace:
Please make sure your work area is covered and you are not working on an unprotected surface. We recommend working on the Sculpey® Work ‘n Bake Clay Mat, wax paper, metal baking sheet, or disposable foil. Uncured clay may damage unprotected furniture or finished surfaces. Be sure to cover your crafting area appropriately.
Getting Started:
Start with clean hands, unwrap and knead clay until soft and smooth, or condition by running clay though a Pasta Machine. We recommend using a designated machine for clay purposes only. When working with multiple colors, clean hands with soap and water or baby wipes (we have found that baby wipes work best) before switching colors. Shape clay, pressing pieces firmly together. Wash hands after use.
Baking:
Begin by preheating oven to 275 °F (130 °C). After you are done creating; for best results bake clay on an oven-proof surface such metal, aluminum foil, an index card or the Sculpey® Clay Mat at 275°F (130 °C) for 30 minutes per ¼" (6 mm) thickness according to package directions. Oven safe glass or ceramic surfaces are also acceptable for baking; however please note that the baking times may take longer as the glass or ceramic surfaces take longer to heat up. For best baking results, use an oven thermometer. DO NOT USE MICROWAVE OVEN. DO NOT EXCEED THE ABOVE TEMPERATURE OR RECOMMENDED BAKING TIME.
Roll out a bar of Pumpkin through the Clay Conditioning Machine on the #1 setting. The longest edge should be at least 6 inches long. Place the clay on your work surface. Lightly mist the sheet with water. Position the length of wood or ruler near the top of the sheet. Gently roll the texture wheel (Rope) across the clay, using the wood as a guide. Reposition the wood lower on the sheet of clay at least an inch from the completed row of texture. Create another row of texture. Repeat this process until the sheet of clay is filled.

Place the clay so that the texture strips run left to right from you. Use the long edge of the Sculpey Super Slicer to cut the TOP edge of the strip closest to you. Then turn the piece you cut off around so that you are again cutting along the top edge of the texture strip to trim that side also. NOTE: Use the flex of the blade to keep your edges even when you trim. Make about 8 strips.


Repeat steps 2 and 3 using Latte.
Load the Jade into your extruder and put the half round die into place. If your die is too large to make a ¼ inch wide extrusion, combine the medium round die with it to make a smaller version. Extrude about three 16 inch pieces of the Jade and set aside.

Place the medium round die into the extruder and extrude about two 12 inch pieces of the Cowboy and set aside.
Apply white glue to the top of the box with a disposable foam brush.

Start laying the strips of clay across the glued top, alternating a texture strip and a extruded Jade strip. Alternate the colors of the texture strips also. You can even use scraps of strips and cover the seam with a decorative brad as shown here. Notice that the strips are not cut to the edge of the box. I do this after all strips are in place by just sliding the Super Slicer down the edge of the box slowly. Sculpey® Soufflé cuts so cleanly and easily!

Once the top of the lid is completely covered, slide the the Super Slicer around the edge of the lid slowly to remove any extra clay. Decoratively place the brads on the the lid. Again, the brads can be used to cover seams to give your project a nice, finished look.

Continue the pattern from the top along the front and back edges of the box lid (or use only the extruded Jade strips like I did for the shorter edges). Don’t fret about the gap between the top and side edges. The round extruded Cowboy clay will fit right into that!

Add three strips of extruded Jade on each of the shorter sides. Again, the gaps at the corners will be filled with extruded round Cowboy.

Add the extruded round Cowboy to the edges, starting with the small corners on the edge of the box lid and then around the entire top edge of the box lid. NOTE: A bamboo skewer with glue on it and stroked along the edge first is a good way to apply glue to this small area before laying in the clay.

With the lid in place, use a pencil to carefully mark where the lid sits on the bottom part of the box. Apply white glue on the sides of the box below the line you have just drawn. Apply the clay to the bottom part of the box in the same manner as you did the lid, this time run the strips of clay going vertically as shown. Add the extruded Cowboy in the corners of the box. Use the Super Slicer to trim away any extra clay along the bottom of the box.

Let the glue dry for about 30 minutes before baking. Bake according to the directions above in Step 1. Do not bake the box with the lid in place.

Once the box is baked and cooled, apply the Burnt Umber paint to the surface and quickly wipe the paint with a damp paper towel to remove it from the upper surfaces of the patterns. Paint the inside of the box and that outer lip that was marked with pencil.

Your Workspace:
Please make sure your work area is covered and you are not working on an unprotected surface. We recommend working on the Sculpey® Work ‘n Bake Clay Mat, wax paper, metal baking sheet, or disposable foil. Uncured clay may damage unprotected furniture or finished surfaces. Be sure to cover your crafting area appropriately.
Getting Started:
Start with clean hands, unwrap and knead clay until soft and smooth, or condition by running clay though a Pasta Machine. We recommend using a designated machine for clay purposes only. When working with multiple colors, clean hands with soap and water or baby wipes (we have found that baby wipes work best) before switching colors. Shape clay, pressing pieces firmly together. Wash hands after use.
Baking:
Begin by preheating oven to 275 °F (130 °C). After you are done creating; for best results bake clay on an oven-proof surface such metal, aluminum foil, an index card or the Sculpey® Clay Mat at 275°F (130 °C) for 30 minutes per ¼" (6 mm) thickness according to package directions. Oven safe glass or ceramic surfaces are also acceptable for baking; however please note that the baking times may take longer as the glass or ceramic surfaces take longer to heat up. For best baking results, use an oven thermometer. DO NOT USE MICROWAVE OVEN. DO NOT EXCEED THE ABOVE TEMPERATURE OR RECOMMENDED BAKING TIME.
Please make sure your work area is covered and you are not working on an unprotected surface. We recommend working on the Sculpey® Work ‘n Bake Clay Mat, wax paper, metal baking sheet, or disposable foil. Uncured clay may damage unprotected furniture or finished surfaces. Be sure to cover your crafting area appropriately.
Getting Started:
Start with clean hands, unwrap and knead clay until soft and smooth, or condition by running clay though a Pasta Machine. We recommend using a designated machine for clay purposes only. When working with multiple colors, clean hands with soap and water or baby wipes (we have found that baby wipes work best) before switching colors. Shape clay, pressing pieces firmly together. Wash hands after use.
Baking:
Begin by preheating oven to 275 °F (130 °C). After you are done creating; for best results bake clay on an oven-proof surface such metal, aluminum foil, an index card or the Sculpey® Clay Mat at 275°F (130 °C) for 30 minutes per ¼" (6 mm) thickness according to package directions. Oven safe glass or ceramic surfaces are also acceptable for baking; however please note that the baking times may take longer as the glass or ceramic surfaces take longer to heat up. For best baking results, use an oven thermometer. DO NOT USE MICROWAVE OVEN. DO NOT EXCEED THE ABOVE TEMPERATURE OR RECOMMENDED BAKING TIME.
Roll out a bar of Pumpkin through the Clay Conditioning Machine on the #1 setting. The longest edge should be at least 6 inches long. Place the clay on your work surface. Lightly mist the sheet with water. Position the length of wood or ruler near the top of the sheet. Gently roll the texture wheel (Rope) across the clay, using the wood as a guide. Reposition the wood lower on the sheet of clay at least an inch from the completed row of texture. Create another row of texture. Repeat this process until the sheet of clay is filled.
Place the clay so that the texture strips run left to right from you. Use the long edge of the Sculpey Super Slicer to cut the TOP edge of the strip closest to you. Then turn the piece you cut off around so that you are again cutting along the top edge of the texture strip to trim that side also. NOTE: Use the flex of the blade to keep your edges even when you trim. Make about 8 strips.
Repeat steps 2 and 3 using Latte.
Load the Jade into your extruder and put the half round die into place. If your die is too large to make a ¼ inch wide extrusion, combine the medium round die with it to make a smaller version. Extrude about three 16 inch pieces of the Jade and set aside.
Place the medium round die into the extruder and extrude about two 12 inch pieces of the Cowboy and set aside.
Apply white glue to the top of the box with a disposable foam brush.
Start laying the strips of clay across the glued top, alternating a texture strip and a extruded Jade strip. Alternate the colors of the texture strips also. You can even use scraps of strips and cover the seam with a decorative brad as shown here. Notice that the strips are not cut to the edge of the box. I do this after all strips are in place by just sliding the Super Slicer down the edge of the box slowly. Sculpey® Soufflé cuts so cleanly and easily!
Once the top of the lid is completely covered, slide the the Super Slicer around the edge of the lid slowly to remove any extra clay. Decoratively place the brads on the the lid. Again, the brads can be used to cover seams to give your project a nice, finished look.
Continue the pattern from the top along the front and back edges of the box lid (or use only the extruded Jade strips like I did for the shorter edges). Don’t fret about the gap between the top and side edges. The round extruded Cowboy clay will fit right into that!
Add three strips of extruded Jade on each of the shorter sides. Again, the gaps at the corners will be filled with extruded round Cowboy.
Add the extruded round Cowboy to the edges, starting with the small corners on the edge of the box lid and then around the entire top edge of the box lid. NOTE: A bamboo skewer with glue on it and stroked along the edge first is a good way to apply glue to this small area before laying in the clay.
With the lid in place, use a pencil to carefully mark where the lid sits on the bottom part of the box. Apply white glue on the sides of the box below the line you have just drawn. Apply the clay to the bottom part of the box in the same manner as you did the lid, this time run the strips of clay going vertically as shown. Add the extruded Cowboy in the corners of the box. Use the Super Slicer to trim away any extra clay along the bottom of the box.
Let the glue dry for about 30 minutes before baking. Bake according to the directions above in Step 1. Do not bake the box with the lid in place.
Once the box is baked and cooled, apply the Burnt Umber paint to the surface and quickly wipe the paint with a damp paper towel to remove it from the upper surfaces of the patterns. Paint the inside of the box and that outer lip that was marked with pencil.