
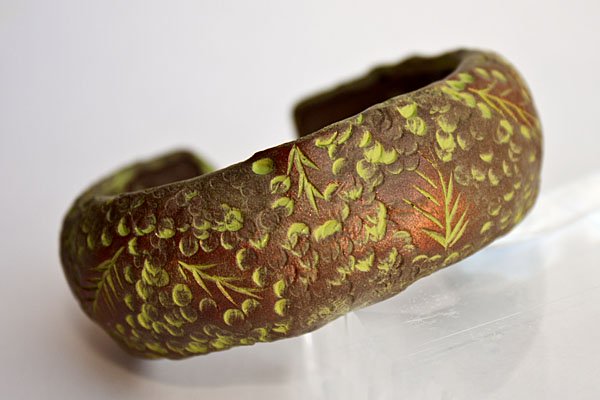
Sculpey Soufflé Carved Leaf Bracelet
Sculpey Soufflé Carved Leaf Bracelet
Read More
Never carved before? Sculpey Soufflé clay makes this a great project to try your hand at it!
Read Less
ADDITIONAL SUPPLIES
• Bamboo skewer
• Linoleum cutter or small carving tool
• Light green acrylic craft paint (or color of choice), small brush, paper towel
• Pearl Ex Antique Copper or Bronze (optional), craft knife (optional)|• Bamboo skewer
• Linoleum cutter or small carving tool
• Light green acrylic craft paint (or color of choice), small brush, paper towel
• Pearl Ex Antique Copper or Bronze (optional), craft knife (optional)
Project Instructions
Getting Started
Polymer clay may stain. CLAY MAY DAMAGE UNPROTECTED FURNITURE OR FINISHED SURFACES. DO NOT USE polymer clay on unprotected surfaces. We recommend working on the Sculpey clay mat, wax paper, metal baking sheet, or disposable foil. Start with clean hands and work surface area. Knead clay until soft and smooth. For best results, clean your hands in between colors. Shape clay, pressing pieces together firmly. Bake on oven-proof glass or metal surface at 275°F (130 °C) for 15 minutes per ¼" (6 mm) thickness. For best baking results, use an oven thermometer. DO NOT USE MICROWAVE OVEN. DO NOT EXCEED THE ABOVE TEMPERATURE OR RECOMMENDED BAKING TIME. Wash hands after use. Baking should be completed by an adult. Begin by preheating oven to 275 °F (130 °C). Test temperature with oven thermometer for perfectly cured clay. For best results, condition all clay by running it through the Clay Conditioning Machine for several passes on the widest setting. Fold the clay in half after each pass and insert the fold side into the rollers first.
Polymer clay may stain. CLAY MAY DAMAGE UNPROTECTED FURNITURE OR FINISHED SURFACES. DO NOT USE polymer clay on unprotected surfaces. We recommend working on the Sculpey clay mat, wax paper, metal baking sheet, or disposable foil. Start with clean hands and work surface area. Knead clay until soft and smooth. For best results, clean your hands in between colors. Shape clay, pressing pieces together firmly. Bake on oven-proof glass or metal surface at 275°F (130 °C) for 15 minutes per ¼" (6 mm) thickness. For best baking results, use an oven thermometer. DO NOT USE MICROWAVE OVEN. DO NOT EXCEED THE ABOVE TEMPERATURE OR RECOMMENDED BAKING TIME. Wash hands after use. Baking should be completed by an adult. Begin by preheating oven to 275 °F (130 °C). Test temperature with oven thermometer for perfectly cured clay. For best results, condition all clay by running it through the Clay Conditioning Machine for several passes on the widest setting. Fold the clay in half after each pass and insert the fold side into the rollers first.
Stand your block of Souffle Cowboy up on its long side and cut the block into thirds. Place one of these pieces into the Sculpey Clay Conditioning Machine with the narrow end down. The Sculpey Clay Conditioning Machine should be set on #1 (widest setting). Roll the clay through to create a long narrow piece of clay. Fold in half and roll through again until the clay is soft and pliable. Roll a second piece through in the same manner. Combine the two pieces of clay to create a long narrow strip of clay. Place the Sculpey bracelet blank on the left edge of the clay and trim the clay to the edge of the blank.

Roll the blank to the right across the sheet of clay. The clay should wrap around the blank as you roll it. Trim the opposite edge of the clay to the edge of the blank.

Slide the Sculpey Super Slicer along the edge of the blank, starting at one end of the blank. This will trim the clay to the edge of the blank. Repeat on the other side.


Trim another length of clay to about 3/8 inch wide and at least the length of the bracelet blank. Position this second layer down the middle of the first layer on the blank. Trim both ends to the blank.

Use your thumbs to gently press down the edges of this layer against the first layer of clay. This will create the dome shape of the bracelet. This does NOT have to be perfectly smooth!

Retrim the edges of the bracelet, if needed.

Roll the remaining Cowboy clay out in a long narrow strip and set the Sculpey Clay Conditioning Machine to #3 and roll through again. Position the bracelet blank on this layer of clay, trying this time to leave a small selvage at both ends.

Gently wrap the layer of clay around the bracelet blank by gently pressing the edges of the clay layer to the inside of the bracelet blank. This layer of clay will completely cover the two previous layers.

Use the craft knife or the Super Slicer to remove the excess clay on the INSIDE of the bracelet blank by sliding it along the INSIDE (not the edge this time) of the bracelet blank.

Finish the edges of the bracelet by wrapping the excess clay over the edge to cover the two previous layers and trim to the back of the bracelet blank. (I sometimes just pull the corners off gently too!) The bracelet should now be covered with one smooth sheet of clay with none of the bottom layers showing. There should be NO clay on the inside of the blank.

Use the blunt end of the bamboo skewer to stamp out rough leaf shapes all over the bracelet.

Once the leaves are stamped out, use the skewer to texture all the areas in between the leaves.

Bake the bracelet in a preheated oven according to the clay package directions. Allow the bracelet to cool.
Use the linoleum cutter or small carving tool to carve in the suggestion of the veins of the leaves. The Sculpey Souffle clay does not take a lot of pressure to carve neatly into its surface. NOTE: I leave the bracelet on the blank at this point to add support while I carve.

Once all the leaves are carved, remove the bracelet from the blank by popping it off the ends of the bracelet.
Brush about half the surface with the selected paint color and quickly wipe it with a damp paper towel to remove the excess paint and expose the textures. Allow the paint to dry and you are DONE!


OPTIONAL: While the paint is still wet, you can wipe some Pearl Ex Antique Copper (or Bronze) onto the areas where the leaves are to highlight them. The Pearl Ex will grab in the damp paint on the Souffle clay.