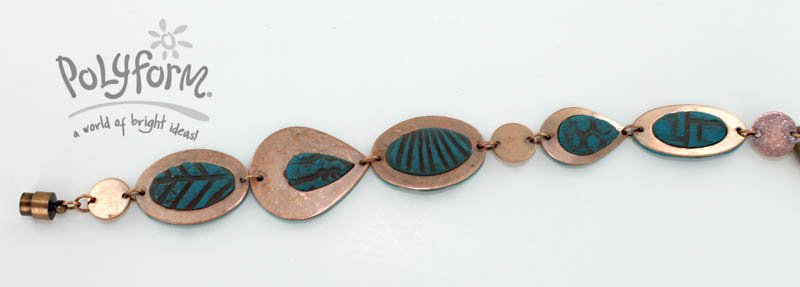
Soufflé Aged Organic Copper Bracelet
Soufflé Aged Organic Copper Bracelet
Read More
Sea Glass, with copper, and a touch of antiquing add to the aged feel of this bracelet.
Designed by Gretchen Amberg
Read Less
ADDITIONAL SUPPLIES
Non Scratch Scouring Pad, Copper chain with flat geometric links, Makeup Sponge, Brown acrylic paint, Baby Wipe or damp paper towel, Craft knife
Chain Nose Pliers
Clasp
Pin Drill Set|Non Scratch Scouring Pad, Copper chain with flat geometric links, Makeup Sponge, Brown acrylic paint, Baby Wipe or damp paper towel, Craft knife
Chain Nose Pliers
Clasp
Pin Drill Set

Project Instructions
Getting Started: Do not use unbaked clay on unprotected furniture or finished surfaces. Start with clean hands and work surface area. Good work surfaces include wax paper, metal baking sheet, or disposable foil. Knead clay until soft and smooth. For best results, clean your hands in between colors. Shape clay, pressing pieces together firmly. Bake on oven-proof glass or metal surface at 275°F (130°C) for 30 minutes per ¼" (6 mm) thickness. For best baking results, use an oven thermometer. DO NOT USE MICROWAVE OVEN. DO NOT EXCEED THE ABOVE TEMPERATURE OR RECOMMENDED BAKING TIME. Wash hands after use. Baking should be completed by an adult. Begin by preheating oven to 275°F (130 °C). Test temperature with oven thermometer for perfectly cured clay. For best results, condition all clay by running it through the clay dedicated pasta machine several passes on the widest setting. Fold the clay in half after each pass and insert the fold side into the rollers first.
Use the chain nose pliers to disassemble the chain so you have all of the links separated.

Condition the Sea Glass clay and roll out a sheet on the 1st setting of the Clay Conditioning Machine. Take the Sculpey® Texture Sheets – Landscape Set and lightly spray the Dandelion pattern texture with water and then press into the sheet of Sea Glass clay until you have a nice deep impression. Lift the texture sheet gently. After you have lifted the texture sheet gently press the scouring pad to the surface of the sheet to add a little bit more texture. Note: Do this gently being careful not to distort the Dandelion pattern; this is just to add a tiny bit more texture which adds to the aged look of the piece.

Pick up one of the links and position it over the textured clay in an area where you like the pattern that shows through the opening in the link. Press the link into the clay so the texture pushes up through the opening. Use the Sculpey® Super Slicer blade to trim the excess clay away from the edges of the link.


Turn the piece over and use the Sculpey® Super Slicer blade to slice the clay away from the back of the link. At this point you should only have clay in the hole in the link. Roll out another sheet of the Sea Glass clay on a thin setting and lay out on the work surface. Rub a thin layer of Translucent Liquid Clay onto the back of the link, make sure you get it on the clay in the hole too, and gently press it down onto the thin sheet of clay. Use the craft knife to cut around the edge of the link and set the link to the side. Note: If the backing sheet of clay in this step is too thick you will have trouble reattaching the jump rings.

Repeat Steps 1 through 4 with the remaining links. To add more interest to the piece use a different texture from the Sculpey® Texture Sheets for each link.
- Pick up one of the links from the previous steps and use the make-up sponge to lightly dab some brown paint all over the surface. Make sure you get it into the indentations from the texture sheet. Note: remember that at this point the clay is still “raw” so you don’t want to press too hard with the sponge. Once you have enough paint on the surface use the baby wipe or damp paper towel to wipe paint off of the high points of the textured areas and also off of the link. Repeat this process with the remaining links, bake according to the directions above, and let cool completely.

Use the pin drill to drill the clay out of the small holes in the links where the connecting jump rings need to go through. Use the pliers to reconnect all of the jump rings and add the clasp. You’re ready to wear your finished piece; enjoy!

