Sculpey Soufflé™ Mod Color Block Earrings
Sculpey Soufflé™ Mod Color Block Earrings
Designed by Amy Koranek
Read More
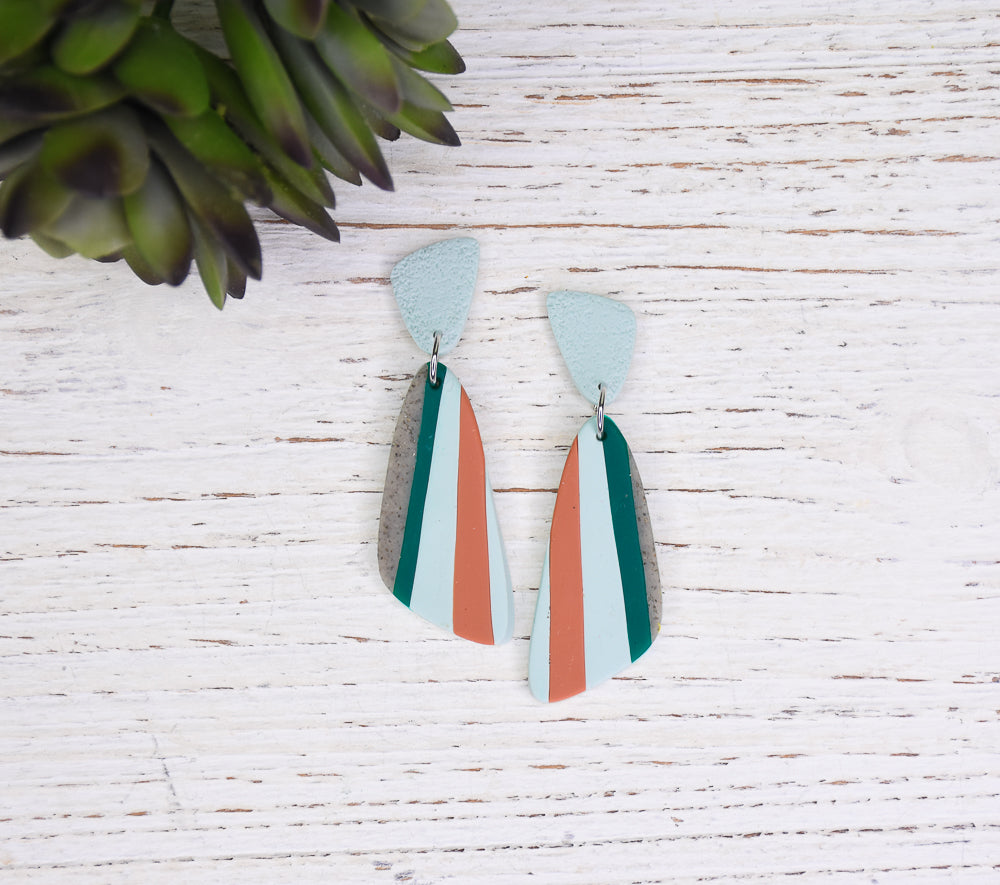
Mod color blocking is enjoying a renaissance in fashion, so what is a better way to introduce this trend into your wardrobe than with a “groovy” pair of earrings? Sculpey Soufflé™ Glacier is the perfect alternative for a light background for this design!
COMPLETION TIME:
60 Minutes to make, bake, and assemble
Read Less
ADDITIONAL SUPPLIES
- Coarse sandpaper
- Symmetrical shape cutters in two sizes
- 8 mm Silver tone jump rings (2)
- 8 mm Silver tone post backs and nuts (2 sets)
- Flat nose pliers
- Silicone glue

Project Instructions
- Getting Started:
Start with clean hands, unwrap and knead clay until soft and smooth, or condition by running clay though a Pasta Machine. We recommend using a designated machine for clay purposes only. When working with multiple colors, clean hands with soap and water or baby wipes (we have found that baby wipes work best) before switching colors. Shape clay, pressing pieces firmly together. Wash hands after use.
- Baking (also called Curing):
Roll Glacier to a thin sheet about 3/32” thick using the Acrylic Clay Roller. Cut out two of the smaller shape.

Texture the top surface of the small shapes with coarse sandpaper. Poke a hole at the bottom of the shape with the Needle Tool.

Roll another sheet of Glacier to 3/32” thick. Make sure the sheet is just large enough to accommodate two of the larger shape cutters.

Using the Acrylic Clay Roller, sheet Glacier, Terra Cotta, Forest Green, and Gray Granite to sheets 1/16” thick.
Using a Clay Blade, cut very narrow strips of each color. Position the strips side by side on top of the Glacier sheet. Make sure the strips are sides touching.
Using a Clay Blade, cut very narrow strips of each color. Position the strips side by side on top of the Glacier sheet. Make sure the strips are sides touching.

Roll over the striped sheet with the Acrylic Clay Roller to flatten the stripes to the sheet evenly.

Cut out two of the larger shape from the striped sheet. Audition how the larger pieces will look hanging from the smaller pieces.

Poke holes in the larger pieces using the Needle Tool.
Bake the clay pieces following the baking instructions for Sculpey Soufflé™.
Allow to cool completely before handling.
Bake the clay pieces following the baking instructions for Sculpey Soufflé™.
Allow to cool completely before handling.

Here’s a layout of how the earrings will be assembled.

Connect the clay pieces to each other using flat nose pliers to open and close the jump rings.

Glue the posts to the backs using silicone glue and allow the glue to dry completely before handling.
