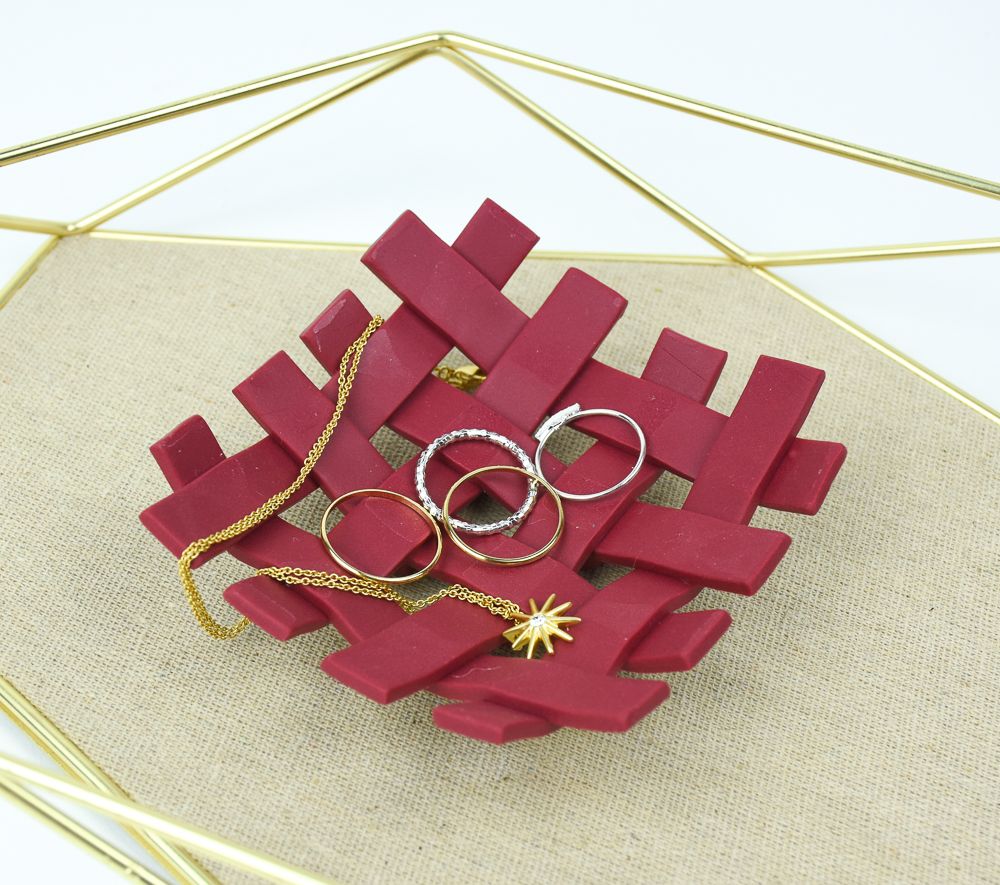
Sculpey Soufflé™ Footed Lattice Tray
Sculpey Soufflé™ Footed Lattice Tray
Designed by Amy Koranek
Read More
Read Less
Wow! You can create this dramatic footed tray in just about an hour! What a terrific gift with the addition of a wrapped soap or maybe a pretty dish towel. COMPLETION TIME: 60 Minutes to make and bake
ADDITIONAL SUPPLIES
- Ruler
- Baking parchment or deli sheet
- Hemisphere baking bowl or other smooth curved surface for shaping the tray
- Flat small saucer

Project Instructions
Step 1
- Getting Started:
Start with clean hands, unwrap and knead clay until soft and smooth, or condition by running clay though a Pasta Machine. We recommend using a designated machine for clay purposes only. When working with multiple colors, clean hands with soap and water or baby wipes (we have found that baby wipes work best) before switching colors. Shape clay, pressing pieces firmly together. Wash hands after use.
- Baking (also called Curing):
Step 2
Sheet the bar of Cabernet through the pasta machine on the thickest setting or with the Clay Roller to 1/8” thick. Make a sheet 4.5” X 4.5”.Divide the sheet with a Clay Blade to eight 1/2” strips.

Step 3
Lay four of the strips parallel with 1/4” gaps between them.
Step 4
Carefully bend two of the strips back. Place a fifth strip across the two flat strips leaving 1/4” tails as shown.
Step 5
Flip the two bent strips back up overlapping the strip that you just laid down.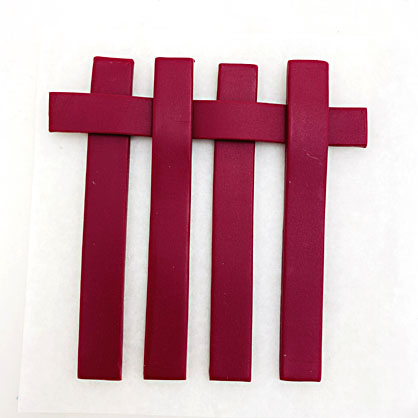
Step 6
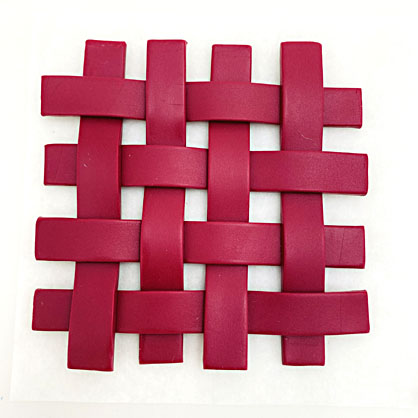
Continue bending and layering more strips weaving them as shown.Leave 1/4” tails on all four sides.
Step 7
Place barrier paper like parchment or deli sheet over the woven slab and roll over it carefully with the Clay Roller. Don’t flatten the clay but just use enough pressure to seal the pieces together.Remove the barrier paper.
Step 8
Create four little cube shaped feet that coordinate in size with your tray - about 1/2” wide by 1/4” thick.
Step 9
Carefully lay the woven slab over a curved form. Use just enough hand pressure to form the clay to the shape.Push the feet into place.

Step 10
Use a flat surface like a small saucer to make sure the feet are level while the tray is upside down on the form.Bake the tray on the curved surface following the baking instructions for Sculpey Soufflé™.
Allow to cool completely before handling.

Step 11
Carefully remove the baked tray from the curved surface with your fingertips.