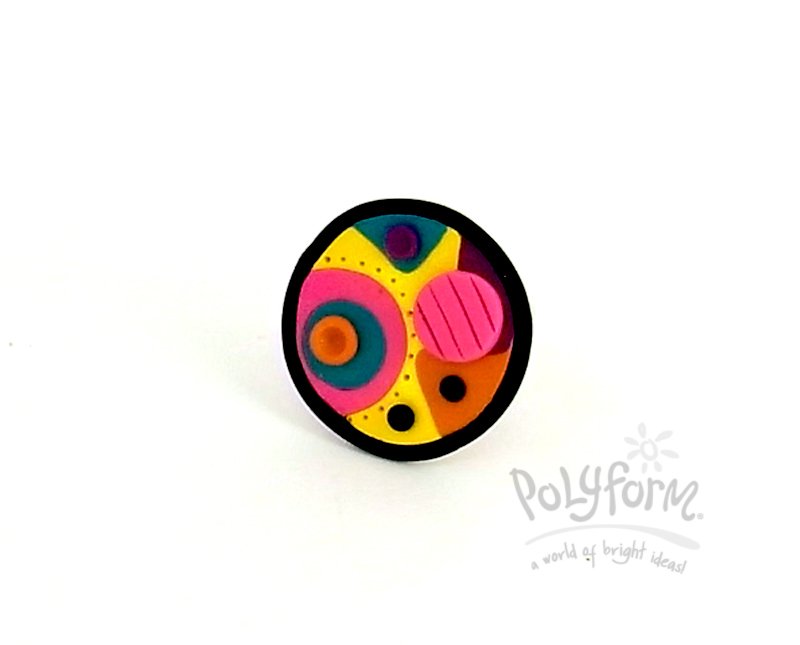
Sculpey Soufflé Color Splash Ring
Sculpey Soufflé Color Splash Ring
Read More
This beautiful ring will add a pop of color to any outfit!
Read Less
ADDITIONAL SUPPLIES
3/8” Metal circle cutter, quarter sized template, ring base, clear fast-drying glue|3/8” Metal circle cutter, quarter sized template, ring base, clear fast-drying glue

Project Instructions
Getting StartedPolymer clay may stain. CLAY MAY DAMAGE UNPROTECTED FURNITURE OR FINISHED SURFACES. DO NOT USE polymer clay on unprotected surfaces. We recommend working on the Sculpey clay mat, wax paper, metal baking sheet, or disposable foil. Start with clean hands and work surface area. Knead clay until soft and smooth. For best results, clean your hands in between colors. Shape clay, pressing pieces together firmly. Bake on oven-proof glass or metal surface at 275°F (130 °C) for 15 minutes per ¼" (6 mm) thickness. For best baking results, use an oven thermometer. DO NOT USE MICROWAVE OVEN. DO NOT EXCEED THE ABOVE TEMPERATURE OR RECOMMENDED BAKING TIME. Wash hands after use. Baking should be completed by an adult.Begin by preheating oven to 275 °F (130 °C). Test temperature with oven thermometer for perfectly cured clay. For best results, condition all clay by running it through the Clay Conditioning Machine for several passes on the widest setting. Fold the clay in half after each pass and insert the fold side into the rollers first.
Make a template using a quarter. Cut out a circle out of heavy paper or card stock.
Condition clay colors (1/4 bar of each) Run each of the colors, except the Poppy Seed through your clay machine on the #2 setting.
Using the circle template, cut out a Canary circle for the base. Smooth edges. Set aside.

Using the square cutter, cut out a square of each of these colors: Pumpkin, Sea Glass and Turnip. Set aside.

Using the mini circle cutter, cut out a So 80’s circle. Set aside.

Using the mini circle cutter, cut out a So 80’s circle. Set aside.
Using the square cutter, use just the corner of it and cut out 3 corner shapes out of the Canary circle. Cut these out of the right-hand edge leaving room on the left to cut out a circle from the left-hand edge. Using the mini circle cutter cut out a circle shape on the left-hand edge. This will not be a full circle, ¼ of it will run off the edge. Fill these holes with the cut out shapes. So 80’s circle on left. Pumpkin Square on bottom right. Turnip square in the middle. Sea Glass square on top. Snug the shapes right up to the edges and then press gently to fill in any gaps.

Using the 3/8” circle cutter, cut out a little circle in the center of your larger So 80’s circle. Using the same cutter, cut out a little Sea Glass circle. Fill the hole in your pink circle with your little Sea Glass circle and press to fit.

Using the paper template again, center it on top of your piece and trim the edges so it is now back in a circle shape. Remove template. Smooth edges.
Condition some Poppy Seed clay and put a small amount in the clay extruder. Using the 2nd to smallest circle disc, extrude about a 5” strip of clay. Wrap this piece around your circle ring base and cut to fit. Smooth edges together. NOTE: you can also roll this snake of clay by hand, being careful to keep it as even as possible in diameter.

Finishing touches. Roll a small Pumpkin ball (6mm), a small Turnip ball (5mm) and 2 very small Poppy Seed balls (3mm) set these aside.Using the 3/8” circle cutter. Cut out a small So 80’s circle. Press it over the Pumpkin and Sea Glass corners. Using the knife tip from the 5 in 1 tool make vertical lines running through the circle for texture.- Press the small Pumpkin ball in the center of the Sea Glass circle. Press the small Turnip ball onto the top Sea Glass colored corner. Press again using the end of a paintbrush or the tip of your pointed 5 in 1 tool.-Press one Poppy Seed ball into the Pumpkin colored corner and one Poppy Seed ball into the Canary space next to the Pumpkin corner.

Finish the piece by poking dots all around the edge of the larger So 80’s circle, using the needle tool tip.
Bake according to directions above and allow to cool completely. Using some clear, fast drying glue, secure your piece to the ring base. Allow to dry.


