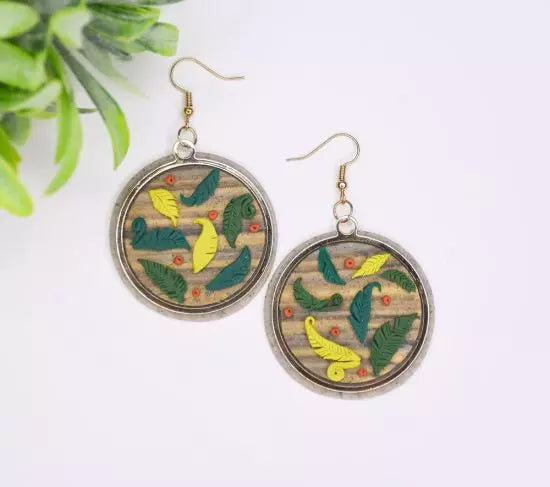
Sculpey Premo™ and Soufflé™ Fern Slab Earrings
Sculpey Premo™ and Soufflé™ Fern Slab Earrings
Designed by syndee holt
Read More
Read Less
Yes, it’s another great collaboration between Sculpey Premo™ and Soufflé™ to create these clever earrings that hint of tropical locations…ahhh, its relaxing just to think about it. They are great fun to make as well! TIME TO COMPLETION:About 45 minutes to make and 30 minutes to bake/cure
ADDITIONAL SUPPLIES
- Craft blade
- Sheet of Deli paper or small sheet of plastic wrap
- 5 inch open gold bezel earring finding (2) Search: “gold toned round open earring bezel” on your favorite supply site
- Gold-toned jump rings (2)
- Gold-toned ear wires (2)
- Crafting pliers
- Clear crafting glue
- Toothpicks

Project Instructions
Step 1
- Getting Started:
Start with clean hands, unwrap and knead clay until soft and smooth, or condition by running clay though a Pasta Machine. We recommend using a designated machine for clay purposes only. When working with multiple colors, clean hands with soap and water or baby wipes (we have found that baby wipes work best) before switching colors. Shape clay, pressing pieces firmly together. Wash hands after use.
- Baking (also called Curing):
Step 2
Condition and roll out small snakes of the Sculpey Premo™ 18K Gold, Gray Granite and Black. The largest snake should be the Gray Granite, followed by the 18k Gold and the smallest snake will be the black. These snakes are only about 2.5 inches long.
Step 3
Press the 3 snakes together and twist them tightly to create fairly vertical stripes. Yes, they look a mess now, but they will magically become glorious!Once you have twisted them flatten the coil with your fingers as much as possible, keeping the strips as vertical as possible.

Step 4
Run this flattened piece of striped clay through the clay conditioning machine on a wide open setting, making sure to keep the stripes vertical.You can carefully fold to keep the stripes vertical and roll through a couple of times to your satisfaction.
Roll the final sheet through a medium setting.

Step 5
Use the 1.5-inch circle cutter to cut out two circles from your striped/marbled sheet. NOTE: I’m using 1.5-inch metal bezels, so your circle should match the size (and shape) of your bezels.
Step 6
Sheet out another small amount of the Premo Gray Granite and cut out two circles with the 1.75-inch round cutter. You can see that my metal bezel is just slightly smaller than this circle.Use your craft knife to cut out the clay in the top connecting circle.

Step 7
Center your marbled clay on the gray granite background and place the bezel around the circle. Make sure that you have your stripes as level as possible in the bezel.Put a small piece of plastic wrap on top of this sheet and gently press it onto the Gray Granite circle and blend the edges of the clay to the metal circle.
You will need to trim out any excess clay in the small hole for assembly.

Step 8
Sheet out a small piece of the Soufflé™ Racing Green on a medium/thin setting. Use your craft knife to cut out a leaf shape that is long/thin like a fern leaf.
Step 9
Use the craft blade to gently draw in the center vein and then LOTS of lines on both sides of the center vein.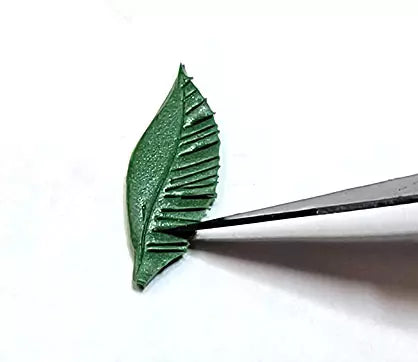
Step 10
Some of these lines should be cut all the way through the clay to the center vein (or shorter) at irregular intervals. This will add motion and natural shaping to your fern leaves. I also curled a couple of the leaf tips.Make a couple of leaves in each of these colors: Soufflé Racing Green, Citron and Premo Forest Green.

Step 11
Once you have a couple of leaves, you can start laying out your design.
Step 12
I also decided to add a few curls to some of the fern leaves with pieces from the sheet I was cutting out the leaves from.
Step 13
Once I felt I had enough fern leaves in each bezel, I pinched off tiny pieces of the Soufflé Cinnamon and rolled tiny balls that I pressed into place with the point of the toothpick (a needle tool works great for this as well!)
Step 14
I didn’t make my earrings match exactly, but I did have 7 leaves and 5 small balls on each earring.Bake/cure the earrings now according to the directions in Step 1 above.

Step 15
Once the earrings have baked/cured and cooled, I checked to see if my metal bezel could pop off and I add a tiny amount of clear craft glue around it using a toothpick and put it back onto the clay.Once the glue had dried, I attached the ear wire to the bezel with the jump ring.
