
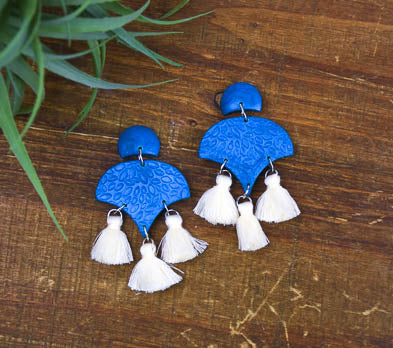
Sculpey Premo™ Moroccan Inspired Post Earrings
Sculpey Premo™ Moroccan Inspired Post Earrings
Designed by Amy Koranek
Read More
Create a wonderful Moroccan inspired pair of earrings in a snap with the help of a few Sculpey tools. The tassels at the bottom of the earrings really help bring the drama.
TIME TO COMPLETION:
60 Minutes to make, bake, and assemble
Read Less
ADDITIONAL SUPPLIES
- 2” Circle cutter (largest cutter in the Sculpey Nested Circle Cutters)
- Little cream tassels (6)
- 6 mm Silver tone jump rings (6)
- 8 mm Silver tone jump rings (2)
- Silver tone ear posts (2)
- Ear backs (2)
- Silicone glue or instant drying glue
- Flat nose pliers
Project Instructions
- Getting Started:
Start with clean hands, unwrap and knead clay until soft and smooth, or condition by running clay though a Pasta Machine. We recommend using a designated machine for clay purposes only. When working with multiple colors, clean hands with soap and water or baby wipes (we have found that baby wipes work best) before switching colors. Shape clay, pressing pieces firmly together. Wash hands after use.
- Baking:
Condition 1/8 block of Peacock Pearl. Hand shape the clay into a shape that mimics the Moroccan cavity and place it into the mold.

Press the clay to fill the entire shape making sure to get the clay into all the sharp points. Shave away excess clay from the back of the open cavity with the Clay Blade to make the clay level to the mold.

With the clay side down, press the mold side of the Moroccan shape with your fingertip to help eject the clay from the cavity. Gently flex the mold to help the piece release onto the work surface.

Repeat Steps 2-4 to make a second piece.

Use the Nature texture sheet to impress a texture into each of the pieces. Lay the texture sheet, texture side down, over one of the shapes, and press firmly all over the shape with your fingertips. If you have trouble getting texture sheets to release from the clay, you can use just a spritz of water to act as a release between the texture sheet and the clay. If you do use water as a release, wipe away any extra water from the surface of the clay with paper towel.

Press Peacock Pearl into the smallest round shape in the Cabochon Mold. Gently release the clay piece by carefully flexing the mold. Reshape with your fingertips as needed. Make a second small round cabochon.

For this design we are going to use the Moroccan shape upside down. Align the small round cabochon above the Moroccan shape. Use a 2” circle cutter to remove the bottom portion of the round cabochon so it sits nicely above the Moroccan shape.

Repeat for the second set.

Align the pieces and poke holes for the assembly later. One hole at the top of the Moroccan shape and one at the bottom of the cabochon. Then three holes at the bottom of the Moroccan shape for the tassels.

Bake the clay pieces and allow to cool completely before handling. Here is the layout for the earrings. The 8 mm jump rings are used to connect the Moroccan shapes to the cabochons since these pieces are thicker. The 6 mm jump rings are to connect the tassels at the bottom.

Use flat nose pliers to open and close the jump rings connecting the pieces as shown.

Glue the posts to the backs of the cabochons and allow the glue to dry completely.

Here’s a look at the big finish!
