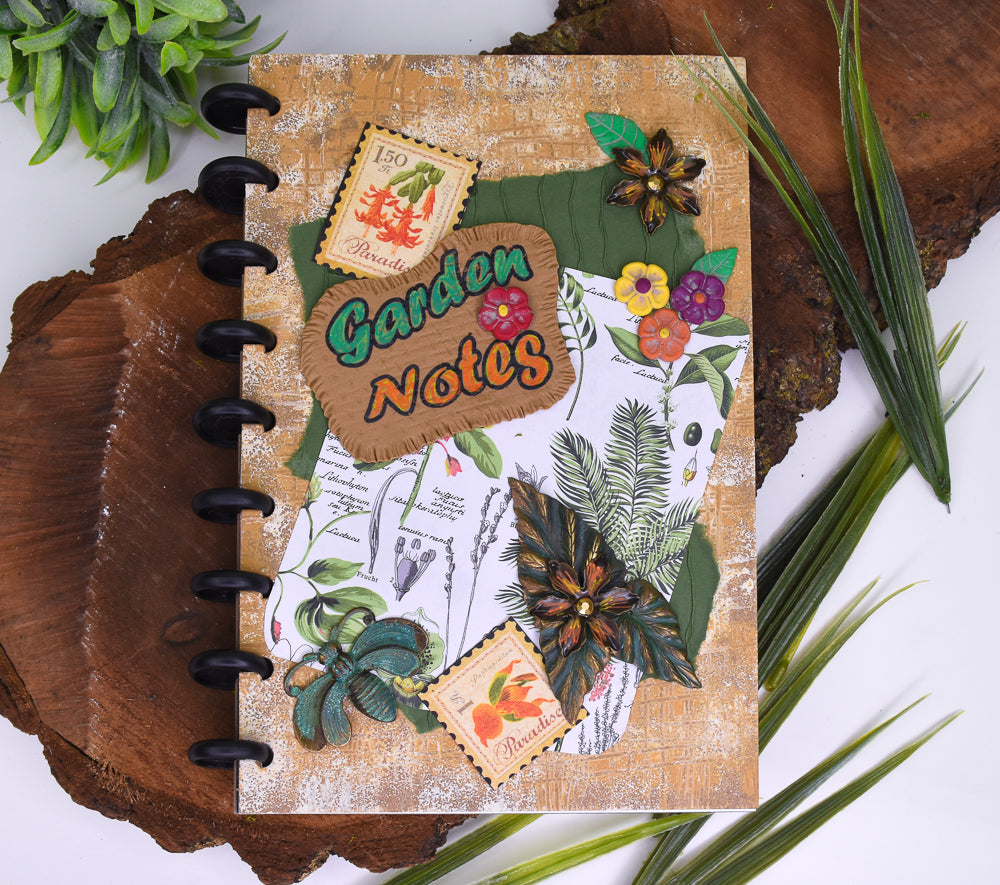
Sculpey Soufflé™ Multimedia Garden Notes Journal
Sculpey Soufflé™ Multimedia Garden Notes Journal
Designed by syndee holt
Read More
Do you have an avid gardener in your family or friends? What better gift for them than to create a Garden Notes journal for them to keep track of WHAT was plants WHERE. The design for this journal cover is based on the garden burlap found in every garden. Add a few botanical papers, stamps and dig through your what nots collection for other garden related items to add to it!
I cannot hand letter, so I create my graphics in Word and/or Photoshop and transfer them to the clay. If you CAN letter, you can skip the next couple of steps to the baking part! Then letter on your baked and cooled piece of clay.
TIME TO COMPLETION: About 40 minutes to create, 30 minutes to bake and 15 minutes to assemble
Read Less
I cannot hand letter, so I create my graphics in Word and/or Photoshop and transfer them to the clay. If you CAN letter, you can skip the next couple of steps to the baking part! Then letter on your baked and cooled piece of clay.
TIME TO COMPLETION: About 40 minutes to create, 30 minutes to bake and 15 minutes to assemble
ADDITIONAL SUPPLIES
Have on hand:
- Clay dedicated pasta machine or acrylic roller
- Acrylic craft paints – Tan, Off-white, dark green, light grey
- Small piece of tan burlap
- Garden themed scrapbook papers
- Small paint pouncers (2), small paint brushes (2)
- Garden themed brass charms
- Optional: Permapaque paint markers, Micron black marker #5
- Craft knife like Exacto blade
- Spray Glue for the papers, Gorilla glue for the ornaments
For a transfer:
- Black and white LASER print of the supplied artwork
- CLEAR Hand sanitizer or rubbing alcohol (72%)
- Craft scrapper (I like to use a silicon brush as shown)
- Small sheet of waxed paper

Project Instructions
- Getting Started:
Start with clean hands, unwrap and knead clay until soft and smooth, or condition by running clay though a Pasta Machine. We recommend using a designated machine for clay purposes only. When working with multiple colors, clean hands with soap and water or baby wipes (we have found that baby wipes work best) before switching colors. Shape clay, pressing pieces firmly together. Wash hands after use.
- Baking (also called Curing):
CREATING THE JOURNAL BACKGROUND:
Load the two small pouncers with your selected colors to pounce on the background. I use small kids watercolor brushes to bring the paint from the bottle to the pouncer.
Load the two small pouncers with your selected colors to pounce on the background. I use small kids watercolor brushes to bring the paint from the bottle to the pouncer.

Press the pouncers to the journal cover. You can blot over a color to keep a balance of the two colors. Cover about 1/2 the journal and go onto quickly to the next step.

Grab your old fork, and drag vertical and horizontal lines through the wet paints. NO! the lines do NOT have to be straight! Now repeat Steps 3 and 4 to complete the entire journal cover background.

Now repeat Steps 3 and 4 to complete the entire journal cover background. Set aside to dry completely.

CREATING A TRANSFERRED IMAGE:
If you want to create your own lettering in either Photoshop or Word to transfer, please be sure to reverse the lettering right to left. I have my transfer and my sheet of Soufflé Latte rolled out to a size that will fit my transfer. In this case, the thickness of the clay doesn’t matter, but I kept mine fairly thin (middle setting on my pasta machine). Trim your transfer leaving a selvage edge around the lettering. Position the sheet of clay on the small sheet of waxed paper.

Place the transfer face down on the clay and saturate the entire paper with either Clear Hand Sanitizer or Rubbing Alcohol. Use a scrapper to remove the excess fluid. I am using a silicone brush, but a small piece of flexible plastic, like an old credit card will work as well. Now we practice patience and let the transfer fluid evaporate!

In just a moment or two, the paper will look opaque again. It is time to repeat Step 7 above. Normally, I have to do Step 7 twice before I add more transfer fluid and gently peel up a corner to see how my transfer is going. Some days, they “play nicely” and other days, well they can be quite testy…

IT IS IMPORTANT THAT THE PAPER BE DAMPENED. Once it appears that the transfer has completed, slowly pull the paper off. If you see a gap in the transfer, gently lay the paper back down, put a spot of transfer fluid on your finger and gently rub the area. If there are tiny spots that didn’t transfer (I call those holidays), don’t worry, we can touch up after baking with a black marker.

Use your clay blade in the Essential Tool kit or craft knife to cut out your design. Be careful not to touch your lettering until it is dry.

Once the clay is completely dry, press a small piece of burlap into the clay using your fingertips. This texture doesn’t have to be perfect – smooth areas, deeply texture areas – all will add to the project!

I used the Rubber Chisel tool from the Essential Tools kit to texture my edges to resemble frayed burlap. I also liked how this texturing caused the edges of the clay to ripple slightly and I kept those ripples because it resembled textile!

Here is a look at my completed title plate ready to go on the baking sheet!

CREATING THE REST OF THE CLAY DESIGNS
I decided to use some of the wonderful Soufflé colors to create a couple little flowers to scatter on the cover.
Roll to small ball of your selected color (this is Pumpkin) and press it firmly into the mold.
I decided to use some of the wonderful Soufflé colors to create a couple little flowers to scatter on the cover.
Roll to small ball of your selected color (this is Pumpkin) and press it firmly into the mold.

Trim the excess clay away from the middle to the edge and repeat on the other side. Then pop the clay out of the mold.

Add a small ball of Soufflé Canary to the center of the flower. Repeat to create a couple more colorful flowers.

Repeat to create a couple more colorful flowers. Repeat steps 14 and 15 to create a couple more flowers.
You can texture the little ball in the center of the flower with either the needle part of the needle tool from the Essential Tools kit or the back of the same tool. It is concave and nicely rounds the ball for us!
Bake your name plate and flowers according to the directions in Step 1 above.
You can texture the little ball in the center of the flower with either the needle part of the needle tool from the Essential Tools kit or the back of the same tool. It is concave and nicely rounds the ball for us!
Bake your name plate and flowers according to the directions in Step 1 above.

Once the clay has baked and cooled, I use a fine tip marker (mine is a Micron #5) to just touch out any little gaps in the transfer.

Now the fun part! Coloring! I am using opaque paint markers because I really like the flat, matte surface that they provide. I like to layer colors over each other, so I am using a bright green first on the Garden letters.

Once those letters are complete and dry (they dry quickly), I kind of scribble over the letters with a darker green marker. Allow some of the bright green to show through.

Repeat this coloring process on the lettering for Notes, using a yellow marker first and scribbling over it with an orange marker.

While everything was drying, baking or cooling, I gathers my papers metal decorations I wanted to use and cut/tore them to fit into my design. Now I can add my completed title plaque to see how everything fits.

I decided that my flowers and leaves were a little too brightly colored, so I toned them down with a quick wash and wipe of light grey craft paint.

I prefer to alter my store-bought decorations slightly to customize them to my project and I had previously painted my brass leaves with a dark green paint for another project, so I added a quick wipe of a gold wax to the top edges of the design. (Gold paint would work as well).

Even my darker metal flowers got a quick pick-me-up with my Opaque paint pens to bring them more in line with my color palette!

I placed everything into position and took a photo for reference. Then I carefully added the binding buttons to the edge of the journal cover and added the paging and back cover once these were in place in the front cover.

I used spray glue to affix my two large sheets of paper and Gorilla glue to affix all the rest of the pieces, using my photo taken above as my reference. I set the completed journal aside overnight to dry completely.
Hmmm, I was going to give this to my daughter-in-law, who is an avid gardener, but I just *might* keep it now! LOL
Hmmm, I was going to give this to my daughter-in-law, who is an avid gardener, but I just *might* keep it now! LOL


