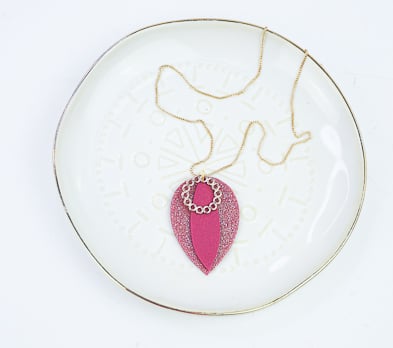
Sculpey Soufflé™ Wild Orchid Layered Pendant
Sculpey Soufflé™ Wild Orchid Layered Pendant
Designed by syndee holt
Read More
This simple pendant gets its drama from the mix of the Sculpey Soufflé™ Wild Orchid and Sculpey Premo™ Yellow Gold Glitter. The addition of the pink gold metal detail ring on top echoes that mix.
TIME TO COMPLETION: 45 minutes
Read Less
ADDITIONAL SUPPLIES
- Small smooth tile
- Exacto type craft blade
- Pink Gold or Gold circular embellishment (about 3/4 inch wide)
- 8 mm pink gold or gold jump ring
- Small chain
- Jewelry tools
- Small piece of stair safety tred or rough sandpaper

Project Instructions
- Getting Started:
Start with clean hands, unwrap and knead clay until soft and smooth, or condition by running clay though a Pasta Machine. We recommend using a designated machine for clay purposes only. When working with multiple colors, clean hands with soap and water or baby wipes (we have found that baby wipes work best) before switching colors. Shape clay, pressing pieces firmly together. Wash hands after use.
- Baking:
I started with a 1 part mix of the Wild Orchid to 2 parts of the Yellow Gold Glitter. This is the 1:2 mix, but I decided I wanted more drama, so I added another 2 parts of the Yellow Gold Glitter.
Note that I use a cutter to measure out my clay for mixes! This is the 1.5” round Sculpey cutter, but any shape will work as long as you use the SAME cutter for each color.
Note that I use a cutter to measure out my clay for mixes! This is the 1.5” round Sculpey cutter, but any shape will work as long as you use the SAME cutter for each color.

Now that I have all the drama and flash I want in the mix, I rolled it out on a medium setting and I moved the sheet of clay to a small smooth tile and pressed it gently into down.
I selected the largest of the fat teardrop to create my design, using the blade to slide along the template. I focus on keeping my blade upright and allow the template to steer the blade.
I selected the largest of the fat teardrop to create my design, using the blade to slide along the template. I focus on keeping my blade upright and allow the template to steer the blade.

Once the cut is completed, remove the template and the excess clay, then gently slide your blade underneath the design to gently remove it from the tile without distortion. Set aside on a clean sheet of paper for now.

I chose to texture my Wild Orchid for the pointed oval with a small piece of stair safety tred (rough sandpaper will work as well.)
Place the textured clay on the tile and gently press into place before cutting out the design. Repeat Step 4.
Place the textured clay on the tile and gently press into place before cutting out the design. Repeat Step 4.

Position the two pieces together and gently use the needle tool to mark both pieces for positioning. Separate the two pieces and complete the holes. Bake the two pieces according to the directions in step 1 above.

Once the pieces have baked and cooled, thread the pieces and your metallic ornament onto your jump ring. Add the chain and you are ready!


