Sculpey Soufflé™ Marble Magic Earrings
Sculpey Soufflé™ Marble Magic Earrings
Designed by Amy Koranek
Read More
This project brings paint pours/marbling to polymer clay! Every single pair will be absolutely unique! COMPLETION TIME:
60 Minutes to make, bake, and assemble; sufficient additional drying time will be needed for paint and glaze to dry.
Read Less
ADDITIONAL SUPPLIES
- Shallow basin for water, medium, and paint
- Paper towels
- Teaspoon measure
- Cup measure
- DecoArt Water Marbling Magic Medium
- DecoArt Water Marbling Acrylic in colors of your choice
- Paintbrush
- 6 mm Silver toned jump rings (2 per earring pair)
- 4 mm Silver toned jump rings (2 per earring pair)
- Silver toned ear wires (2 per earring pair)
- Flat nose pliers

Project Instructions
- Getting Started:
Start with clean hands, unwrap and knead clay until soft and smooth, or condition by running clay though a Pasta Machine. We recommend using a designated machine for clay purposes only. When working with multiple colors, clean hands with soap and water or baby wipes (we have found that baby wipes work best) before switching colors. Shape clay, pressing pieces firmly together. Wash hands after use.
- Baking (also called Curing):
Start by mixing up the water and medium because the medium will need to set up for 30 minutes before using.
I used a shallow container as shown with 2 cups of warm water and 1 teaspoon of medium.
Follow the directions carefully on the canister DecoArt Water Marbling Magic Medium completely to make the fluid for water marbling.
I used a shallow container as shown with 2 cups of warm water and 1 teaspoon of medium.
Follow the directions carefully on the canister DecoArt Water Marbling Magic Medium completely to make the fluid for water marbling.

Stir the medium in as well as you can. You can see that some of the medium does not mix in completely but will after the setting time of 30 minutes.

While the water and medium set, make two large teardrops for each pair of earrings that you want to make from Sculpey Soufflé™ Igloo. I made several pairs because this was my first time using the marbling material and I wanted to have several samples to choose from.
Use the Needle Tool or the Blunt Point Tool to poke holes in the top of each clay teardrop.
Bake the teardrop pieces following the baking instructions for Sculpey Soufflé™ and allow to cool completely before handling.

After the fluid medium has been allowed to set for 30 minutes, stir it again. The remaining lumps from the previous mixing will easily stir in now.

Set up your work area. You will need paper towels spread out flat next to the water basin. I have an additional styrofoam tray in this photo, which I did not end up needing.

The DecoArt website gives many inspirations for colors and paint dripping techniques and I would suggest looking at the website for ideas before dripping colors on the surface of the water.
I tried both a rainbow technique and a three-color technique.
In this tutorial I’m showing you how I did both techniques using the same fluid and finishing both styles of earrings.
Start with dots of color onto the surface of the water as you like. I started with red.
I tried both a rainbow technique and a three-color technique.
In this tutorial I’m showing you how I did both techniques using the same fluid and finishing both styles of earrings.
Start with dots of color onto the surface of the water as you like. I started with red.
Then I added orange drops into the center of the red. You can see that each color you add pushes the original color drops out.

Here’s a look after I added both yellow and then bright green always dripping from the center of each area.

Finally, I added blue dots of color in the centers of each green area.

Use the Needle Tool to drag through the colors creating a marbled effect to your liking.
Dip the face of the baked Soufflé™ pieces into the color
Dip the face of the baked Soufflé™ pieces into the color

Immediately flip the marbled clay pieces (face up) onto the paper towel and allow them to dry completely.

I dipped several pieces into the rainbow marbling fluid that I had created and set them aside to dry.
As you dip the pieces into the color fluid, much of the paint will be removed leaving blank spaces in the fluid.
I added drips of purple and teal Water Marbling Acrylics into these blank spaces. Then I dragged the Needle Tool through again to create more patterns.
As you dip the pieces into the color fluid, much of the paint will be removed leaving blank spaces in the fluid.
I added drips of purple and teal Water Marbling Acrylics into these blank spaces. Then I dragged the Needle Tool through again to create more patterns.

Then I dipped additional baked Soufflé™ pieces into this color combination as well and set the pieces aside to dry completely.

After the paint was completely dry, I carefully glazed the painted surfaces using a paintbrush with Sculpey® Glossy Glaze and allowed it to dry completely.

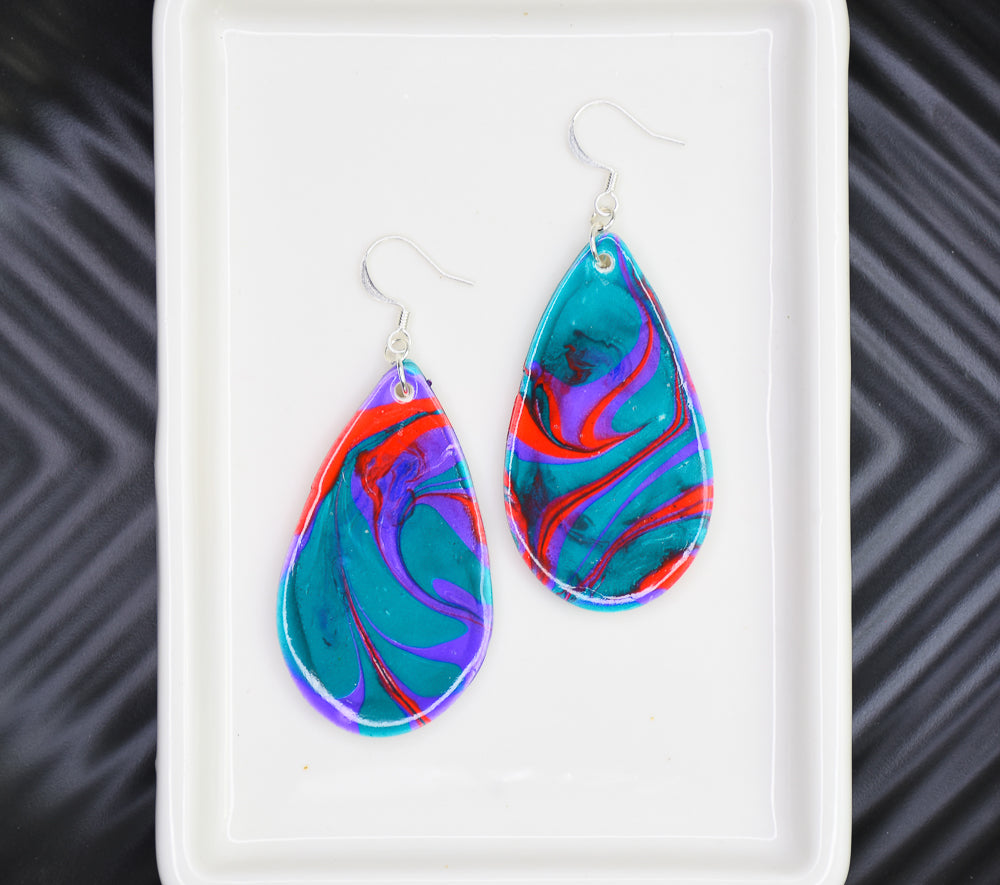
Here’s the earring layout for the red/teal/purple earrings.

Use flat nose pliers to open and close jump rings and ear wires assembling finished earrings.

I repeated the layout and assembly for the rainbow dipped earrings as well
