Skip to product information
1 of 1

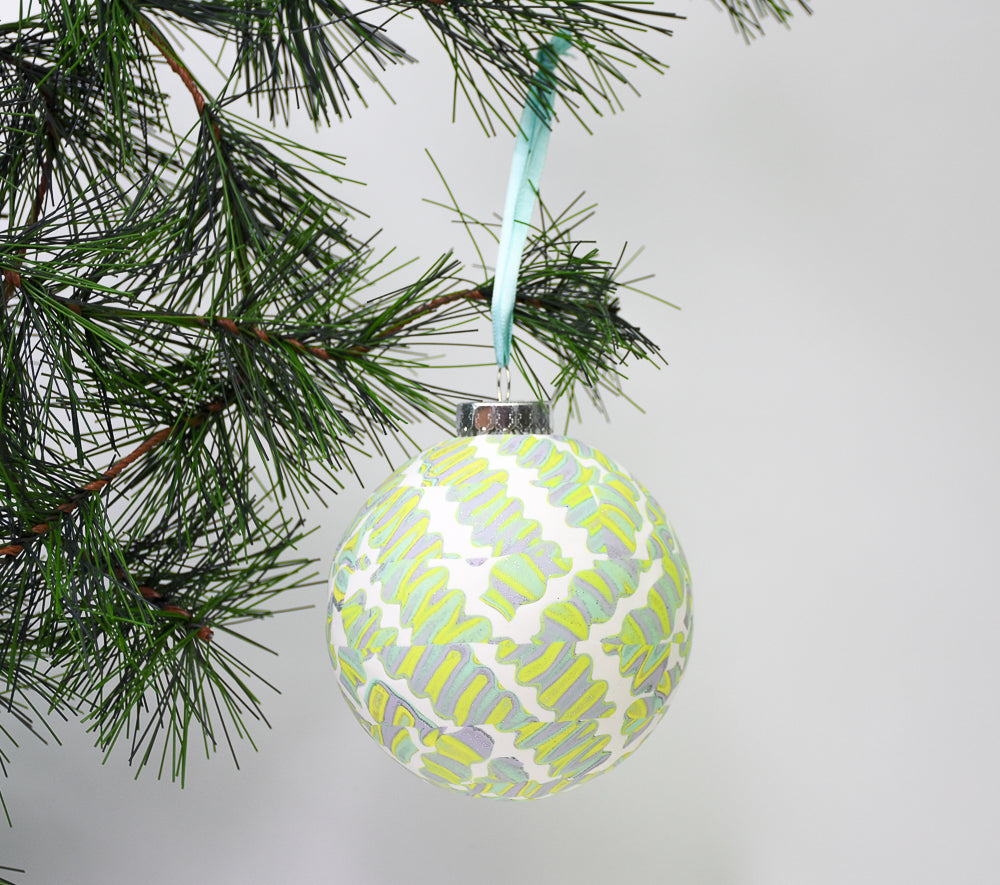
Sculpey Premo™ Terrazzo Ball Ornament

Sculpey Premo™ Terrazzo Ball Ornament

Read More
Cover a glass ornament ball with wavy blade slices to create a custom color combo for your holiday trimmings. COMPLETION TIME: 60 Minutes to make and bake Designed by Amy Koranek
Read Less
ADDITIONAL SUPPLIES
  • Glass ornament ball
  • 25” Square cutter
  • Ruler
  • 12” Coordinating ribbon
  • Scissors
View full details
Project Instructions

Step 1

Getting Started:
Please make sure your work area is covered and you are not working on an unprotected surface. We recommend working on the Sculpey® Oven-Safe Work Mat, wax paper, metal baking sheet, or disposable foil. Uncured clay may damage unprotected furniture or finished surfaces. Be sure to cover your crafting area appropriately.

Start with clean hands, unwrap and knead clay until soft and smooth, or condition by running clay though a Pasta Machine. We recommend using a designated machine for clay purposes only. When working with multiple colors, clean hands with soap and water or baby wipes (we have found that baby wipes work best) before switching colors. Shape clay, pressing pieces firmly together. Wash hands after use.

Baking (also called Curing):
Begin by preheating oven to 275 °F (130 °C). After you are done creating; for best results bake/cure clay on an oven-proof surface such metal, aluminum foil, an index card or the Sculpey® Clay Mat at 275°F (130 °C) for 30 minutes per 1/4" (6 mm) thickness according to package directions. Oven safe glass or ceramic surfaces are also acceptable for baking/curing; however please note that the baking/curing times may take longer as the glass or ceramic surfaces take longer to heat up. For best baking results, use an oven thermometer. DO NOT USE MICROWAVE OVEN. DO NOT EXCEED THE ABOVE TEMPERATURE OR RECOMMENDED BAKING TIME.

Step 2

Make sure the glass ornament ball is clean.
Remove the metal cap and set aside for now.

Step 3

Sheet each 1/4 bar each Lavender, Mint Green, and Sunshine to 1/8” thick either with the Acrylic Clay Roller or through the pasta machine on the thickest setting.

Sheet White Gold Glitter to 1/16” thick either with the Acrylic Clay Roller or through the pasta machine on the third thickest setting.

Cut equal size pieces of each of the colors either with a square cutter or just by measuring- about 1.25” square. This does not need to be precise, just making sure we have roughly the same volume of each.

Cut the same size square three times of the thinner White Gold Glitter.

Step 4

Place one thin White Gold Glitters on top of each color.

Step 5

Stack the colors as shown.

Step 6

Roll to press all the sheets together and to press out air bubbles. Only roll to lengthen in one direction.

Step 7

Either keep rolling or press through the pasta machine on the thickest setting to make the sheet a total of 1/8” thick.

Step 8

Cut the sheet in half.

Step 9

Stack the sheets one on top of the other matching the straight edges.
Roll with the Acrylic Clay Roller to seal them together.

Step 10

Cut off the wonky end.
Divide the sheet into three equal sections.

Step 11

Stack the three sections.

Step 12

Stand the pile on its side.

Step 13

If your pile is fairly wide, it will be easier to manage if you make it more narrow. Do this by cutting it in half and placing one half in front of the other.
Press the two halves together.

Step 14

With the wavey blade, slice through the pile of clay parallel to the stripes. Make each slice about 1/8 inch thick.

Step 15

Cut the entire stack into wavey pieces. When I use the wavey blade, I prefer to make all my cuts parallel lining up the wave pattern to the one before to save material and not produce thin spots.

Step 16

Roll or sheet each slice to 1/8” thick.

Step 17

Use the Wavey Blade again to divide each slice into multiple thin strips.

Step 18

Prepare a sheet of White Premo™ to 1/8” thick with the Acrylic Clay Roller or the pasta machine on the thickest setting.
Place the wave strips all over the sheet. You can be as precise or as random as you like.

Step 19

Roll over the strips to set them in place.

Step 20

Either roll the entire sheet until it is level or press it through the pasta machine on the thickest setting to embed the strips.

Step 21

Use a ruler to section the sheet into equal width strips.

Step 22

Cut the ends of the strips off square.

Step 23

Wrap strips around the ball starting in the middle. Don’t line the patterns up, but let each row fall randomly.

Step 24

As you get closer to either end of the ornament, the strips may start to wrinkle. Distribute the wrinkles as evenly as possible and then just smooth them to the ball with fingertips.

Step 25

Press each strip flat to the ball.
Trim the ends of each strip squarely, so you can add another strip neatly beside it.

Step 26

Keep adding strips until you get to the top.
Use a circle cutter to trim a nice edge around the stem.

Step 27

Remove the rough edge of clay that was scored by the circle cutter.

Step 28

Keep adding strips until you get to the bottom of the ball.
Use a circle cutter to define the area remaining at the bottom.

Step 29

Use the same size circle cutter to a piece that will fill in the bottom area.

Step 30

Smooth all the seams with fingertips and by rolling the ball carefully between your palms.
You can place the ornament on something soft, like a folded dish towel for baking so it doesn’t get a flat spot on it.
Bake following the baking instructions for Sculpey Premo™. Allow to cool completely before handling.

Step 31

Replace the metal cap. Add a coordinating ribbon.