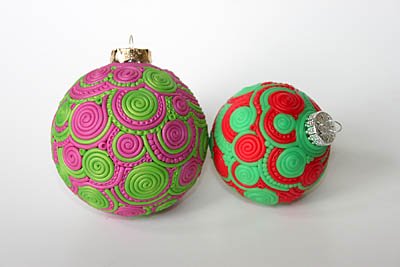
Sculpey Premo™ Extruded Sculpey Doodle Ornaments
Sculpey Premo™ Extruded Sculpey Doodle Ornaments
Doodling is so much fun! These ornaments are just doodling with clay instead of pen and paper! The patterns are created in a flowing motion just like doodles are – no start, no end, just connecting one to the other.
- Glass ornament
- Baking parchment paper
- Polyester fiber fill small box or round cutter to sit the ornament in

- Getting Started:
Start with clean hands, unwrap and knead clay until soft and smooth, or condition by running clay though a Pasta Machine. We recommend using a designated machine for clay purposes only. When working with multiple colors, clean hands with soap and water or baby wipes (we have found that baby wipes work best) before switching colors. Shape clay, pressing pieces firmly together. Wash hands after use.
- Baking:
Extrude the clay by loading the extruder and extruding in about 12 inch lengths. I like to set a TV tray up next to my work table and cover it with baking parchment paper. Then I lay the lengths of clay on the parchment paper as I create them. Create at least a 8-10 lengths of each color.
Start by wrapping one of the colors a couple of times around the top of the ornament, ending with a small coil of clay.

Add the second color, by cutting the end of the coil at an angle to fit into the space created at the intersection of the first color coil. Use the craft blade to cut the end to match the other intersection.

Add a second coil of clay with the green color, putting it as close as possible to the pattern. NOTE: I often create my coils flat on a sheet of paper and then transfer them to the ornament.
Fill the space left between the coils of clay with a small ball of clay and use the small ball tool to press it into place.

Use a small piece of the baking parchment to gently press the clay coils to better adhere them to the glass and to create a smoother surface to the ornament.

Because we are only using two colors of clay, we can add more variety to the pattern by adding lines of color, textured lines of color and lines of small balls of clay to the pattern.

When the ornament is about 1/3 completed, bake it for about 10 minutes at the temperature specified on the clay package directions. Of course, since the ornament is round, you need to anchor it for baking. I use a small cardboard box and a piece of polyester fiber fill to “nest” the ornament. The fiberfill will NOT burn and it will not adhere to the clay.

Once the clay is baked and cooled, you can continue with your pattern. I tend to bake the ornaments 3 times, regardless of the size of the ornament.
- Choosing a selection results in a full page refresh.
- Opens in a new window.

