Skip to product information
1 of 1

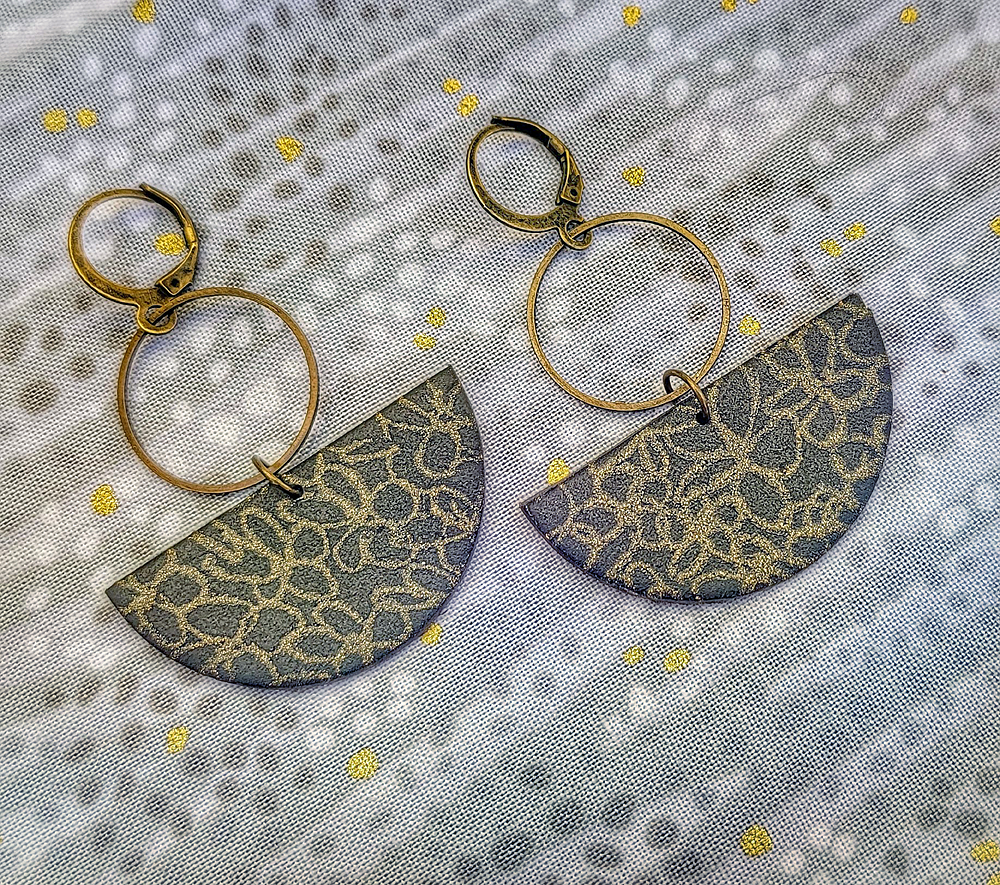
Sculpey Soufflé™ and Liquid Sculpey® Custom Silkscreened Dangle Earrings

Sculpey Soufflé™ and Liquid Sculpey® Custom Silkscreened Dangle Earrings

Read More
Creating designs with polymer clay is so exciting to do, but to team your clay up with your own custom handmade silkscreen is SUPER FUN! You can draw your own designs directly onto clear plastic or print them on transparency material through your printer. Then it’s time to “burn” your screen. Don’t worry EZ Screen has terrific directions that make the whole silkscreen creation easy. The bonus for this project is that we will be using Gold Liquid Sculpey® (LS) to screen with. LS doesn’t air dry, so there isn’t the big rush to wash the screen as when acrylic paint is used. You can screen several sheets of clay (different colors!) before you do an easy cleanup of the screen!
Time to completion: 90 minutes to make the screen, 60 minutes to make/bake the earrings
Designed by syndee holt
Read Less
ADDITIONAL SUPPLIES
  • EZ Screen Mini Starter Kit
  • Round cutter- mine is 1.5 inches in diameter
  • Flexible card (like an old hotel key) or a Silicone paint brush like I’m using
  • Baby Wipes and small bottle of hand sanitizer
  • Needle tool or drill to make the assembly hole in the clay
  • Gold or Antique Gold 6 mm jump ring (2)
  • Flat brass rings – mine are 20 mm (2)
  • Lever back round French hook ear wire (2)
  • Jewelry pliers (I prefer to use a pair of matching bent nose pliers)
View full details
Project Instructions

Step 1

Getting Started:

Please make sure your work area is covered and you are not working on an unprotected surface. We recommend working on the Sculpey® Oven-Safe Work Mat, wax paper, metal baking sheet, or disposable foil. Uncured clay may damage unprotected furniture or finished surfaces. Be sure to cover your crafting area appropriately.

Start with clean hands, unwrap and knead clay until soft and smooth, or condition by running clay though a Pasta Machine. We recommend using a designated machine for clay purposes only. When working with multiple colors, clean hands with soap and water or baby wipes (we have found that baby wipes work best) before switching colors. Shape clay, pressing pieces firmly together. Wash hands after use.

Baking (also called Curing):

Begin by preheating oven to 275 °F (130 °C). After you are done creating; for best
results bake/cure clay on an oven-proof surface such metal, aluminum foil, an
index card or the Sculpey® Clay Mat at 275°F (130 °C) for 30 minutes per
1/4" (6 mm) thickness according to package directions. Oven safe glass or
ceramic surfaces are also acceptable for baking/curing; however please note
that the baking/curing times may take longer as the glass or ceramic surfaces
take longer to heat up. For best baking results, use an oven thermometer. DO
NOT USE MICROWAVE OVEN. DO NOT EXCEED THE ABOVE TEMPERATURE OR RECOMMENDED BAKING TIME.

I have attached a sheet with my artwork I used for this project if you wish to print out and use for your silkscreen.

Step 2

Create your personal screen following the directions from the EZ Screen kit.

Step 3

Roll your conditioned Poppy Seed out to a thickness you prefer for your earrings. (I use #3 on my pasta machine). Place your silkscreen onto the sheet of clay. Stir
the bottle of Liquid Sculpey® (LS) well and squeeze a generous amount onto the
silkscreen.

NOTE: The fabric feeling side of the screen goes up and the
shiny emulsion side goes down against the clay!

Step 4

Use your old credit card, room key or silicone brush to spread the LS evenly over
your design.

Step 5

Gently remove the excess LS with your card or brush and return it to the LS
bottle. No waste!

Step 6

Remove the silkscreen and set it aside on a clean sheet of paper. Admire your new
silkscreened clay!

Step 7

Useyour selected cutter to cut out your design and use the blunt tool to gently
press a clay edge to loosen the clay from the cutter. Souffle is not a sticky
clay, so this process is quick and easy! Take care not to smear the LS
surfaces. Set aside and cut more designs out if you wish!

Step 8

Cut your circle in half using a clay blade or knife tool. I like to use a lined index card to help me find center and keep my cut straight.

Step 9

Since the LS doesn’t dry out on the silkscreen like and acrylic paint would, I cut
out several circles from some of my favorite Soufflé colors as well!

If you are using a needle tool, place your holes in the clay pieces and bake/cure your clay according to the directions in Step 1. (Note, I recommend you read Step 10 for my trick to getting a centered hole!)

Step 10

Clean your screen while your clay is baking/curing using a baby wipe and hand
sanitizer. The top of the screen (fabric feeling side) can be scrubbed but be a little more gentle in dabbing any excess clay from the emulsion side. Set the screen side to complete drying on a smooth surface.

843-11

I like to drill my clay after baking, but regardless of if I drill before or after
baking/curing, I like to use a small piece of graphing paper to help me get the
hole centered perfectly for hanging. (A lined piece of paper turned vertically will work as well!)

Step 12

Since I had a circle shape theme going here, I decided to use these lever back round French hooks. I just had join my brass circle to the clay with my jump ring and the lever back loop opens to attach to the brass circle!Now these will be secure as they swing in the breeze on my ears!

Step 13

Here is a look at the completed earrings.