
Liquid Sculpey® Rhythm Necklace
Liquid Sculpey® Rhythm Necklace
Designed by Amy Koranek
Read More
This project is unique in that we mold a 3D piece in the 3D Jewelry Mold, and then we add an element of design over the top and bake it again. I think you’ll be able to translate this method into all kinds of future design ideas.
TIME TO COMPLETE:
90 Minutes to make, bake twice, and assemble
Read Less
ADDITIONAL SUPPLIES
- Paper towel
- Rubbing alcohol
- Cotton swab
- 18” Gold tone chain with clasp
- Gold tone double connectors (2)
- 6mm Gold tone jump rings (2)
- Flat nose pliers
- Wire cutters

Project Instructions
- Getting Started with Liquid Sculpey®:
- Getting Started with Liquid Sculpey®:
- Baking:
- It is important to use oven thermometer when you bake the liquids so that you can ensure your oven is at the correct temperature.
- Do not microwave the liquids. They must be baked in a Preheated oven at 275 ºF (130 ºC) for liquid colors and 300 ºF (149 ºC) for Clear – Do not exceed baking temperatures.
- If your piece is less than 1/4” bake for 15 minutes. For thicker pieces that are 1/4” or above bake for 30 minutes.
- If your liquid project has become yellowed or discolored in the oven, when you remake it, tent it by placing either – folding an index card in half and placing your project under it or by using aluminum foil over your project.
Please note: the photos in Steps 2 through 8 were taken while making a
different project so the colors are a little off. However, the process and the tips given here are still the
same for this project.
Fill the half round shape in the 3D mold with Amethyst Pearl Liquid Sculpey® (LS). Fill the cavity as close to level as possible without going over. Tap the mold vigorously on the work surface to agitate air bubbles loose.
Fill the half round shape in the 3D mold with Amethyst Pearl Liquid Sculpey® (LS). Fill the cavity as close to level as possible without going over. Tap the mold vigorously on the work surface to agitate air bubbles loose.

Place two gold tone double connectors on one of the metal rods included in the
3D Jewelry Mold set. I like to use double connectors with LS because they are securely anchored in the shape
and cannot be pulled out after baking. Double connectors look like two jump rings that are joined in the
middle making a figure eight shape.

Dip the connectors (on the metal rod) into the LS in the half round shape.
Suspend the rod across the open shape and place the rod in the built-in brackets in the mold.

Use the tip of the Needle Tool to make sure the connectors are in good
position in the LS.
Bake the mold following the baking instructions for Liquid Sculpey®. Allow the mold to cool completely
before removing the molded piece.

Here’s a quick tip for removing molded pieces from the mold. Burp the mold
open slightly and drip a drop of Sculpey® Clay Thinner & Softener into the space between the mold wall and
the baked piece.

Carefully dip the tip of the Needle Tool in between the baked piece and the
sidewall of the shape. Drag the Needle Tool along the sidewalls of the mold to distribute the Softener
around the sides of the baked piece.

Push the baked piece out by pinching the bottom of the shape. It should slide
right out of the mold.

Wipe the baked piece clean with paper towel. If the mold has residual Softener
in it, you can swab it out with a cotton swab doused in rubbing alcohol.

Drip stripes of Amethyst Pearl and Gold LS across the baked piece. Stripes
that aren’t perfect will look nice here.

Drop a few dots of White LS into the stripes. Not too many, we are keeping
this one classy.

Use the tip of the Knife Tool to turn the White dots into up and down streaks.
Push the edge of the Knife Tool directly down into a White dot and carefully push the tip of the knife
forward through the Amethyst and the Gold, and then without lifting the Knife Tool, pull it back toward you.
Then lift the tool completely out and wipe it clean with paper towel before repeating the process with the
next White dot.
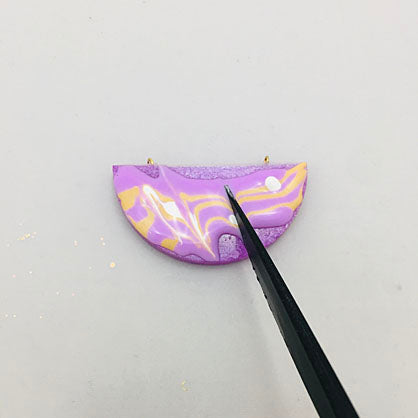
Repeat to create a rhythmic pattern across the pendant.

Bake the piece another time following the baking instructions for Liquid
Sculpey®. When it comes out of the oven the colors will be nice and deep.

The pendant will be connected to the chain with jump rings. Cut the chain in
half with wire cutters directly opposite the clasp.

Use flat nose pliers to open and close the jump rings connecting the pendant
to the chain.
